Importing Grouping and Layers
Upon completion of this unit, you should be able to:
- Import objects
- Adjust import settings.
- Group and ungroup objects.
- Change the order of objects within a layer.
- Use the Info panel.
- Create and use layers.
 Importing Objects Importing Objects
In this lesson, you learn to import graphic objects, group and ungroup objects, and use layers to manage your objects as you work. In the process, you create the final version of the compass logo you started in Lesson 2.
You begin by setting up a new document and then importing the objects you're going to work with. Macromedia Fireworks 8 provides a wealth of tools for creating graphics, but you still might want to import graphics from other sources. For example, you might want to import a company logo created in Macromedia FreeHand or import a scanned image from Adobe Photoshop to combine with buttons you've created in Fireworks.
Fireworks can import these formats: PNG, GIF, JPEG, PICT, BMP, TIFF, ASCII, RTF, Adobe Photoshop PSD files, Adobe Illustrator 7, FreeHand 7 and later, and HTML.
To finish the compass logo, you need to add some text to the compass you created in the previous lesson. The text was created in FreeHand.
-
STEP-BY-STEP 3.1: Importing Objects to a Fireworks Document
- Save the following file to your Raw Images files (Right-click on link, choose Save Target As, then find your Raw Images folder.)
- Compass Logo text
- Create a new document. Make sure the canvas size is 400 x 400 pixels and the canvas color is white. If the grid is visible when the document opens, turn it off by clicking the View menu, pointing to Grid, and clicking Show Grid.
- Save your file as compass_logo, followed by your initials. Your finished logo will look similar to Figure 3-1a.
FIGURE 3-1a:
Finished compass logo

- Click the File menu, click Import, navigate to the compass.png file you created in the last lesson. The pointer changes to an import pointer.
- Position the pointer in the upper-left corner of the canvas and click to place the object in this location at its default size. This object is placed on the current layer, Layer 1. (If necessary, click the title of the Layers panel to display the panel.) You can see from the Layers panel that Layer 1 contains several objects.
Next you will import the FreeHand graphic.
- Click the File menu, click Import, navigate to the compass_text.fhll file and double-click it. The Vector File Options dialog box opens, as shown in Figure 3-1b.
FIGURE 3-1b:
Vector File Options dialog box
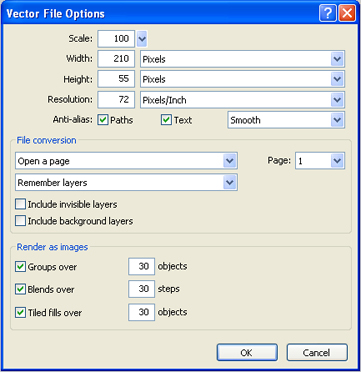
- Click OK to accept the default vector options. These options are discussed in the following section.
- Position the pointer below the compass graphic and click to place the FreeHand object. The FreeHand text graphic is also placed on the current layer, Layer 1. Save the file and remain in this screen for the next Step-by-Step.
Understanding Vector File Options
In the Vector File Options dialog box, you can set the following options when you import vector files. The Vector File Options dialog box does not open when you paste or drag an image from another application.
- Scale: Specify the scale percentage for the imported file.
- Width and Height: Specify in pixels the width and height of the imported file.
- Resolution: Specify the resolution of the imported file.
- Anti-Alias: Anti-alias imported text and/or paths.
- File Conversion: These options specify how multiple-page documents are handled when imported. The options are:
- Open a Page: Import only the specified page.
- Open Pages as Frames: Import all of the pages from the document and place each on a separate frame in Fireworks.
- Remember Layers: Maintain the layer structure of the imported file.
- Ignore Layers: Delete the layer structure of the imported file. All objects are placed on the currently selected layer.
- Convert Layers to Frames: Place each layer of the imported document in a separate frame in Fireworks. This can be useful if you are importing artwork for use in animations.
- Include Invisible Layers: Import objects on layers that have been turned off. Otherwise, invisible layers are ignored.
- Include Background Layers: Import objects from the document's Background layer. Otherwise, the Background layer is ignored.
- Render as Images: Rasterize (convert to bitmap) complex groups, blends, or tiled fills and place them as a single image object in a Fireworks document. Enter a number in the corresponding text box to determine how many objects a group or tiled fill can contain or how many steps a blend can use before it is rasterized during import.
Grouping and Ungrouping Objects
Most of the graphics you create in Fireworks will be made from several smaller objects. Once you complete a graphic or a portion of a graphic, you might want to group the individual objects to protect their relationship to one another. It's also a lot easier to work with one grouped object than to work with dozens of separate lines and shapes. When objects are grouped, they move together and can be manipulated as a single unit. You can scale and rotate all objects in the group at the same time. You can also combine two groups together. This is referred to as nested grouping.
The compass graphic you imported on Layer 1 is made from several smaller shapes, but they have not been grouped.
-
STEP-BY-STEP 3.2: Grouping Selected Objects
- Select the Pointer tool. Click in the upper-left corner of the canvas and drag to select the entire compass graphic. You can tell by the multiple sets of selection handles that you've selected several objects. Each of the selected objects is highlighted on the Layers panel.
- Click the Modify menu, and then click Group. You can tell the objects are grouped because they now share one set of selection handles: They also appear as one group of 11 objects on Layer 1 of the Layers panel.
- Select the Subselection tool from the Tools panel, as shown in
Figure 3-2.
Hot Tip: In Windows, you can also select; the Window menu, point to - Toolbars, click Modify to display the Modify toolbar, and use buttons on the toolbar to group and ungroup objects.
FIGURE 3-2:
The Subselection tool on the Tools panel
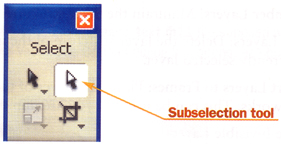
- Position the pointer over the grouped compass graphic. Point to several different parts of the graphic. As you roll over different parts of the graphic with the Subselection tool, you can see the individual objects that make up the compass.
- Click in the middle of the graphic and notice the blue line (the path) and the points on the path. Try clicking different parts of the graphic.
You can use the Subselection tool to select the parts that make up a grouped object. You can also subselect by using the Pointer tool and holding down Alt (Windows) or Option (Macintosh) as you click an object in the group.
- Select any single element in the group, click the Select menu, and then click Superselect to select the group that contains the object. Remain in this screen for the next Step-by-Step.
Arranging the Stacking Order of Objects
Even if objects are sitting on the same layer, they can be stacked, one on top of the other. If you look on the Layers panel, you see that Layer 1 still contains two objects: the grouped compass and the imported text graphic. You can control the stacking order of these objects by drag ging their positions up or down on the Layers panel or by using the Arrange commands on the Modify menu. The advantage of using the Arrange commands is that you can also control the stacking order of objects that have been grouped, such as the compass logo.
-
STEP-BY-STEP 3.3 Arranging the Order of Objects
- Click the Subselection tool and select the star of the compass graphic.
- Click the Modify menu, point to Arrange, and then click Send to Back. The star is still selected, but it's "hidden" behind the other objects.
- Click the Modify menu, point to Arrange, and then click Bring to Front. The star returns to the front of the graphic.
- Make sure the star object is still selected. Click the Modify menu, point to Arrange, and then click Send Backward. The star is sent back just one level. It's hidden behind the inner circle, but you can see the white tips of the star.
- Click the Modify menu, point to Arrange, and then click Bring Forward. The star moves back up one level to the top of the stack. Save the file and remain in this screen for the next Step-by-Step.
Hot Tip:
With Microsoft Windows, you can also use the Modify toolbar to arrange the stacking order of objects.
Using the Info Panel
The Info panel provides information about the location and dimensions of selected objects and the exact coordinates of the pointer as you move it across the canvas. You can even use the Info panel to size an object by using exact height and width dimensions. You can also size an object by using the Property inspector.
In Step-by-Step 3.4, you use the Info panel to size the compass graphics.
-
STEP-BY-STEP 3.4: Using the Info Panel
- Click the Window menu, and then click Info. The Info panel opens, as shown in Figure 3-4. If the bottom half of the panel is not visible, click and drag the bottom border of the panel down to display it.
FIGURE 3-4: The Info panel
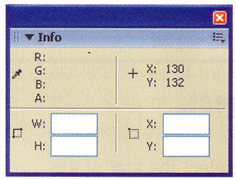
- Click the Pointer tool and select the grouped compass graphic.
- Enter 62 for both the width (W) and height (H), and then press Enter (Windows) or Return (Macintosh). The compass graphic is now 62 x 62 pixels. Save the file and remain in this screen for the next Step-by-Step.
Working with Layers
The Layers panel, as shown in Figure 3-5, is similar to the Layers panels in other graphics programs such as Macromedia FreeHand or Adobe Photoshop. Think of a layer as a transparent plane where you can create and place objects. Layers enable you to divide your artwork when building complex vector objects or composite images.
FIGURE 3-5:
The Layers panel
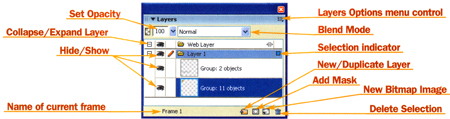
Different portions of an image can be stored on different layers and selectively turned off or on so you can isolate just the portion you are working with. Layers can contain either vector or bitmap objects, or a combination of both. On each layer, you can place one object or multiple objects. If you place multiple objects on the same layer, each object appears in a stack of objects contained within the layer. A thumbnail representation of the object is displayed to the left of the object name.
When you create a new document in Fireworks, you get two layers by default: Layer 1 and the Web Layer. All your objects and images are initially placed on Layer 1. The Web Layer is where slices and hotspots are stored. We discuss these in a later lesson.
Collapsing and Expanding Layers
If your document contains several layers, or several objects on a single layer, the Layers panel can become crowded. One way to help manage layers as you work is to collapse them. You can collapse and expand layers by clicking the plus and minus signs (Windows) or the down- and right pointing arrows (Macintosh) beside each layer. Right now, Layer 1 contains two groups of objects.
-
STEP-BY-STEP 3.5 Collapsing and Expanding Layers
- Click the minus sign (Windows) or down arrow (Macintosh) beside Layer 1. Layer 1 collapses and the minus sign becomes a plus sign (Windows) or a right-pointing arrow (Macintosh).
- Click the plus sign (Windows) or right-pointing arrow (Macintosh) beside Layer 1. Layer 1 expands. Remain in this screen for the next Step-by-Step.
Hiding and Showing Layers
As you create and build objects to form your final graphic, you might want to hide layers. Hiding layers allows you to isolate very specific parts of your work.
Right now, Layer 1 contains two groups of objects. In a moment, you'll create the rectangle that forms the border for the final compass logo. This might be easier to do with the compass and text hidden from view.
-
STEP-BY-STEP 3.6: Wing and Showing Layers
- Click the eye icon beside the first object on Layer 1 (the compass text). The text graphic is hidden from view.
- Click the spot where the eye icon used to be beside the first object in Layer 1. The text graphic reappears. You can also hide everything within a layer by using the eye icon beside the layer's name.
- Click the eye icon beside Layer 1. Now every object on Layer 1 is hidden. You have a clean canvas for creating the last part of the logo. Remain in this screen for the next Step-by-Step.
Adding and Naming Layers
In this task, you add a new layer and name it Rectangle. You also change the name of Layer 1 to Imported Objects. Finally, you create the rectangle that will serve as the boundary for the final compass logo.
-
STEP-BY-STEP 3.7 Adding n Naming a Layer
- Click the New/Duplicate Layer button on the Layers panel (see Figure 3-5). Layer 2 is added above Layer 1.
- Double-click the name Layer 2 on the Layers panel.
- In the Layer Name dialog box, key Rectangle and press Enter (Windows) or Return (Macintosh) to rename the layer.
- Double-click the name Layer 1 on the Layers panel.
- Key Imported Objects and press Enter (Windows) or Return (Macintosh).
- Click the Rectangle layer to select it.
- Select the Rectangle tool and draw a rectangle on the canvas. Use the Info panel or the Property inspector to make the rectangle 288 pixels wide and 72 pixels high. In the Property inspector, make sure the rectangle's stroke is set to None.
- Open the file named site_colors.png from your Raw Images folder, click the Window menu, and then click Tile Vertical.
- Make sure the rectangle in the compass_logo.png file is selected. You might need to scroll to bring the object into view. Click the Fill Color box on the Property inspector, and click the eyedropper on color 1 in the site_colors.png file.
- Close the site_colors.png file, and then click the Maximize button in the compass-logo window. Save the file and remain in this screen for the next Step-by-Step.
Arranging Layers
You learned earlier how to change the stacking order of objects on the same layer. In the next Step-by-Step, you learn to arrange layers by using the Layers panel. Right now, the rectangle is on a layer above that of the imported graphics. You need to place the rectangle behind the graphics to complete the logo.
-
STEP-BY-STEP 3.8: Arranging Layers an Objects on Layers
- Select the compass with the Pointer tool and drag the compass to the right side of the rectangle. Notice that because of the way the layers are arranged, the compass is hidden behind the rectangle. That's not what you want.
- On the Layers panel, drag the thumbnail of the rectangle graphic down. As you drag, you'll see a black line appear either above or below the other layers. The object you are moving is placed according to the position of the black line. Drag below the last layer and release. You have just moved the rectangle out of the Rectangle layer and into the Imported Objects layer. That's not what you want either.
- Click the Edit menu, and then click Undo Layer Change.
You'll move the whole layer instead to get the arrangement you want.
- Drag the Rectangle layer's name or folder icon until it is below both objects on the Imported Objects layer. This places the entire Rectangle layer behind the Imported Objects layer, just as you want.
Hot Tip:
If a layer contains more than ; one object, you can move that object between layers by selecting the object and then dragging the selection indicator (blue square) beside the layer name to the desired new layer. Only the selected object moves.
- Select the text graphic and drag it to the left side of the rectangle, as shown in Figure 3-6. If necessary, you can select objects and fine-tune their positions by using the left, right, up, and down arrow keys. Remain in this screen for the next Step-by-Step.
FIGURE 3-8:
The rectangle is now on a layer behind the compass and text
Locking Layers
To prevent your layers from being accidentally changed, you can lock them.
-
STEP-BY-STEP 3.9 Locking a Layer
- Click the blank space between the Rectangle layer name and the eye icon. An icon of a padlock appears, indicating that this layer is now locked and cannot be edited.
Hot Tip:
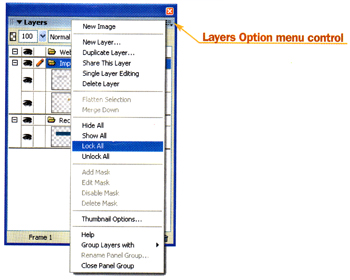
Single-layer editing, accessed from the Layers Options menu, makes only the currently selected layer accessible for editing. You can't select, edit, or change any objects on a locked layer. With single-layer editing, you can edit objects only on the selected layer; the other layers act as if they are locked.
- Click the Layers panel Options menu, and then click Lock All, as shown in Figure 3-9. All three layers are locked.
FIGURE 3-9:
Lock All command on the Layers panel Options menu
- Click the Modify menu, point to Canvas, and then click Trim Canvas.
- Save and close the compass_logo.png file.
When you finish this lesson you should take the Lesson 3 test and complete Project 4: Logo.
 Go to Project 4: Creating a logo Go to Project 4: Creating a logo
 Back to Lesson2: Using Vector Graphics Back to Lesson2: Using Vector Graphics
Go to next section: Lesson 4: Using Live Effects
|
