Lesson 2 - Working with Vector Graphics
Upon completion of this unit, you should be able to:
- Combine simple shapes to create complex objects.
- Select points and paths in vector graphics.
- Use the ruler and guides for drawing.
- Draw with the basic drawing tools.
- Rotate objects.
- Use the History panel to save steps as commands.
- Use the Knife tool to cut paths.
- Scale objects.
- Apply stroke and fill settings.
- Use the Eyedropper tool to sample color.
- Trim the canvas and fit the canvas to your objects.
 Making Selection in Vector Mode Making Selection in Vector Mode
In this lesson, you use the vector drawing tools to create a simple logo. Before you begin drawing from scratch, it's important that you have a few basic skills for selecting vector graphics. To gain these skills, you will work with a simple vector object.
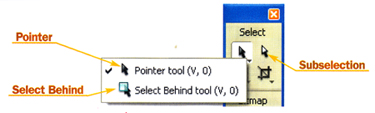
Macromedia Fireworks 8 provides a few tools for making selections in Vector mode: the Pointer tool, the Subselection tool, and the Select Behind tool, which are shown in Figure 2-1. A vector graphic is made up of two or more points that connect to form a path. You can use the Pointer tool to select the path, the Subselection tool to select the points on the path, and the Select Behind tool to select an object that is hidden behind another object.
FIGURE 2-1:
Pointer and selection tools
-
STEP-BY-STEP 2.1 Selecting a Grouped Object
- In Fireworks, open the butterfly2.png file from your Raw Images folder. This file contains a vector graphic of a butterfly. This graphic is stored on the layer named Butterfly. (Hint: To display the Layers panel, click the Window menu and click Layers.) The butterfly is a single graphic made from several smaller drawings that have been grouped. This file also contains colored rectangles on layers that are behind the butterfly. (You will learn more about grouping and layers in Lesson 3.)
- Select the Pointer tool and position the pointer over the butterfly. When you point to this graphic, four red selection handles appear.
- Click the butterfly. The red handles are replaced by blue handles, indicating that the graphic is selected. Remain in this screen for the next Step-by-Step.
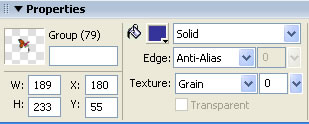
Notice that when you click the butterfly, only the butterfly is selected and not the colored rectangles. This is because the colored rectangles are on layers "behind" the Butterfly layer. The butterfly is made up of multiple objects, but only one object is selected here, because the objects that make up the butterfly have been grouped. This is indicated for you on the Property inspector. The selected object is called Group (79), which tells you 79 different objects are grouped as one. If you view the Layers panel to the right of the graphic, you will see how each object or group is stacked.
FIGURE 2-2:
Property Inspector showing 79 groupings
-
STEP-BY-STEP 2.2 Selecting Part of a Grouped Object
- Choose the Subselection tool from the Tools panel.
- Move the pointer over different parts of the butterfly. As you roll over different parts of the graphic with the Subselect tool, the individual shapes that make up the butterfly are highlighted in red.
- Click in the middle of the graphic and notice the blue line (the path) and the points on the path. Try clicking different parts of the butterfly.
- Click the Select menu, and then click Deselect. Remain in this screen for the next Step-by-Step.
You can use the Subselection tool to select the parts that make up a grouped object.
-
STEP-BY-STEP 2.3: Selecting Objects Hidden Behind Other Objects
- Choose the Select Behind tool from the Tools panel by clicking the arrow on the Pointer tool and then clicking Select Behind.
- Click the butterfly graphic. Blue handles appear, indicating that the butterfly graphic is selected. The Butterfly layer is also highlighted on the Layers panel.
- Click the butterfly graphic again. Now the orange rectangle is selected, and the Orange Frame layer is highlighted on the Layers panel.
- Click the butterfly graphic again. Now the green rectangle is selected, and the Green Frame layer is highlighted on the Layers panel.
- Click the butterfly graphic again. Now the black rectangle is selected, and the Black Frame layer is highlighted on the Layers panel.
- Click the butterfly graphic again. You've clicked through every layer in the file. The butterfly is once again selected.
- Close the butterfly2.png file. If you are asked if you want to save changes, click No (Windows) or Don't Save (Macintosh). Remain in this screen for the next Step-by-Step.
Displaying Rulers and Guides
You can use rulers and guides to lay out objects as precisely as possible and to help you draw. You can place guides in the document and snap objects to those guides or turn on the Fireworks grid and snap objects to the grid.
-
STEP-BY-STEP 2.4: Setting Up the Canvas
- Create a new document. Make the canvas size 400 x 400 pixels and the color white. You are going to draw a compass to be used in a logo like the one shown in Figure 2-2.
FIGURE 2-2: Finished compass

- Save your file as compass, followed by your initials. Remain in this screen for the next Step-by-Step.
To make it easier to precisely draw the compass, you'll use grid lines and rulers. The grid lines will make it easier to size the circle, and the ruler guides will help you align the objects as you draw them.
-
STEP-BY-STEP 2.5: Showing and Setting the Grid, Rulers, and Guides
- Click the View menu, point to Grid, and then click Edit Grid. This displays the Edit Grid dialog box as shown in Figure 2-3 (Windows) or the Grids and Guides dialog box (Macintosh).
FIGURE 2-5a
Edit Grid dialog box
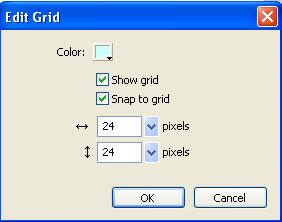
- Make the grid size 24 x 24 pixels.
- Make sure the Show Grid and Snap to Grid options are selected (a check will appear in each box).
Hot Tip: To turn the grid on or off, open the View menu, point to Grid, and then click Show Grid.
- Click the Color box and choose a pale blue color such as #CCFFFF for the grid.
- Click OK. Pale blue gridlines now appear on the canvas.
- Make sure the page rulers are visible, as shown in Figure 2-4. If they are not click the View menu and then click Rulers.
FIGURE 2-5b:
The rulers
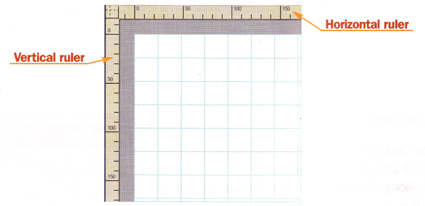
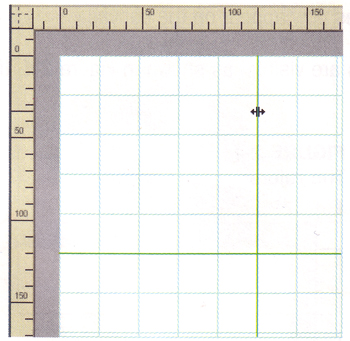
- Position the pointer over the vertical ruler (on the left). Drag from the ruler onto the canvas. Then release to add a vertical guide to the document.
- Position the pointer over the horizontal ruler (on the top). Drag from the ruler onto the canvas. Then release to add a horizontal guide to the document. Remain in this screen for the next Step-by-Step.
You are going to use the intersection of the guides as the center of your logo.
Note: Because Fireworks images are intended for the Web, where graphics are measured in pixels, the rulers in Fireworks always measure in pixels, regardless of the unit of measurement you used when creating the document.
-
STEP-BY-STEP 2.6: Moving and Adjusting Guides
- Make sure the Pointer tool is selected. Then position the pointer over the vertical guide. The pointer changes to indicate that you are positioned to drag the guide, as shown in Figure 2-6a.
FIGURE 2-6a Dragging a guide
- Drag the guide left or right.
Hot Tip: To remove a guide, just drag it off the canvas.
- Double-click the vertical guide. This opens the Move Guide dialog box, as shown in Figure 2-6b. (Note: Don't worry if the value in your Position box differs from that shown.)
FIGURE 2-6b
Move Guide dialog box
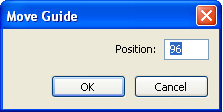
- In the Move Guide dialog box, enter 216 in the Position box, and click OK. You are placing the guides at position 216-not the exact center at 200-so the guides will align with the grid. This will help in drawing the final graphic.
Note: Double-clicking a ruler guide does not open the Move Guide dialog box if the guides are locked.
- Repeat the same process for the horizontal guide: Double-click the guide, enter 216 in the Position box, and then click OK.
Once you set the position of a guide, you can lock it into place.
- Click the View menu, point to Guides, and then click Lock Guides. (You can also lock your guides from the Guides dialog box.) If your guides are locked, you cannot drag them.
- To unlock guides, open the View menu, point to Guides, and then click Lock Guides again.
- Click the View menu again, point to Guides, and then click Edit Guides to open the Guides dialog box, as shown in Figure 2-6c (Windows), or Grids and Guides dialog box (Macintosh).
You can change the color of the guides, turn Snap to Guides on or off, lock the guides, and clear all guides from the page. With Snap to Guides selected, objects snap to align with guides as you position them in the document.
FIGURE 2-6c: Guides dialog box
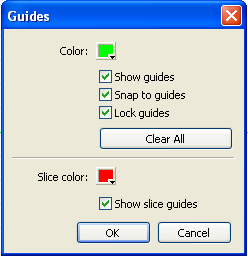
- Make sure Snap to Guides is selected and click OK. Now you are ready to begin drawing the compass. Remain in this screen for the next Step-by-Step.
Drawing Basic Shapes
Most drawings, even complicated ones, are made from a variety of basic lines and shapes. Fireworks provides some basic shape tools for creating vector graph ics: the Rectangle, Ellipse, and Polygon tools, which are shown in Figure 2-8.
Note: Fireworks also includes a number of Smart Shapes. These are more complicated shapes, such as Bent Arrow, Rounded Rectangle, or Spiral, that can be controlled in a variety of ways.
FIGURE 2-8:
Shape tools on the Tools panel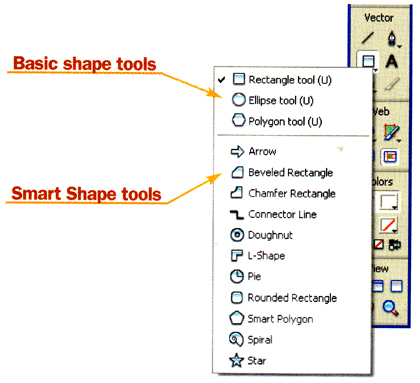
-
STEP-BY-STEP 2.7 Drawing an Ellipse
- Choose the Ellipse tool from the Tools panel by clicking the arrow on the Rectangle tool and then clicking Ellipse.
The ellipse you will draw needs to have a black stroke and no fill. You can use the Property inspector (shown in Figure 2-9) to set the options for the Ellipse tool.
FIGURE 2-7b
Property inspector for the Ellipse tool

- Make sure the Stroke Color box is set to black (#000000).
- Make sure the Tip Size box is set to 1 (for 1 pixel).
- Click the arrow on the Stroke category box, point to Pencil, and then click 1-Pixel Hard.
- Click the arrow on the Fill category box, and click None.
- Position the pointer in the document where the guides cross. You will draw the circle from the center out.
Hot Tip: To switch between shape tools; you can click the current shape tool and select a new tool from' - the menu. You can also press U to cycle through the basic Shape tools.
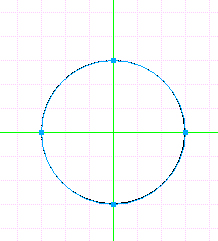
- Hold down Alt (Windows) or Option (Macintosh), press Shift to constrain the shape to a circle, and drag to create a circle that is three grid lines wide from the center point, as shown in Figure 2-7c. Release the mouse before releasing the modifier keys.
FIGURE 2-7c:
Circle drawn from the center of the ruler guides
- Click the Select menu, and then click Deselect to deselect the ellipse. Save your file and remain in this screen for the next Step-by-Step.
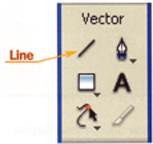
Using the Line Tool
Another important tool for drawing basic shapes is the Line tool. Using the Property inspector, you can experiment with the stroke and fill options to draw some interesting graphics using nothing but basic lines. In this task, you use the Line tool shown in Figure 2-8 to draw tick marks on the compass logo.
Hot Tip:The title bar of the Document window displays an asterisk when you make a change to the document. This is a great reminder that you should save your work.
FIGURE 2-8:
Line tool on the Tools panel
-
STEP-BY-STEP 2.8: Drawing Lines
- Select the Line tool from the Tools panel. On the Line tool's Property inspector, the line color should be set to black, the Tip size to 1 pixel, and the Stroke category to 1-Pixel Hard.
Note: After you draw the vertical line, the ruler guide makes it difficult to select the line. You might find that you select the guide instead of the line. You can lock or hide the guides to make this task easier.
- Position the cross-hair on the vertical guide, about one-half a grid line above the top of the circle. Hold down Shift as you drag down to draw a straight line that extends one-half a grid line below the bottom of the circle.
- Click the Edit menu, and then click Clone to make an exact copy of the line. The copy is placed directly on top of the line and is selected. Remain in this screen for the next Step-by-Step.
Rotating Objects
You can rotate objects in Fireworks by using the Scale tool or by pointing to Transform on the Modify menu and then choosing one of the preset rotation options. If you need to be more precise when rotating, you can use the Numeric Transform dialog box. From here, you can enter exact settings for scaling, sizing, and rotating objects. In this task, you use the Numeric Transform dialog box to rotate a line 45 degrees.
-
STEP-BY-STEP 2.9: Rotating an Object
- With the cloned line still selected, click the Modify menu, point to Transform, and then click Numeric Transform. The Numeric Transform dialog box appears, as shown in Figure 2-9.
FIGURE 2-9:
Numeric Transform dialog box

- Click the arrow on the drop-down text box and choose Rotate.
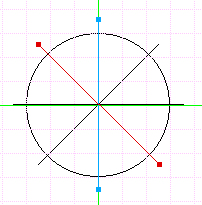
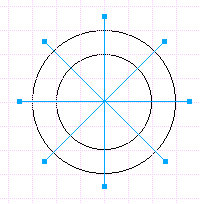
- Enter 45 in the Angle box and click OK. The line rotates from the center point of the circle. You need a total of four lines, each at a 45-degree angle from the last line. The lines cut the circle like a pie. You could repeat the process of cloning and then rotating the clone, but an easier way to repeat these steps is by using the History panel, which is discussed in the next section. Remain in this screen for the next Step-by-Step.
Using the History Panel
The History panel records each step you perform as you create objects on the canvas. Each time you use the Undo command on the Edit menu, you are stepping back a step on the History panel. The History panel makes it easy to see your steps and undo multiple actions. You can also use the History panel to repeat a set of actions. For example, you've just performed two actions: you cloned a line and then you rotated the line. You will now use the History panel to repeat those two actions.
-
STEP-BY-STEP 2.10: Viewing and Using the History Panel
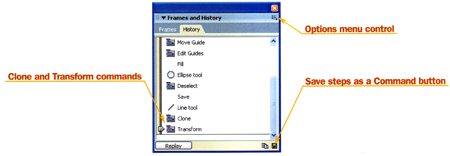
- Click the Window menu, and then click History. The History tab moves to the foreground of the Frames and History panel, as shown in
Figure 2-10a. (Hint: To display more of the History panel, you can collapse the other panels, such as Layers and Answers, by clicking the names of the open panel groups.)
FIGURE 2-10a: History panel
- Make sure the line you are copying is still selected.
- Scroll down to the bottom of the list in the History panel until you see the two actions Clone and Transform.
- Hold down Shift and click Clone and then Transform.
- Click Replay at the bottom left of the History panel A -- line is drawn at a 45-degree angle from the last line.
- Click Replay again to draw the last line. Your drawing should look like Figure 2-14. Remain in this screen for the next Step-by-Step.
FIGURE 2-10b:
Circle with four intersecting lines
The History panel can replay steps, as you've just seen, and it can be used to step back through your actions, like a super Undo command. To undo your steps with the History panel, just drag the slider on the left side of the panel up; to redo the steps, drag the slider down. You can also save your steps for actions you will perform in the future. For example, in the preceding Step-by-Step exercise you cloned and rotated the line. You used the Replay button twice to create the other lines. If you know you will want to use that same action again, you can save the steps as a command that can be used over and over.
-
STEP-BY-STEP 2.11 Saving Steps as a Command
- Hold down Shift and click the Clone and Transform actions on the History panel, if they are not already selected.
- Click the Save Steps as a Command button (see Figure 2-10a, above) at the bottom of the History panel.
Note: You can also open the Save Command dialog box by choosing Save as Command from the History panel Options menu (see Figure 2-10a).
- In the Save Command dialog box, enter Clone and Rotate and click OK. Those actions are now saved as a single command on the Commands menu for you to use again.
- To experiment with the new Clone and Rotate command, draw another line off to the side of the compass you are drawing.
Hot Tip: To delete a saved command, click Commands, click Manage Saved Commands, choose the command you want to remove, click Delete, and then click OK.
- Click the Commands menu, and then click Clone and Rotate. The line is cloned and then rotated.
- You don't need those extra lines, so delete them by clicking each with the Pointer tool and then pressing Delete. Remain in this screen for the next Step-by-Step.
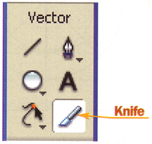
Using the Knife Tool
When you draw basic shapes in Fireworks, your lines are called paths. You can dissect the paths into two or more paths by using the Knife tool shown in Figure 2-12.
FIGURE 2-12:
Knife tool on the Tools panel
The finished compass logo has only tick marks (partial lines on the edges of the circle). The next step is to cut each line and remove the center portion. So you can more easily make the cuts, you will draw another circle, smaller than the first, and cut around the edges of the smaller circle.
-
STEP-BY-STEP 2.12: Using the Knife Tool
- Choose the Ellipse tool. Make sure the Fill category is set to None on the Property inspector, or the circle will cover your lines, making it difficult to complete this task.
- Hold down Alt (Windows) or Option (Macintosh) and Shift to draw a smaller circle from the center outward within the first circle. Use the grid lines to make this new circle two grid lines wide from the center point. The object should now look like Figure 2-12b.
FIGURE 2-12b:
The inner circle acts as a guide as you work with the Knife tool
- Select one of the lines with the Pointer tool.
Note: The guides could make it difficult to select your vertical and horizontal lines. You might need to turn off the guides while editing these lines. If you do, make sure to turn them back on when you are done. You will continue to use them in this lesson.
- Select the Knife tool from the Tools panel.
- Drag the Knife pointer across the line where it intersects the smaller circle. You don't have to drag a huge amount just enough to cut through the line. When you release, a point appears on the line. That is the cut you just made.
- Repeat the process at the other end of the line.
deselect the line.
- Switch to the Pointer tool and click anywhere outside the circle to
- Click the center portion of the line between the two cuts; then press Delete to remove the inner line.
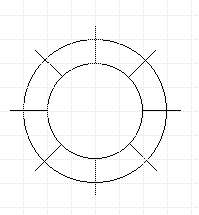
- Repeat the process on the other lines. The objects should now look like Figure 2-12c. Remain in this screen for the next Step-by-Step.
FIGURE 2-12c:
Circle with tick marks
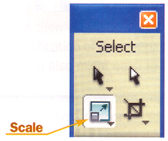
Scaling Objects
You can scale objects in Fireworks by using the Scale tool shown in Figure 2-18. Scale allows you to rotate the object freely. If you need to be more precise when scaling, you can use the Numeric Transform dialog box to enter exact settings for scaling, sizing, and rotating objects. In this task, you will reduce the size of the inner circle.
Hot Tip: If there appear to be breaks in your lines or circles, it might - just be your view. Try zooming in by using the Zoom tool or the Magnification box.
- Select the inner circle by using the Pointer tool.
- Select the Scale tool on the Tools panel. Scale handles appear. You can use this tool to scale or rotate the selected object.
- Drag the lower-right handle up and to the left. The circle is smaller, but it's no longer centered like you want.
- Click the Edit menu, and then click Undo Transform.
Hot Tip:
If you hold down the Alt key when scaling an object with the Scale tool, the transformation is performed from the center of the object.
- Click the Modify menu, point to Transform, and then click Numeric Transform. The Numeric Transform dialog box appears.
- Click the arrow on the drop-down list box and choose Scale.
- Make sure Constrain Proportions is selected.
- Enter 95 (for 95%) in either of the text boxes and click OK. The circle is scaled down.
- Deselect the image. Save the file and remain in this screen for the next Step-by-Step.
Applying Strokes
Stroke refers to the width, color, and style of lines drawn in Fireworks, as well as the lines that border the shapes you create. When you select a drawing tool in Fireworks, you can adjust the stroke settings by using the Property inspector, as shown in
Figure 2-14.
FIGURE 2-14:
Property inspector showing Stroke and Fill settings

-
STEP-BY-STEP 2.14 Changing the Stroke of a Line
- Select all eight lines on the canvas by holding down Shift and clicking each line with the Pointer tool.
- Click the arrow on the Stroke category box, point to Basic, and then click Soft Line.
- Enter 2 (for 2 pixels) in the Tip size box.
- Deselect the image.
- Select both circles, click the arrow on the Stroke category box, and click None.
- Deselect the image.
- Click Save As in the File menu and rename the file compass_incomplete and your initials and remain in this screen for the next Step-by-Step. This incomplete version of the design must be submitted along with your finished design.
Applying Fill Color
If you're working with Web tools such as Fireworks, you've probably heard the term Web-safe colors. You might have also heard them called browser-safe, the 216 palette, the Netscape cube, Explorer colors, and so on. These all refer to a set of 216 colors that can be viewed with computer systems that are set to display 8-bit colors. However, these days, most computers can display 64,000 colors or more. Many Web designers now use a WebSnap Adaptive palette or an Exact palette instead.
You might choose not to work at 16-bit color depth, because Web-safe colors might dither (making the image look grainy), and the eyedroppers in Fireworks often incorrectly sample colors at that depth.
When you select fill and stroke colors in Fireworks, you are presented with a palette of Websafe colors, but you can also sample colors from another image by using the Eyedropper tool. Keep in mind that for you to get accurate color sampling, your monitor needs to be set to 24-bit or greater color depth.
In the following Step-by-Step, you will open another file, tile it side-by-side with the compass file, and sample a color to use as the fill color for the compass logo.
-
STEP-BY-STEP 2.15: Filling the Circles with Color
- Save the site_colors.png file from this link to your Raw Images folder. (Right-click on link, choose Save Target As, then find your Raw Images folder.) Open this file in Fireworks. This file contains the colors you will use for the circles.
- Click the Window menu, and then click Tile Vertical. The two files now appear side by side. You might need to adjust the magnification of the compass file to 100% so you can see the entire graphic while the windows are tiled. You also might need to scroll to bring the entire image into view.
- Click in the compass Document window to make sure it is the active document. Select the outer circle of the compass. The circle has no stroke or fill, so it might be hard to see. To select the circle, move the pointer over the image until the circle's selection handles appear in red; then click it.
- Click the Fill Color box on the Property inspector and position the eyedropper over color 2 in the site colors.png file. Click this color to change the color of the selected circle.
- Deselect the outer circle and select the smaller, inner circle.
- Click the Fill Color box on the Property inspector and position the eyedropper over color 3 in the site colors.png file. Click this color to change the color of the selected circle.
- Close the site_colors.png file. Click the Maximize button in the compass window.
- Click Save As in the File menu and rename the file compass and your initials . Remain in this screen for the next Step-by-Step.
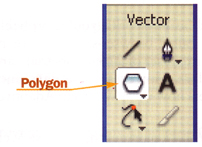
Using the Polygon Tool
With the Polygon tool (see Figure 2-20), you can draw any equilateral polygon, from a triangle to a polygon with 360 sides. The last step to complete the compass logo is to draw a four-pointed star on top of the inner circle. Using the Polygon tool, drawing a simple star is a snap.
- Choose the Polygon tool on the Tools panel. (Hint: The Polygon tool is in the same tool group as the Rectangle and Ellipse tools.) The Property inspector shows the options for the Polygon tool.
- On the Property inspector, click the arrow on the Shape box and choose Star.
- Enter 4 in the Sides text box and 26 in the Angle text box.
- Click the Fill Color box and select the color white (#FFFFFF).
- If the guides are not visible, turn them back on by clicking the View menu, pointing to Guides, and then clicking Show Guides.
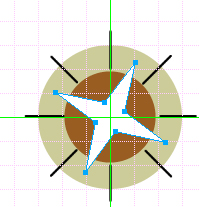
- Drag from the center point of the guides to draw the star. As you drag, rotate the star to position the points between the tick marks on the circle. The logo should now look like Figure 2-21. Remain in this screen for the next Step-by-Step.
FIGURE 2-21
The logo graphic with the star drawn by using the Polygon tool
Trimming the Canvas
Your finished drawings aren't always evenly placed on the canvas. One way to correct this is to manually crop the unwanted areas of the canvas. Another method is to simply trim the canvas by using the Trim command.
-
STEP-BY-STEP 2.17: Trimming the Canvas
- Click the Modify menu, point to Canvas, and then click Trim Canvas. Fireworks trims the canvas to an exact fit for the graphic.
- Save and close the compass file.
 Back to Lesson1: Bitmap Editing Back to Lesson1: Bitmap Editing
 Go to next section: Lesson 3: Importing, Grouping and Layers Go to next section: Lesson 3: Importing, Grouping and Layers
|
