Text, Masks and Live Filters
Upon completion of this unit, you should be able to:
- Add text and special effects to your documents.
- Import text to your graphics and Web pages.
- Format text and position it in your documents.
- Add and edit Live Filters.
- Align and distribute objects.
- Create a mask by using Paste Inside.
 Getting Started Getting Started
In this lesson, you use Macromedia Fireworks to buils a new Web page by using the compass graphic and compass logo you created in previous lessons. You add the formatted text, apply filters called Live Filters, align objects, and use masking to isolate a part of an image to use as a button.
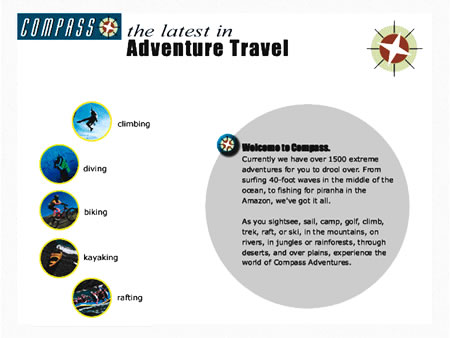
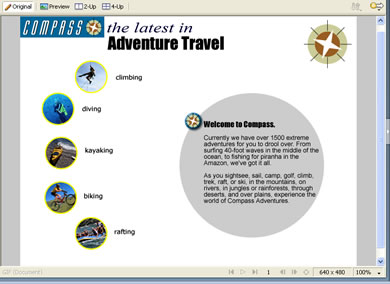
Your first step is to set up the new document and import some of the objects you'll work with. Your final Web page should look something like Figure 4-1. Refer to this figure often, because it will help you as you lay out your Web page.
FIGURE 4-1: Adventure Travel Web page
-
STEP-BY-STEP 4.1 Beginning the Web Page
- Create a new document. Change the canvas size to 640 pixels wide by 480 pixels high and the color to white.
- Click the View menu, point to Grid, and turn off the Show Grid and Snap to Grid features.
- Save your file as adventure, followed by your initials.
- Click the File menu, click Import, navigate to the compass_logo4.png file supplied with the data files for this course (inside your Fireworks/Lesson 4 folder), and double-click it. Click to place the logo in the upper-left corner of the canvas.
- Click the File menu, click Import, navigate to the compass4.png file supplied with the data files for this course, and double-click it. Position the pointer over the canvas and click to place the graphic in the document. Refer to Figure 4-1 as you do the next steps.
Hot Tip:
If you select the logo, you can use the Info panel or the Property inspector to enter exact X and Y coordinates to position the logo. You can also use the rulers to help align objects.
- Scale the compass graphic to approximately 35% of its original size. Click the Modify menu, point to Transform, and then click Numeric Transform. Make sure Scale is selected, and enter 35% in the scaling boxes.
You car also scale the graphic by using the Scale tool or by entering exact dimensions on the Info panel or Property inspector.
- Move the compass graphic to the upper-right corner
of the canvas. Remain in this screen for the next Step-by-Step.
Adding Text
The Web has become an extremely visual medium, but no matter how well your images communicate, text will remain an important part of every Web page. In addition to large blocks of text, you'll want to use formatted text as headings and labels on your buttons and banners. In Fireworks, you can create text by using the Text tool, or you can import existing text.
The text you create in Fireworks is saved in the original PNG file where you can always edit it. However, after you export the image as a GIF or JPEG file, the text becomes part of the bitmap image and cannot be changed. You should keep the original Fireworks file (the PNG file) along with the exported images in case the text needs to be changed. To import text, the text must be saved as an ASCII (TXT) or rich text format (RTF) file.
-
STEP-BY-STEP 4.2: Using the Text Tool and Importing Text
- Select the Text tool from the Tools panel, as shown in Figure 4-2.
FIGURE 4-2: Text tool on the Tools panel
- Click on the canvas and key Adventure Travel.
- Click the File menu, click Import, navigate to the welcome.txt file supplied with the data files for this course (Windows users should make sure Files of type is set to All files), and double-click it.
Note: Fireworks remembers your most recent text settings and applies them to your new text.
- Click on the canvas to place the imported text. Remain in this screen for the next Step-by-Step.
Formatting Text
You can format both the text you create and the text you import by using the text options on the Property inspector. You can change the font, size (measured in points), kerning (letter spacing), leading (line spacing), horizontal scale, paragraph indents, alignment, color, transparency, and style (such as bold or italics).
Before you can format text; you must first select it. You can also select your formatting options before you begin typing.
-
STEP-BY-STEP 4.3: Changing the Font, Size, Color, and Style
- Click the Pointer tool and select the text Adventure Travel. The Property inspector shows the options for the Text tool, as shown in Figure 4-3.
FIGURE 4-3:
Property inspector for the Text tool

- Click the arrow on the Font box and change the font to Impact (or Arial Black if Impact is not an available choice).
- Highlight the value in the Size box and key 32.
- Click the Fill Color box and change the color of the selected text to black.
If you want to format just a portion of the text, you must use the Text tool to highlight the portion you want to format. To format the entire text object, just select it by using the Pointer tool.
- Click the Text tool and drag to draw another text box about 1/2 inch high and 3 inches wide.
- On the Property inspector, change the font to Times New Roman, the size to 27, and the color to dark blue (#000033). Select the Italic style.
- Key the latest in. Your new text takes on the formatting you set on the Property inspector.
- Click the Text tool, highlight the first line of the imported text, Welcome to Compass, and change it to a size of 15 and a font of Impact (or Arial Black). Highlight the rest of the imported text and change it to size 11 Verdana. Remain in this screen for the next Step-by-Step.
Scaling, Kerning, and Leading
Changing the horizontal scale changes the width of the text without changing the height, as if you were stretching the text on a rubber band. Be careful not to overdo the stretching; you are electronically distorting the text without regard to its original design.
In the next Step-by-Step, you also work with kerning and leading formatting features. Kerning refers to the amount of space between letters, and leading controls the amount of space between lines of text.
-
STEP-BY-STEP 4.4: Changing Scale, Kerning, and Leading Formats
- Click the Text tool and select the text the latest in.
- Highlight the value in the Horizontal Scale box and key 130. Then press Enter (Windows) or Return (Macintosh). The values are expressed as percentages. Values less than 100% condense the character width; values greater than 100% expand the character width, as shown in Figure 4-4.
FIGURE 4-4:
Effects of horizontal scaling on text

- Select the text Adventure Travel.
- Highlight the value in the Kerning box and key 6. Then press Enter (Windows) or Return (Macintosh).
- Select the entire imported text block, either by clicking it with the Pointer tool or by highlighting all the text with the Text tool.
- Highlight the value in the Leading box and key 145. Then press Enter (Windows) or Return (Macintosh). Remain in this screen for the next Step-by-Step.
Positioning Text
Now that you have your text formatted, you can place it where you want it to appear on the Web page. You can do that by selecting the text object with the Pointer tool and dragging the text to its new location, or you can use the Property inspector to position the text in an exact location on the canvas. Again, refer to Figure 4-1 as you position your text. After the text is where you want it, you will draw an ellipse as a stylish backdrop.
-
STEP-BY-STEP 4.5: Positioning the Text and Drawing the Backdrop
- Move the text Adventure Travel to the top of the page. The final position of this text should be X:165, Y:35.
- Move the text the latest in directly above Adventure Travel.
- Move the imported text block to the right side of the page. The final position of this text should be approximately X: 343, Y: 197.
- You can force the text to wrap by adjusting the width of the text box. Just select it and then drag the right side handle to the left or the right until the text wraps where you want. You can use Figure 4-1 as a reference.
- Click the Ellipse tool and draw a circle that covers the imported text. To draw a perfect circle from the center of the text, hold down Alt-Shift (Windows) or Option-Shift (Macintosh) as you drag.
- Use the Property inspector to change the stroke of the circle to None and the fill color to light gray, #CCCCCC.
- With the circle still selected, click the Modify menu, point to Arrange, and then click Send to Back to move the circle behind the text. Remain in this screen for the next Step-by-Step.
Adding Live Filters
Live Filters are filters that apply to vector, bitmap, and text objects, as shown in Figure 4-5a. Applying a Live Filter does not permanently change the original object. On the other hand, if you make a change to the original object, the Live Filter updates accordingly.
FIGURE 4-5a:
Effects section of the Property inspector
For example, if you create a button and then use Live Effects to apply a bevel and drop shadow, you can change the color and size of the original button, and the effects will be reapplied automatically to the new button. You apply or remove Live Filters by using the Filters pop-up menu on the Property inspector.
-
STEP-BY-STEP 4.6: Applying and Editing an Effect
- Click the Ellipse tool and draw a perfect circle that is 100 x 100 pixels. You can draw the circle anywhere on the page for now. You will complete the graphic and position it later. (You can use the Property inspector to enter exact height and width settings for the circle.)
- Click the Fill Color box, and click the eyedropper on the blue color in the compass logo to change the circle's fill color to the same blue.
- Click the Add Live Filter button on the Property inspector (+), point to Bevel and Emboss, and then click Inner Bevel. A pop-up window opens, as shown in Figure 4-6b.
FIGURE 4-6b:
Inner Bevel settings in the Effects pop-up window
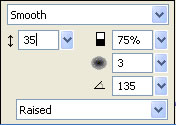
- Click the arrow on the Bevel Edge Shape box and click Smooth. Make sure Contrast is set to 75, Softness is set to 3, and Angle is set to 135. Enter 35 in the Width box. (Hint: If necessary, hover your mouse pointer on the options in the window to display their tooltips.) Click outside the pop-up window to close it.
- Click the Add Live Filter button again, point to Shadow and Glow, and then click Drop Shadow. In the pop-up window, make sure the fill color is black (#000000). Enter 10 in the Distance box, 65% in the Opacity box, 10 in the Softness box, and 315 in the Angle box. Click outside the pop-up window to close it.
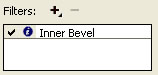
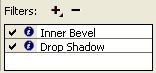
- Make sure the circle with the Live Filter is selected. Notice that the Live Effects you applied to the object are represented by a list box in the right portion of the Property inspector, as shown in Figure 4-6c. You can click the info button (the circle icon) next to an effect to open its pop-up window. Click the info button for each of the Live Filter and verify that you've entered the settings as described in steps 4 and 5. Click outside the pop-up window to close it.
FIGURE 4-6c:
Effects list with multiple Filters
- Save your file and remain in this screen for the next Step-by-Step.
When multiple effects are applied to an object, the order of the effects in the Filters list can change the look of the image.
-
STEP-BY-STEP 4.7: Reordering Effects
- Make sure the circle with the Live Filter is selected. Select the Inner Bevel effect name from the Effects list and then drag it down below the Drop Shadow effect. Changing the order of Inner Bevel and Drop Shadow changes the look of the circle.
- Drag the Drop Shadow effect below the Inner Bevel. Deselect the circle. Remain in this screen for the next Step-by-Step.
Aligning Objects
Trying to align objects by using the rulers and guides can be a challenge. But by using the Align panel, you can quickly align several objects or evenly distribute them with the click of a button.
-
STEP-BY-STEP 4.8: Aligning Objects
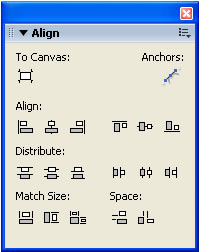
- Click the Window menu, and then click Align to open the Align panel shown in Figure 4-8a. (Note: If the Align panel doesn't look like that shown in Figure 4-8a, click the Anchors button to deselect it.)
FIGURE 4-8a: The Align panel
- Shift-click to select the two text objects the latest in and Adventure Travel at the top of the Web page.
- On the Align panel, click Align Left Edge. If necessary, hover your mouse pointer on the various buttons in the Align panel to display their tooltips.
- Select the compass graphic in the upper-right corner. Click the Edit menu, and then click Duplicate. A copy of the compass is offset from the original.
Hot Tip:
Many of the alignment commands are also available when you click the Modify menu, and then click Align.
- Drag the copy on top of the beveled circle. If the compass is behind the circle, bring it to the front.
- Shift-click to select both the beveled circle and the compass graphic.
- On the Align panel, click Align Horizontal Center and then click Align Vertical Center. (Note: You will need to hide the Shadow effect first.)
- Click the Modify menu, and then click Group to group the beveled circle and the copy of the compass graphic. Then close the Align panel by clicking its Close button. The graphic should look like Figure 4-9.
FIGURE 4-8b:
The beveled circle and compass graphic grouped

- On the Property inspector, change the width and height of the grouped object to 32 x 32 pixels.
- Move the grouped object to the left of the text Welcome to Compass. Remain in this screen for the next Step-by-Step.
Hot Tip: Fireworks aligns objects objects left based on .t:... leftm
object in the selected group and aligns objects on the right based on the rightmost object in the selected group, The topmost object controls Align Top, and the bottommost object controls Align Bottom. For Distribute Widths, Fireworks creates an equal amount of space between' the objects, divided between the right edge of the leftmost objects and left edge of the rightmost objects. For Distribute Heights, Fireworks creates an equal amount of space between the objects, divided between the bottom edge of the highest and top edge of the lowest objects.
Working with Masks
A mask is a window to something underneath. One way to create a mask in Fireworks is to use the Paste Inside command. You can think of the mask as a mat within a picture frame: only the area inside the mat is visible. Just as with a mat, you can use any shape for the mask. In fact, you can even use text or other objects to define the shape of the mask.
-
STEP-BY-STEP 4.9: Creating a Mask by Using Paste Inside
- Click the File menu, click Import, navigate to the climber.gif file in the images folder that's supplied with the data files for this course, and double-click it. Click to place it in the left section of the page.
- Click the Ellipse tool and draw a circle that surrounds the climber in the picture (your finished circle should be about 60 x 60 pixels).
- On the circle's Property inspector, click the arrow on the Fill Category box and select None. Click the arrow on the Stroke Category box, point to Basic, and then click Soft Line. Change the Tip Size to 2. Change the stroke color to a dark yellow, #FFFF00.
- Click the Edit menu, and then click Duplicate to make a copy of the circle. Use the Pointer tool to move the copy off to the side for now.
- Click the Pointer tool and select the picture of the climber. Click the Edit menu, and then click Cut to copy the image to the Clipboard and delete it from the canvas.
Hot Tip: When you click the Edit menu and then click Paste Inside, the image is pasted in the same location on the canvas as when it was cut: If the image doesn't appear to be "inside" the selected circle, select the circle and then use the blue starshaped move handle to reposition the image within the circle.
- Select the circle. Click the Edit menu, and then click Paste Inside. The image is pasted within the boundaries of the circle. Remain in this screen for the next Step-by-Step.
After you create the mask, you can change the position of the object within the mask, and you can split apart a mask and its object.
-
STEP-BY-STEP 4.10: Working with Objects in a Mask
- Select the masked circle with the Pointer tool. Notice the small blue star within the selection. This is the move handle.
- Drag the move handle to move the image within the mask.
- Click the Modify menu, and then click Ungroup. The elements are now separated.
- Click the Edit menu, and then click Undo Ungroup. Remain in this screen for the next Step-by-Step. The only thing left to do on the Web page is to add the remaining masked images.
-
STEP-BY-STEP 4.11: Completing the Page
- Select the copy of the circle you made in step 4 of Step-by-Step 4.9, and make three more copies by using the Duplicate command on the Edit menu.
- Click the File menu, click Import, navigate to the diver.gif file in the images folder that's supplied with the data files for this course, and double-click it. Click to place it under the climber object.
- With the diver image selected, click the Modify menu, point to Arrange, and click Send to Back.
- Drag one of the copies of the circle and position it on the diver, as shown in Figure 4-11.
FIGURE 4-11:
The finished Compass Adventure page
- Select the picture of the diver. Click the Edit menu, and then click to copy the image to the Clipboard and delete it from the canvas.
- Select the circle. Click the Edit menu, and then click Paste Inside. The image is pasted within the boundaries of the circle.
- Repeat steps 2 through 6 to place the kayak.gif, biker.gif, and rafting.gif images on the page. Refer to Figure 4-11.
- Use the Text tool to create the one-word descriptions next to the masked images and position them as shown in Figure 4-11. Set the descriptions in size 12 Verdana.
- Save and send the adventure file to the teacher
 Back to Lesson 3: Importing, Grouping and Layers Back to Lesson 3: Importing, Grouping and Layers
 After this lesson, you should complete the following After this lesson, you should complete the following
- Test on Fireworks Lesson 4: Text, Masks and Live Filters
Go to next section: Lesson 5: Creating Buttons
|
