Lesson 7 - Creating Animations
Upon completion of this unit, you should be able to:
- Add a reusable animation symbol to the library.
- Create animation by using frames.
- Preview and edit animations by using onion skinning.
- Control the playback of frame animations.
- Automate the animation process with tweening.
- Export an animation as an animated GIF file.
- Optimize your animation settings by using Export Preview.
- Import and export symbols for use in other files.
Animating with Fireworks
There was a time when most Web sites were filled with page after page of text. But these days, Web surfers demand much more. At the very least, your site should contain colors and graphic images to help communicate and make your site more interesting. You can take that to the next level by adding animation to your pages. Animation is good for getting the reader's attention, and it's also a great way to illustrate concepts and model ideas.
The most common animations you'll find on the Web are simple animated GIF images. They're popular because they're typically fairly small files, and they don't require any special software to view them. They appear in your Web browser along with the rest of your images. The animations you create in Macromedia Fireworks are most commonly exported as GIF animations.
Animating in Fireworks is done by placing an object in a frame and then placing a slightly different copy of the object in the next frame-maybe with the object moved, made more transparent, or rotated. Once you have a series of frames, you can play them back quickly to get the appearance of motion.
In Fireworks, you can build your animations one frame at a time, or you can automate the process by using features such as tweening. With tweening, you set the first and last frames of an animation and then tell Fireworks to fill in the gap; Fireworks automatically creates the inbetween frames.
If you want to use an animation over and over again, you can create an animation symbol. The symbol is added to the library, and you can add instances of the animation to different parts of your document. You can even export the symbol for use in other documents.
 Creating Animation Symbols Creating Animation Symbols
The main advantage of symbols is that you can create the object once, store it in the library, and use it over and over again. You can place several copies, or instances, of the symbol in your document and then make changes to the instances without altering the original symbol. Fireworks uses three types of symbols: graphic symbols, animation symbols, and buttons.
-
STEP-BY-STEP 7.1: Creating and Previewing an Animation Symbol
- Create a new document. Make the canvas size 600 pixels wide by 150 pixels high and the color white.
- Make sure the Show Grid and Snap to Grid options are turned off (click the View menu and point to Grid to deselect these options).
- Save the file as animated logo, followed by your initials.
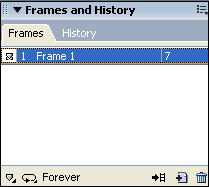
- Click the Window menu, and then click Frames to view the Frames panel. This document contains one frame, as shown in Figure 7-1a. (You might want to collapse one or more of the other panels, such as Optimize, to get a better view of the Frames panel.)
FIGURE 7-1: Frames panel
- Import the compass logo7.png file from the data files supplied with this course. Click to place it in the center of the canvas.
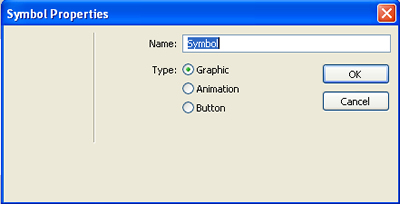
- With the logo still selected, click the Modify menu, point to Symbol, and then click Convert to Symbol. This opens the Symbol Properties dialog box, as shown in Figure 7-1b, where you can give your symbol a name and choose whether it is to be a graphic, an animation, or a button.
FIGURE 7-1b:
Symbol Properties dialog box
- Key Faded Logo for the name of the symbol, click the Animation option, and click OK to open the Animate dialog box. The Animate options diwalog box will open, as shown in Figure 7-1c.
FIGURE 7-1c:
Animate options dialog box
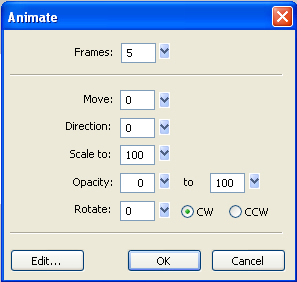
- Enter 5 in the Frames text box. The more frames, the smoother the animation, but the bigger the file.
- Make sure the Move and Direction text boxes are set to 0. The Move option determines how far the object will move, and Direction tells it which direction to move. Because this will be a fade only, you don't want the object to move at all.
Note: The Move number is a positive numeric value; the Direction value represents degrees.
- Make sure the Scale To text box is set to 100. These
settings tell the object to start out smaller or larger and then scale during the animation.
- Enter 0 (for 0 percent) in the first Opacity text box and 100 (for 100 percent) in the second Opacity text box. The object will seem to materialize right before the viewer's eyes.
- Make sure the Rotate text box is set to 0 (for 0 degrees). Rotating creates the effect of a spinning object.
- Click OK.
When you see a message that you need to add frames to accommodate the animation, click OK to accept the new frames. The document now contains five frames, as shown on the Frames panel.
- In the frame controls at the bottom of the Document window shown in Figure 7-1d, click Play. The animation loops repeatedly.
FIGURE 7-1d:
Frame controls in the Document window

- Click the Stop control. The animation stops. You can use the Previous Frame and Next Frame buttons in the frame controls to view the animation frame by frame.
- Click First Frame to move to the beginning of the animation. Because this animation fades up from 0 opacity, the first frame is transparent. Remain in this screen for the next Step-by-Step.
Editing the Instance of a Symbol
The advantage of using animation symbols over frame-by-frame animation is that the initial image - the symbol - controls the overall look of all the other images. If you change something in the symbol (color, size, or rotation, for example), the instances are changed as well. They are, in a sense, linked together. If you had created the animation frame by frame, you would need to make your changes in each frame. That could take a long time.
-
STEP-BY-STEP 7.2: Editing an Instance of the Symbol
- Click the Faded Logo symbol on the canvas to select it. Because you are in frame 1, the logo is transparent, but you can select it. Move the pointer over the logo until you see the red handles and then click. The red handles are replaced by blue handles, indicating that the logo is selected.
- On the Property inspector, enter 12 in the Frames text box. Then press Enter (Windows) or Return (Macintosh), and click OK again to accept the added frames.
- Click Play to preview the animation. This instance now plays for 12 frames, which creates a smoother animation than five frames. The document now contains 12 frames.
- Click Stop to stop the animation.
- Return to frame 1 and move the Faded Logo symbol to the bottom center of the canvas. Even though it's transparent, you can select and move it. Save your work and remain in this screen for the next Step-by-Step.
Note: You can move between frames by using the frame controls at the bottom of the Document window or by selecting the desired frame on the Frames panel.
Creating Frame Animations
The next Step-by-Step demonstrates basic frame-by-frame animation for creating an animated GIF image. You import a graphic object and animate the object moving across the screen.
Right now, this document contains 12 frames. Be sure the Frames panel is visible, and you are viewing frame 1.
-
STEP-BY-STEP 7.3: Creating a Frame-by-Frame Animation
- Import the compass7.png file from the data files supplied with this course. Click to place the object in the upper-left corner of the canvas.
- Make a duplicate of the grouped compass. You can click the Edit menu and then click Duplicate or begin dragging and hold down Alt (Windows) or Option (Macintosh) to make the copy. Place the copy to the right of the original.
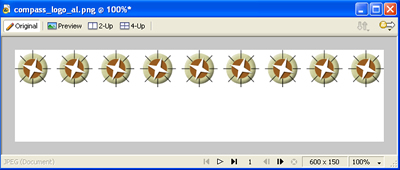
- Continue to make new copies until you have nine copies placed on the canvas. Line up the compasses in a row from left to right, as shown in Figure 7-3a.
Note: The Alt or Option key is the keyboard shortcut for the Subselection tool. If you hold down the Alt or Option key first, the Pointer tool changes to the Subselection tool. Dragging with the Subselection tool duplicates and drags only a portion of the grouped object. Drag the object first and then add the Alt or Option key to make a copy of the compass.
FIGURE 7-3a:
Copies on the canvas
- Select all nine objects. Make sure not to select the Faded Logo symbol by accident. (You can tell how many objects you have selected by looking on the title bar.)
- Align all nine copies of the compass logo. (In the Align panel, turn on To Canvas, click Align top edge and Space evenly horizontally.
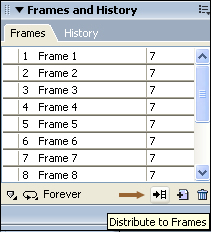
- Be sure you are in Frame 1 with all nine objects selected. Click the Distribute to Frames button on the Frames panel, as shown in Figure 7-3b. This places each individual object in a separate frame. The first object you created is placed in the first frame. The remaining objects are placed in subsequent frames in the order they were created. Frames 1 through 9 now contain copies of the compass graphic. Frames 1 through 12 are used for the Faded Logo graphic.
FIGURE 7-3b:
Frames panel
- Click each frame on the Frames panel to view successive frames of the animation.
- Click Play at the bottom of the Document window to preview the animation. The animation displays each compass object as the compass moves across the canvas.
- Click Stop at the bottom of the Document window. Remain in this screen for the next Step-by-Step.
Hot Tip: When you create your animations,Fireworks adds new frames for you automatically. You can also add and delete frames manually by using the New/Duplicate Frame (document icon with a plus sign) and Delete Frame (trashcan) buttons at the bottom of the Frames panel. Any frame selected when you click the trashcan will be deleted. You can Ctrl-click (Windows) or Command-click (Macintosh) to select more than one frame for deletion.
Using Onion Skinning
Onion skinning is a traditional animation technique that enables you to see and manipulate objects before and after the current frame. When you're creating frame-by-frame animation, this helps you position objects in each frame without flipping back and forth between frames. When onion skinning is turned on, objects in frames before and after the current frame are dimmed so you can distinguish them from objects in the current
In the following Step-by-Step, you use onion skinning to reposition the Faded Logo symbol so it appears in line with the animated compass.
frame.
-
STEP-BY-STEP 7.4: Using Onion Skinning
- Select frame 6 on the Frames panel.
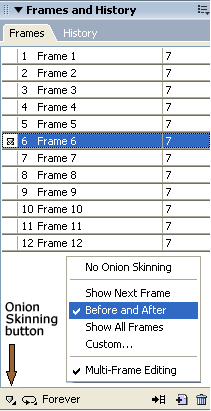
- Click the Onion Skinning button at the bottom of the Frames panel, as shown in Figure 7-4a, and choose Before and After from the pop-up menu.
FIGURE 7-4a:
Onion Skinning button and pop-up menu
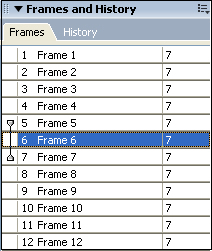
A vertical bar appears on the Frames panel indicating all of the visible frames, as shown in Figure 7-4b. You can add or remove frames from the view by clicking the frame numbers. Frame 6 is selected, so frames 5 and 7 are partially visible, making it easier to align the objects in the animation. When using onion skinning, only the current frame is 100% opaque; the others are partially visible to help you know which frame is selected.
FIGURE 7-4b:
Frames panel showing onion skinning
- Click to the left of frame 9 on the Frames panel to view onion skinning for frames 5 to 9.
- Drag the Faded Logo symbol so the compass in the logo lines up with the compass in frame 9, as shown in Figure 7-4c.
FIGURE 7-4c:
Using onion skinning to align objects

- Click Play in the Document window to preview the animation.
- Click Stop and turn off onion skinning (click Onion Skinning and choose No Onion Skinning). Remain in this screen for the next Step-by-Step.
Hot Tip: You can choose Custom from the Onion Skinning pop-up menu to view more than three frames at once and to change the opacity of the frames before and after the current frame. You can also choose Multi-Frame Editing to enable other frames to be selected and edited (even though they are dimmed).
Controlling Playback
After you have the animation sequence working, you can change the playback speed by setting the frame delay. The frame delay determines the amount of time each frame is displayed. Frame delay is specified in hundredths of a second. For example, a setting of 100 displays the frame for a second, and a setting of 25 displays the frame for a quarter of a second.
-
STEP-BY-STEP 7.5: Setting the Frame Delay
- Click frame 1 on the Frames panel to select the first frame. Hold down Shift and click the last frame to select all 12 frames in the animation.
- Display the Frames panel Options menu. Then choose Properties to open the Frame Delay window, as shown in Figure 7-5.
Figure 7-5:
Frames panel Options menu and Frame Delay window
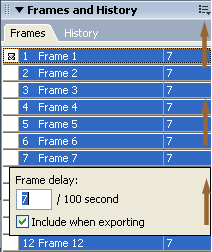
- Enter 5 in the Frame Delay box to speed up the animation.
- Click outside the Frame Delay settings window to close it. Remain in this screen for the next Step-by-Step.
Hot Tip: You can also double-click the selected frame to display the properties: Double-click the Frame Delay column (the right column),, not the frame name. You can rename each frame by doubleclicking the name and entering a new name.
Setting Looping
Looping makes the animation play over and over. You can control the number of times your animation loops by using the GIF Animation Looping button on the Frames panel.
-
STEP-BY-STEP 7.6: Setting Looping
- Click the GIF Animation Looping button on the Frames panel. The GIF Animation Looping pop-up menu appears, as shown in Figure 7-6.
FIGURE 7-6:
GIF Animation Looping pop-up menu
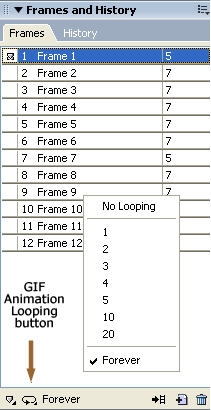
- Choose No Looping and then click Play to preview the animation with your new playback settings. Even though you selected no looping, your animation will loop when you play it back in the document. However, it will not loop when exported as an animated GIF image.
- Click Stop. Remain in this screen for the next Step-by-Step.
Applying Tweening
Tweening is the process of defining beginning and end frames and then creating images in between to give the appearance that the first frame slowly changes to the end frame. You define an image as a symbol, place two instances of the symbol on the canvas, and then let Fireworks calculate (tween) the images in the middle. In this task, you use tweening to animate between two instances of a graphic symbol.
-
STEP-BY-STEP 7.7: Using Tweening
- Select frame 1.
- Click the Text tool and key the words Adventure Travel on the canvas. Make the text size 36, Impact, and black. For now, position the text in the lower-left corner of the canvas.
- With the text object selected, click the Modify menu, point to Symbol, and then click Convert to Symbol to open the Symbol Properties dialog box.
- Key Adventure Travel as the name, make sure Graphic is selected, and click OK to convert the text to a graphic symbol. The text is converted to a graphic symbol and added to the library.
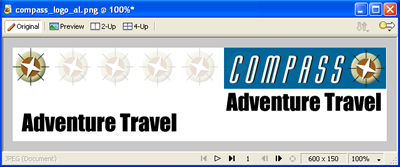
- Drag another instance of Adventure Travel from the Library panel (if necessary, click the Window menu and click Library to display the Library panel), and position it below the Compass logo, as shown in Figure 7-7. Because the logo in the first frame is transparent, you may want to turn on onion skinning for all frames, so you can see the Compass logo for better positioning.
FIGURE 7-7:
Adventure Travel added below the Compass logo
- Select the first instance of Adventure Travel (the one that is not positioned below the logo). Use the Scale tool to stretch it both horizontally and vertically, making it much larger and distorted.
- Highlight the value in the Opacity box on the Property inspector and change the opacity of the larger Adventure Travel instance to 0.
- Drag the large transparent Adventure Travel instance beyond the left edge of the canvas as far as you can. Even though it is transparent, you can position it by using its selection border.
- Shift-click to select both instances of Adventure Travel. Click the Modify menu, point to Symbol, and then click Tween Instances to open the Tween Instances dialog box.
- Make sure the Steps text box is set to 10, click Distribute to Frames, and click OK.
- Click Play to preview the animation and then click Stop. Remain in this screen for the next Step-by-Step.
Exporting a GIF Animation
When you have completed the animation, you can export the file as an animated GIF image and add it to your HTML pages.
You can use the Optimize panel to tell Fireworks you want the exported file to be an animated GIF image.
-
STEP-BY-STEP 7.8: Exporting a GIF Animation
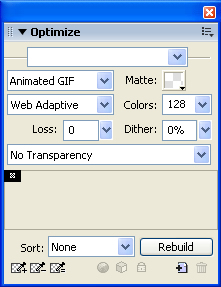
- Make sure the Optimize panel is open by clicking the Window menu and then clicking Optimize.
- Click the arrow on the Export File Format box and select Animated GIF.
- Change the Indexed Palette to Web Adaptive. The Optimize panel should look like Figure 7-8.
FIGURE 7-8:
Optimize panel with Animated GIF selected
- Click the File menu, and then click Export to export the file. The Export dialog box opens. Make sure the new filename is animated logo.gif and that Images Only is selected in the Save as Type (Windows) or Save As (Macintosh) box.
- Display the folder to which you are saving course files, and click Save to export. A new file named animated_logo.gif is placed in the folder. You can now view this file in a Web browser.
- Leave the animated logo.png file open for the next Step-by-Step.
Using Export Preview
The default settings for animated GIF files will work for most of your animations, but if you'd like to experiment with the settings, use the Export Preview window. You can set any number of loops, change the disposal method, and even hide a frame from view.
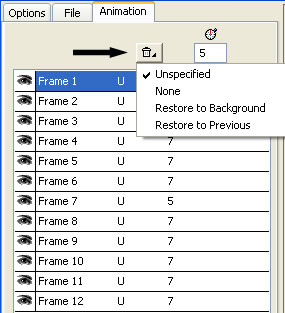
The disposal method controls what happens to the previous frame after the current one is displayed. The types of methods are:
- Unspecified: No disposal method is specified. Fireworks automatically selects the disposal method for each frame. Select Unspecified to create the smallest possible animated GIF file and for full-frame animations.
- None: The frame is not disposed of before the new frame is displayed. The next frame appears on top of the current frame. Select None to add a smaller object to the existing frame, for full-frame animations, and for frame optimization and transparency.
- Restore to Background: This option erases the current frame's image and restores the area to the background color or pattern that appears in the Web browser. Select Restore to Background when moving an object in a transparent animated GIF file.
- Restore to Previous: This option erases the current frame's image and restores that area to the previous frame's image. Select Restore to Previous to animate objects across a background image within the animation.
-
STEP-BY-STEP 7.9: Controlling Settings with Image Preview
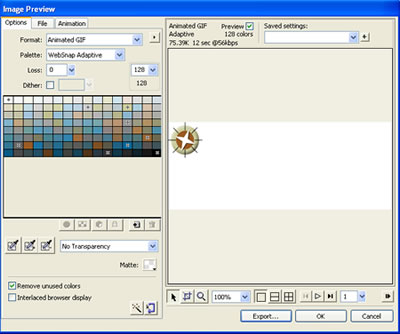
- Click the File menu, and then click Image Preview to access the Image Preview window shown in Figure 7-9a.
Note:
The Image Preview window lets you change your settings and see the results of your changes in a single window.
FIGURE 7-9a:
The Image Preview window
- Select the Animation tab of the Image Preview window.
- Click the Disposal Method button to display the pop-up menu. Make sure the Unspecified option is selected.
as shown in Figure 7-9b.
FIGURE 7-9b:
Disposal Method pop-up menu
- Select a frame on the Animation tab of the Image Preview window.
- Click Show/Hide Frame (the eye) next to each frame to turn that frame on or off. If a frame is turned off, it is not visible when you preview the animation in Fireworks, and it will not be exported with the animation. Leave all the frames visible for now. Remain in this screen for the next Step-by-Step.
Animated GIF files used as banner ads typically need to be a set file size or smaller. By using the Image Preview window, you can let Fireworks determine the settings (color palette and number of colors) based on a set file size.
-
STEP-BY-STEP 7.10 Exporting to a Specific File Size
- Click the Options tab of the Image Preview window.
- Click the Optimize to Size Wizard button to open the Optimize to Size dialog box shown in Figure 7-10a and b.
FIGURE 7-10a:
Optimize to Size Wizard button

FIGURE 7-10b:
Optimize to Size dialog box
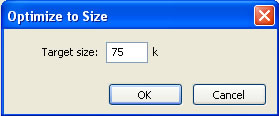
- Enter 75 (the file size in kilobytes) in the Target Size text box and click OK. Fireworks determines the optimization settings based on the target value.
- When your settings are complete and the preview of the animation is to your liking, click Export. (You can also click OK to save your optimization and animation settings and return to the document without exporting.)
- Enter a name, specify the location for the file, and click Save. If you are asked to replace a file of the same name, you can click Yes (Windows) or Replace (Macintosh) to overwrite the old file with your new settings. Remain in this screen for the next Step-by-Step.
Using the Library Panel
The Library panel is a repository for the symbols and buttons you create. When you create a symbol, it's automatically placed in the library for you. The library is document specific, which means the items within the library are only those created in that document. You can, however, export symbols from and import them into other documents.
-
STEP-BY-STEP 7.11: Exporting and Importing Library Symbols
- The animated logo.png file should still be open. Make sure the Library panel is open by clicking the Window menu and then clicking Library.
- Open the Library panels Options menu, and click Export Symbols to open the Export Symbols dialog box.
- Click Select All to select all the symbols to export, and then click Export.
- Name the file my-exported symbols.png, followed by your initials. Select the location to which you are saving course files, and click Save. Then close the file.
Now, you will import symbols.
- Create a new document, using the most recent settings in the New Document dialog box. Save the file as my-imported symbols.png, followed by your initials.
- Click the Window menu, and then click Library to view the Library panel, if necessary.
- Open the Library panels Options menu, and click Import Symbols.
- Select the custom_symbols.png file from the data files supplied with this course and then click Open to open the Import Symbols dialog box shown in Figure 7-11. The custom_symbols.png file contains some symbols you can place on your page.
FIGURE 7-11:
Import Symbols dialog box
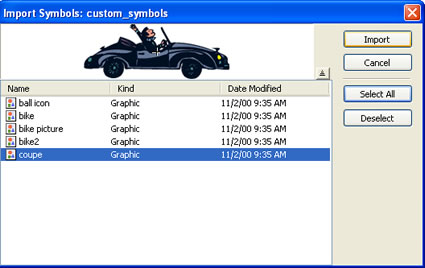
- Click Select All to select all the symbols, and then click Import. The symbols are now placed in the library for the current document.
- Save and close the file. You may choose to use these symbols for Project 9: Animated GIF
 Back to Lesson 6: Optimizing Back to Lesson 6: Optimizing
 After this lesson, you should complete the following After this lesson, you should complete the following
- Test on Fireworks Lesson 4: Text, Masks and Live Filters
- Project 9: Animated GIF
Back to Fireworks main page
|
