Macromedia Fireworks
Upon completion of this unit, you should be able to:
- Define the difference between bitmap and vector graphics.
- Identify elements of the Fireworks interface.
 Bitmap Versus Vector Graphics Bitmap Versus Vector Graphics
Macromedia Fireworks MX 2004 functions as both a bitmap editor and a vector drawing program. Most images on the Web are bitmap graphics (GI, JPEG, or PNG files). Bitmaps record information pixel by pixel and color by color. The size of a bitmap is determined by the number of pixels and colors used to define the image. Creating and editing bitmaps has its limitations. As with paint on a canvas, you need to completely remove a mistake. When editing bitmaps, you need to completely erase or "paint" over the mistake.
Vector graphics, on the other hand, use mathematical formulas to describe the image. They provide more precise control when creating the image and allow for more advanced editing and modification.
By combining these drawing methods in the same application, Fireworks gives you a very powerful and versatile set of tools. You get the features of photo editing and paint programs, along with the precision of a vector drawing program, and your finished graphics are optimized for use in Web pages.
Elements of the Fireworks Interface
Fireworks knows whether you want to create and edit vector objects, bitmap objects, or text, based on the current tool or selection. The Tools panel is divided into clearly labeled sections for easy tool selection.
-
Floating and Tabbed Panels
Panels provide easy access to controls that help you edit selected objects or elements of the document. Panels let you work on frames, layers, symbols, color swatches, and more. Each panel group is draggable, and you can group panels together in custom arrangements. By default, the panels are docked to the right side of the workspace. You can undock panel groups, add panels to a group, rearrange the order of docked panel groups, and collapse and close panel groups. To undock a panel group, drag the gripper in the upper-left corner of the panel group's title bar, as shown in Figure 1-1.
Hot tip: By clicking the Commands menu and then clicking Panel Layout Sets, you can select from one of three panel arrangements, or you ' can arrange the panels and save the new arrangement as a custom layout.
FIGURE 1a: Fireworks panels

Many of the panels are divided into two or more tabs. You can create your own arrangement by selecting a panel or an individual tab, choosing Group [panel or tab name] With from the panel Options menu, and then selecting the new panel to group with. You can collapse and expand panel groups by clicking the panel group's title.
The Property inspector displays options that change according to the current object or tool selection. Open a document, and the Property inspector displays document properties. Choose a tool, and it displays tool options. Select a vector object, and it displays options such as stroke and fill. You can change these and other options right from the Property inspector. By default, the Property inspector is visible, but you can hide or show it by clicking the Window menu and then clicking Properties.
-
The Fireworks Tools Panel
The Fireworks Tools panel is divided into clearly labeled sections for easy tool selection, as shown in Figure 1-2. If the Tools panel is not visible, you can display it by clicking the Window menu and then clicking Tools. To select a tool, just click it. If a tool has a small black triangle in the lower-right corner, it is part of a group of tools; click and hold over the tool to access the popup tool group. Table 1-1 lists the tools and the tools in their tool group (if they have one), and a description of each.
FIGURE 1b: Fireworks Tools panel
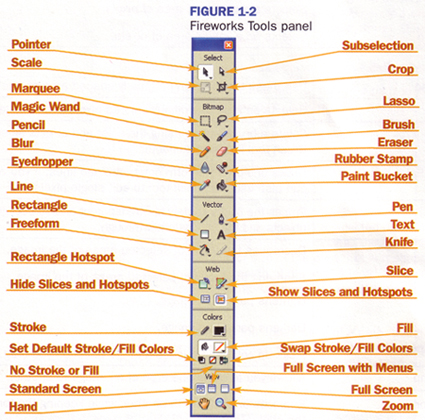
The following table describes all of the tools available from the Tools Panel:
TABLE 1-1
Description of tools
| Selection Tools |
Description |
Pointer
Select Behind |
Selects and moves objects on the screen.
Selects an object behind the currently selected object. |
| Subselection |
Selects and moves paths on the screen, selects an object within a group, displays points on a path, and selects points. |
Scale
Skew
Distort
|
Resizes an object horizontally, vertically, or proportionally.
Transforms an object by slanting it along the horizontal or vertical axis or along both axes.
Changes the size and proportion of an object.
|
Crop
Marquee |
Discards portions of a document.
Exports a portion of a document. |
| Bitmap Tools |
Description |
Marquee
Oval Marquee |
Selects a rectangular area of pixels:
Selects an elliptical area of pixels. |
Lasso
Polygon Lasso |
Use these to select an irregularly shaped area of pixels. |
Magic Wand
|
Selects an area of similarly colored pixels in an image.
|
Brush
|
Paints a brush stroke using the color and effects selected in the Brush tool Property inspector.
|
| Pencil |
Draws one-pixel freeform or constrained lines. If you zoom in, you ' can also use the Pencil tool to edit single pixels. |
| Eraser |
Erases the pixels so they are transparent and so background objects and the canvas show through. |
Blur
Sharpen
Dodge
Burn
Smudge |
Decreases the focus of selected areas of the image.
Sharpens the focus of selected areas of the image.
Lightens part of an image.
Darkens part of an image.
Picks up color and pushes it in the direction you drag. |
Rubber Stamp
Replace Color
Red Eye Removal |
Allows you to clone one area of an image to another.
Replaces one color with another, while keeping the tonal range of the original color.
Changes the colors of pixels within a certain range of red to neutral grays and blacks. |
| Eyedropper |
Picks up color from anywhere in a document to designate a new stroke or fill color. |
Paint Bucket
Gradient |
Fills objects with solid colors.
Fills objects with gradients or patterns. |
| Vector Tools |
Description |
Line
|
Draws straight lines with editable paths.
|
Pen
Vector Path
Redraw Path |
Draws vector objects by plotting points along a path.
Paints free-form lines with editable paths.
Redraws or extends a segment of a selected path while retaining the path's stroke, fill, and effect characteristics. |
Rectangle
Ellipse
Polygon
Smart Shapes |
Use the Rectangle and other tools in this group to quickly draw basic shapes. Only rectangles are drawn as grouped objects, which allows you to adjust corner roundness after drawing. In all other instances, basic shapes draw paths. To move a rectangle corner point independently, you must ungroup the rectangle or use the Subselect tool.
Smart Shapes are new in Fireworks 2004. They can also be found in this tool group. Smart Shapes are complex shapes you can modify by using special control points. |
Text
|
Creates text blocks and selects and edits existing text.
|
Freeform
Reshape Area
Path Scrubber - Additive
Path Scrubber - Subtractive
|
Pulls or pushes a selected path or part of a path to reshape it. Fireworks automatically adds, moves, or deletes points along a path as you edit it. With the Freeform tool selected, you can use, the Property inspector to control the size of the push pointer. Use the arrow keys (left or right) to resize the push or pull pointer as you draw. You can also press 1 to make the pointer smaller or 2 to make the pointer larger.
Modifies the shape of a vector object when you select the Reshape Area tool and drag across a selected path. The Reshape Area tool contains inner and outer circles. The outer circle controls the gravitational pull or size of the area that is reshaped. The inner circle controls the strength of the tool. A large inner circle produces a wide blunt shape. A narrow inner circle produces a narrower shape.
Use these to change the appearance of a path. Using varying pressure or speed, you can change a path's stroke properties.
These properties include stroke size, angle, ink amount, scatter, hue, lightness, and saturation. |
| Knife |
Splits a path into two or more paths. |
| Web Tools |
Description |
Rectangle Hotspot
Circle Hotspot |
Use the Rectangle Hotspot and the other tools in the group to draw a hotspot on an image (hotspots are Web objects that specify interactive areas in a Web graphic). When exported as HTML and images, hotspots become image maps.
|
Slice
Polygon Slice |
Use these to create slices from an existing graphic. Slices cut an image into sections so you can apply rollover behaviors, animation, and Uniform Resource Locator (URL) links to parts of the overall image.
|
Hide Slices and Hotspots
|
Hides slices and hotspots while you work.
|
Show Slices and Hotspots
|
Displays slices and hotspots in the workspace.
|
| Color Tools |
Description |
Stroke Color
|
Shows the color currently set for the stroke. |
Fill Color
|
Shows the color currently set for the fill. |
Set Default Stroke/Fill Colors |
Restores the color boxes to the default colors of black for the stroke and white for the fill. |
No Stroke or Fill |
Removes the stroke and fill of the selected object. |
| View Tools |
Description |
Standard Screen mode
|
Sets the Standard Screen mode. Use the view mode buttons in the View area of the Tools panel to choose from any of three view ' modes to control the layout of your workspace. Standard is the default. |
Full Screen with Menus mode
|
Sets a maximized Document window view against a gray background with menus, toolbars, scroll bars, and panels visible. |
Full Screen mode |
Sets a maximized Document window view against a black background with no menus, toolbars, or title bars visible. |
Hand |
Pans the document and views hidden areas when you are zoomed I in and the document is not entirely visible. |
| Zoom |
Moves in and out to view more or less of the workspace. |
 Back to Fireworks Main Page Back to Fireworks Main Page
 Go to next section: Lesson 1: Editing a Bitmap Image Go to next section: Lesson 1: Editing a Bitmap Image
|
