Lesson 3b: Bitmap Editing
Upon completion of this unit, you should be able to:
- Define the difference between bitmap and vector graphics.
- Identify elements of the Fireworks interface.
- Create and set up a new Fireworks document.
- Edit bitmap images.
- Make selections in Bitmap mode.
- Using the Marquee tool
- Using the Magic Wand tool
- Using the Lasso tool
- Using the Rubber Stamp tool
- Ising the Brush tool
 Setting up a New Document Setting up a New Document
When you begin a new document, you are presented with the New Document dialog box. This is where you set the size and color of your canvas and the image size for the new document. Each new document defaults to the settings you established in your most recently saved document,
unless you have copied an image to the Clipboard. In that case, the Width and Height settings match the dimensions of the copied image.
-
Step-by-Step 1.1: Setting Up a New Document
- Start Fireworks. Click the File menu, and then click New to create a new empty document. The New Document dialog box opens, as shown in Figure 1-1a.
FIGURE 1-a: New Document dialog box
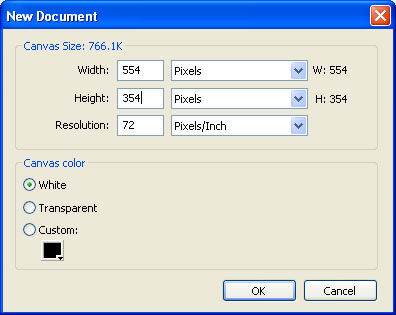
- You can set the canvas size in the New Document dialog box, using pixels, inches, or centimeters. Set the canvas size to 554 pixels wide by 354 pixels high.
In the New Document dialog box, the resolution is set to 72 pixels per inch. This is the default for Web graphics. (You can also change the resolution by selecting Image Size on the Property inspector or by clicking the Modify menu, pointing to Canvas, and then clicking Image Size. This opens the Image Size dialog box.)
- The Canvas Color is the background color of your document. You can choose a white canvas, a transparent canvas, or a custom color canvas. To display the color palette, click the Custom Color box beneath the Custom button.
Hot Tip: You can also change the canvas size by selecting Canvas Size on the Property inspector, or by clicking the Modify menu, pointing to Canvas, and then clicking Canvas Size. You can also use the Crop tool to crop the document, or click the Modify menu, point to Canvas, and then click Trim Canvas to trim the empty edges of the canvas. Or you can click the Modify menu, point to Canvas, and then click Fit Canvas to expand the canvas to fit all objects in the document if any objects are in the gray area outside the canvas right of the Custom button. Finally, the Property inspector for the document has a handy Fit Canvas button in it.
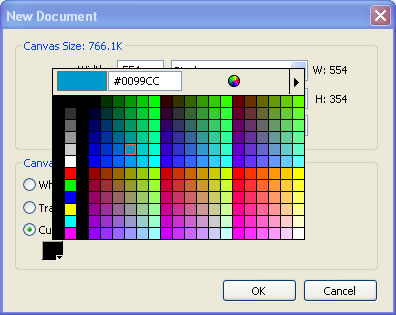
The pointer becomes an eyedropper you can use to select colors from anywhere on the screen, including the color pop-up window, as shown in Figure 1-1b.
FIGURE 1-1b:
Custom Color box and palette in the New Document dialog box
- Use the eyedropper to select a new color. Then click OK. The canvas color changes.
- Make sure the Pointer tool is selected on the Tools panel. Then click the Canvas color box on the Property inspector, as shown in Figure 1-1c. In the color pop-up window, select the color white. You can also change the canvas color by clicking the Modify menu, pointing to Canvas, and then clicking Canvas Color. This opens the Canvas Color dialog box.
FIGURE 1-1c: Document Property inspector

Note: The color you choose as the canvas color is also the color of the background page when you export to HTML. If your canvas color is set to Transparent, then the transparent background will export as a white background unless you select Index or Alpha Transparency on the Optimize panel or in Export Preview or unless you set the Matte color to some color other than white on the Optimize panel.
- Click the File menu and then click Close. If you are asked to save the file, click No (Windows) or Don't Save (Macintosh). Remain in this screen for the next Step-by-Step.
Editing Bitmap Images
Fireworks provides a wealth of tools for creating new bitmap graphics and for editing existing ones. To edit an existing bitmap image, you must first open or import the file you want to edit. Fireworks recognizes the following bitmap file formats: Photoshop native files (PSD), TIFF, JPEG, GIF, BMP, PICT (Macintosh), PNG, and Targa.
-
Step-By-Step 1.2 Editing a Bitmap Graphic
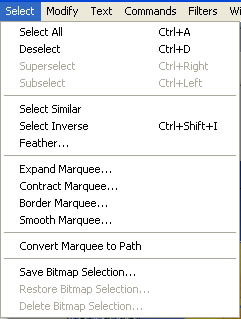
- Save the girl_pumpkinl.png file from this link to your Raw Images folder. (Right-click on link, choose Save Target As, then find your Raw Images folder.)
- Open Fireworks (if it is not already open), click the File menu, and open the girl_pumpkin1 file that you just saved in you Raw Images file.
- Click the File menu, click Save As, name the file girl_pumpkin1, followed by your initials, and click Save. Note that the png file extension is added by default to the name of the file.
- Select the Pointer tool from the Tools panel if necessary, and double-click the image. Double-clicking a bitmap image switches Fireworks to Bitmap mode.
- To exit Bitmap mode, click the Exit Bitmap Mode button (the red circle with a white X) at the bottom of the Document window, as shown in Figure 1-6. You can also press Escape (Windows and Macintosh), Ctrl + Shift + E (Windows), Command + Shift + E (Macintosh), or Command + period (Macintosh). Remain in this screen for the next Step-by-Step.
FIGURE 1-2a: Exit Bitmap Mode button

Selecting Pixels
Bitmap graphics are made from a collection of colored picture elements called pixels. To make changes to a bitmap graphic, you can edit one pixel at a time, or you can select and edit several pixels. To work with bitmaps successfully, you must learn to select the exact part of the graphic you want to edit. Fireworks provides tools and commands for selecting groups of pixels. For example, you can use the Magic Wand tool to select a range of pixels with a similar color, such as the sky in a photograph. When you make a selection, a floating marquee indicates the area that is selected.
After you draw the selection marquee, you can manipulate it by moving it, adding to it, or basing another selection on it. You can edit the pixels inside the selection, apply filters to the pixels, or erase pixels without affecting the rest of your document.
Figure 1-2b shows the Bitmap section of the Tools panel. You might want to review the Bitmap Tools section of Lesson 3a.
FIGURE 1-2b:
Bitmap portion of the Tools panel, showing selection tools for image editing

Using the Marquee Tools
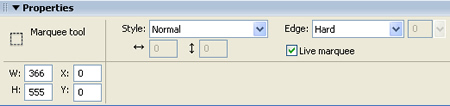
The Bitmap section of the Tools panel contains the marquee selection tools. The Marquee and Oval Marquee tools are used for selecting specific shapes in the image. You can modify the style and edge of the marquee tools, using the settings on the Property inspector shown in Figure 1-3a. For the Fixed Size style, type the exact width and height in pixels for the selection. For the Fixed Ratio style, type the proportion of width to height before making the selection. You can also change the appearance of the edges of the selection. You learn more about this in the section Controlling the Edge of a Selection later in this lesson.
FIGURE 1-3a:
Property inspector for the Marquee tool
-
Step-By-step 1.3: Working with the Marquee Tools
- The girl_pumpkinl.png file should still be open. Select the Marquee tool from the Tools panel. Click the bitmap object at any spot where you want to begin your selection and then drag to the opposite corner to define the area. The area within the marquee is selected. You can now modify, move, or delete pixels.
- To deselect, click outside the selection. You can also click the Select menu and then click Deselect.
Hot Tip: After you click, you can hold down Shift to constrain the shape of the selection. You can also hold down Alt (Windows) or Option (Macintosh) to draw the marquee shape from the center outward. Hold down Shift-Alt (Windows) or Shift-option (Macintosh) to constrain the shape of the marquee as you select from the center outward.
- Select the Oval Marquee tool from the Tools panel. To
switch between the Marquee and Oval Marquee tools, click the Marquee tool to reveal the pop-up menu, and then click the tool you want to use. You can also press M to toggle between the marquee tools.
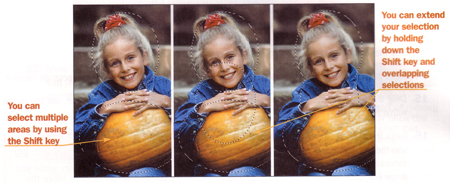
- Drag to draw a selection marquee around the girl's face.
- Hold down Shift. A plus sign appears on the pointer.
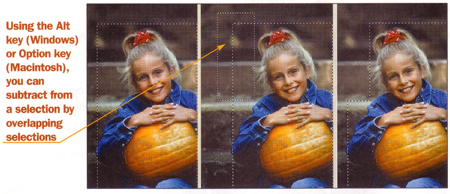
- Drag to draw a second marquee around the pumpkin. Be careful not to overlap the selections. Both areas are selected.
- Make sure you still have selection marquees around the girl's face and the pumpkin.
- Hold down Shift. A plus sign appears on the pointer.
- Drag to draw a new marquee that overlaps the current selections. The original marquee expands to include the new selection, as shown in Figure 1-3b. Click outside the image to deselect it.
FIGURE 1-3b: Expanded selection
- Use the rectangle Marquee tool to select the entire girl and the pumpkin.
- Hold down Alt (Windows) or Option (Macintosh). A minus sign appears on the pointer.
- Drag to draw a new marquee that overlaps a portion of the current selection, as shown in Figure 1-3c. The overlapped area is removed from the selection. Click outside the image to deselect it.
FIGURE 1-3c: Modified selection
- Use the rectangle Marquee tool to select the pumpkin.
- Move the pointer within the selection. The pointer appears as a triangle with a small rectangle below it.
- Drag the marquee until it surrounds the girl's face. This moves just the selection, not the pixels within the selection.
- Press the right arrow key several times. (You can also use the up, down, and left arrow keys.) The selection moves a distance of one pixel each time you press an arrow key. Click outside the image to deselect it.
Hot Tip:
Hold down the Shift key while you use the arrow keys to move the selection 10 pixels at a time.
- Use the rectangle Marquee tool to select the entire girl and the pumpkin.
- Move the pointer within the selection and hold down Ctrl + Alt (Windows) or Command + Option (Macintosh). The pointer changes to a double-triangle pointer.
- Drag the selection to the left while holding down the modifier keys. A copy of the image moves within the selection.
- Click the Edit menu and then click Undo Duplicate. Click outside the image to deselect it.
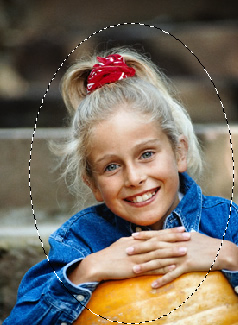
- Switch to the Oval Marquee tool. Hold down Alt (Windows) or Option (Macintosh), click the girl's nose, and then drag to draw an ellipse around the girl's head and shoulders from the center of the ellipse, as shown in Figure 1-3c.
FIGURE 1-3c:
Oval Marquee selection drawn from the center outward
- Move the pointer within the selection and hold down Ctrl (Windows) or Command (Macintosh). The pointer changes to a triangle and a pair of scissors.
Note:
If you want to remove the selected pixels instead of moving them, press Delete or click the Edit menu and then click Cut. This allows you to paste the selection to another area of your document.
- Drag the selection while holding down the modifier key. The selected pixels of the bitmap object move from their original position. When you release, the moved pixels are pasted in the new location. This leaves a transparent hole in the position of the original pixels.
- Click the Edit menu and then click Undo Move.
- Save the file by clicking the File menu, and then clicking Save. Remain in this screen for the next Step-by-Step.
Feathering and Cropping
Fireworks provides many options and tools for enhancing and modifying the look of an image. In the next Step-by-Step, you use the Feather option to fade and soften the background of the image, and you use the Crop tool to remove portions of the image.
-
Step-By-Step 1.4: Feathering and Cropping an Image
- If necessary, use the Oval Marquee tool to draw an ellipse around the girl's head and shoulders, as shown in Figure 1-3b above.
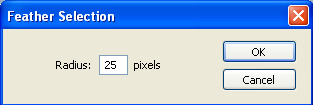
- Click the Select menu, and then click Feather. In the Feather Selection dialog box, enter 25 in the Radius box, and click OK, as shown in Figure 1-4a. (You won't be able to see the feathering until you delete the background.)
FIGURE 1-4a: Feather Selection dialog box
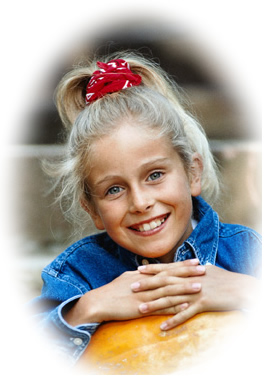
- Click the Select menu, and then click Select Inverse to select the background.
- Press Delete to delete the background. This isolates the face with a soft edge.
- Click the Select menu, and then click Deselect to deselect the image. Your results should look like Figure 1-4b.
FIGURE 1-4b: Final results of feathering
- Select the Crop tool from the Tools panel. The Crop tool lets you crop unwanted parts of the canvas (review Figure 1-2 and Table 1-1).
- Drag to select the feathered image. Handles appear along the borders of the crop marks. You can use these to fine-tune your selection.
- Position the pointer within the image and the crop marks, and double-click to crop the image.
- Save and close the file. Leave Fireworks open for the next Step-by-Step.
Using the Magic Wand
With the Magic Wand tool (review Figure 1-2 and Table 1-1), you can select neighboring pixels of the same or a similar color. The level of similarity depends on the tolerance level you set on the tool's Property inspector. The lowest level, zero, selects one color; you pick the exact color with the tip of the tool. The highest setting, 255, allows the greatest range of colors to be selected. The default tolerance level of 32 is generally a good starting point. Instead of increasing the tolerance level, try adding to the selection by holding down Shift and clicking another color.
-
Step-By-Step 1.5: Using the Magic Wand Tool
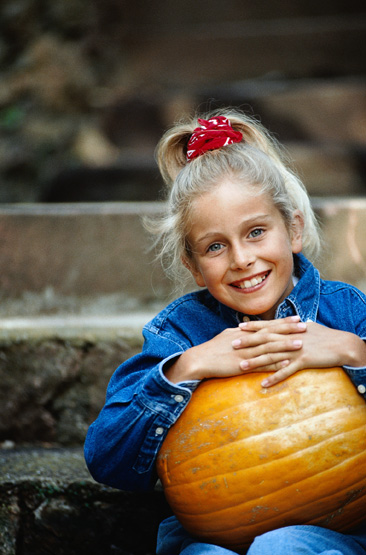
- Save the flower1.png file from this link to your Raw Images folder. (Right-click on link, choose Save Target As, then find your Raw Images folder.) Save it as flower1, followed by your initials. Open the flower1.png file in Fireworks
- Select the Magic Wand tool on the Tools panel. The Property inspector now displays the settings for the Magic Wand tool, as shown in
Figure 1-5.
FIGURE 1-5:
Property inspector for the Magic Wand tool

- Highlight the value in the Tolerance box on the Property inspector and enter 255.
- Click anywhere in the blue sky area of the picture. A wide range of colors is selected.
- Press Delete. Just about everything but the flowers is deleted.
- Click the Edit menu, and then click Undo Delete. The picture returns to normal.
- Click the Select menu, and then click Deselect to deselect the image. You will now try a different tolerance value.
- Highlight the value in the Tolerance box and enter 32.
- Click anywhere in the blue sky area of the picture. A much narrower range of colors is selected.
- Click the Select menu, and then click Deselect to undo this selection. Now you will make a selection based on similar colors.
- Click one of the yellow petals on the large sunflower.
- To add to your selection based on color similarity, click the Select menu, and then click Select Similar. Any similar colors in the image are added to the selection.
- Click the Select menu, and then click Deselect to undo the selection.
- Save the file and remain in this screen for the next Step-by-Step.
Controlling the Edge of a Selection
You can change the appearance of the edge of a selection by selecting Hard, Anti-Alias, or Feather from the Edge menu on the Property inspector. A hard edge on any shape that is not a horizontal or vertical edge creates a stair-step effect, as shown in Figure 1-6a. This is the result of trying to create a curve or a diagonal line from square pixels; it can't be done. Anti-aliasing makes the edges appear smooth by adding lighter-colored pixels on the edges. Feathering expands the border of the selection and applies a blur to the extra pixels in the border. If you select Feather, set the amount of the blur with the Feather slider control. You should make your edge choice before you make your selection. After the selection is made, you can't use the Property inspector to change the edge (although you can use commands on the Select menu to make certain changes).
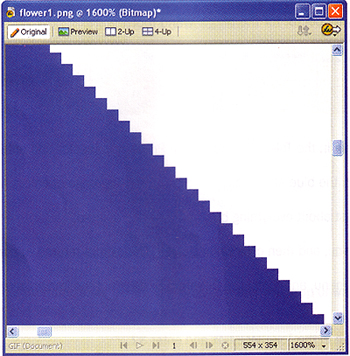
FIGURE 1-6a: Stair-step effect on a diagonal line
Using the Lasso Tools
The Lasso tool creates a free-form selection boundary around an area. Wherever you drag, you draw a selection outline. When you release, the selection area closes automatically. To close the selection area yourself, return to the first point of the selection. As you come close to the beginning, the pointer displays a small square, as shown in Figure 1-6b. To close the selection, release when you see the square.
Lasso
FIGURE 1-6b: Lasso pointer in the document

Try This : The Polygon Lasso tool draws straight-line segments. Instead of dragging the tool to make the selection, click for your first point, release, move to a new location, and click again to define a line segment. As with the Lasso tool, you'll see a small square by the pointer when close to the beginning point. Click when you see the square to close the selection, or double-click to close the selection, even if you have not moved your pointer back to the beginning point.
Using the Rubber Stamp Tool
The Rubber Stamp tool (review Figure 1-2 and Table 1-1) works well for retouching an image or copying a portion of an image.
When you use the Rubber Stamp tool, you are, in effect, painting a copy some area of a bitmap object onto another area of the bitmap object. Here the process will be referred to as cloning. First, you have to designate the area that you plan to clone: your set point.
In the following exercise, you clone the small sunflower at the left of the image.
-
Step-By-Step 1.7 Using the Rubber Stamp Tool
- The flower1 file should still be open. Select the Rubber Stamp tool on the Tools panel.
- On the Property inspector, make sure that Source Aligned is selected and that Use Entire Document is not selected, as shown in Figure 1-7.
FIGURE 1-7:
Rubber Stamp tool Property inspector perties

- On the Property inspector, set Size to 10 and Edge to 90. This creates a small stamp with a soft edge, allowing you to clone the small edges of the flower and blend the new image with the surrounding pixels.
- Move the pointer over the center of the small sunflower at the lower left of the image. Hold down Alt (Windows) or Option (Macintosh) and click to mark the set point. A cross-hair marks the set point.
- Position the pointer to the left of the small sunflower and drag to begin cloning. Try using small circular motions and work from the center outward as you clone. Since you have selected the Source Aligned option, the relationship (distance) between the original cloned area and the location of the new image remains constant. If you move the pointer to a new location, you can see this relationship. As you clone, a cross-hair appears above the set point and the cloned image appears where you drag.
- Deselect Source Aligned on the Property inspector. The set point will remain the center of the small sunflower. You can now clone the sunflower to another area of the image.
- Draw another sunflower just above the green leaves along the right edge of the picture. You may need to scroll to bring this area of the image into view.
- Save the flower1 file and remain in this screen for the next Step-by-Step.
Hot Tip:
If the document includes vector objects along with the bitmap, you can select Use Entire Document to clone the vector object as well as the bitmap image.
Using the Brush Tool
You use the Brush tool in Bitmap mode to paint new pixels. You use the settings on the Property inspector to create the type of brush you want to paint with.
-
Step-By-Step 1.8: Using the Brush Tool
- Select the Brush tool from the Tools panel and drag anywhere on the image. As you drag, pixels are replaced with the color indicated on the Property inspector.
- Click the Edit menu, and then click Undo Brush Tool.
- On the Property inspector (see Figure 1-19), click the arrow on the Stroke category box, point to Basic, and then click Soft Rounded. Highlight the value in the Tip size box and enter 5. Click the Color box and select white. Highlight the value in the Edge softness box and enter 90. Highlight the value in the Opacity box and enter 30%.
FIGURE 1-8: Brush tool Property inspector

- Click several times along the top of the image (you might need to scroll to bring this part of the image into view). This paints small round brush strokes on the image at 30% opacity, creating the visual effect of stars
- Save and close the flower1 file.
Review of Selection Options
This lesson introduced you to several methods for selecting pixels in a bitmap graphic. Fireworks includes a Select menu with a comprehensive list of selection options, as shown in Figure 1-9. The following list provides an overview of the commands on the Select menu.
FIGURE 1-9: Select menu commands
- Select All: In Bitmap mode, selects all of the pixels in a bitmap object on a selected layer. In Vector mode, selects all visible objects on all layers.
- Deselect: Removes the selection marquee.
- Superselect: Selects an object's entire group or mask group when the object has already been selected by the Pointer tool.
- Subselect: Selects all of the objects individually within a group selected by the Pointer tool.
- Select Similar: Within a single bitmap object, creates an additional selection around colors bearing a similarity to colors in the existing selection. The Magic Wand tool (and, thereafter, Select Similar) can also select transparent pixels or the space outside of a bitmap object.
- Select Inverse: Selects all pixels not in the current selection and deselects the currently selected pixels.
- Feather: Feathers the edges of the selection.
- Expand Marquee: Expands the selection by a set number of pixels.
- Contract Marquee: Contracts the selection by a set number of pixels.
- Border Marquee: Creates an additional marquee to frame an existing marquee at a specified width.
- Smooth Marquee: Smoothes the selection by a set number of pixels.
- Save Bitmap Selection: Remembers the current selection within the document.
- Restore Bitmap Selection: Restores the last-saved selection.
Viewing the Gamma Settings
When creating graphics for the Web, how do you make the color look good on al machines? This is a nearly impossible task. Monitors are usually not calibrated accurately, nor are they calibrated the same from one machine to another. To make matters
worse, on different computer platforms, shades of colors appear differently.
The gamma setting on your computer affects the apparent brightness and contrast of the monitor display. The gamma setting for the Macintosh is lower than that on Windows machines. This makes images created on the Macintosh appear darker when viewed on a Windows PC. Knowing this, you have to compensate as you create your images. If you are designing on a Macintosh, create your images a little lighter; on a PC, create them a little darker.
To make your job easier, Fireworks has a built-in function for viewing the gamma setting on the other platform. If you are using Windows, click the View menu, and then click Macintosh Gamma. This renders the image to simulate its display on a
Macintosh. If you are using a Macintosh, click the View menu, and then click Windows Gamma. This renders the image to simulate its display on a PC.
 Back to previous page: Introduction to Fireworks Back to previous page: Introduction to Fireworks
 Go to next section: Lesson 2: Vector Graphics Go to next section: Lesson 2: Vector Graphics
|
