Lesson 6: Optimizing and Exporting
Upon completion of this unit, you should be able to:
- Export graphics by using the Export Wizard.
- Optimize your file before exporting it.
- Select a color palette when exporting.
- Export an image as a GIF or JPEG file.
- Preview a document in the workspace.
- Use the Quick Export menu to export graphics.
 Exporting Images Exporting Images
One of the most satisfying moments when working in Macromedia Fireworks MX 2004 is when you put the final touches on your artwork. But then what? Most likely you've created an image intended for a larger project, such as a Web site. That's why Fireworks gives you complete control when outputting your images to their final destination. With controls such as the Export Wizard and the Optimize panel, you can fine-tune the settings of your files before you export them for use in another program. Whether you're using your images on the Web or for multimedia, Fireworks provides several methods for creating the best-quality images with the smallest file size. Fireworks exports the following formats: GIF, JPEG, PNG, TIFF, PICT (Macintosh), WBMP, BMP, PSD, AI, SWF, and HTML.
The native file format of Fireworks is PNG. You should always keep a copy of your original PNG files in addition to the exported files you create. If you need to make changes to your images, simply change the PNG files and export them again.
There are several ways to export files from Fireworks. One is to follow the step-by-step advice of the Export Wizard. Another is to optimize the file manually by using the settings on the Optimize panel and then export the file by using the Export command or by using the Quick Export feature. Quick Export lets you select export options for Macromedia Flash, Dreamweaver, FreeHand, and Director; for Adobe Photoshop, GoLive, and Illustrator; for Microsoft FrontPage; and for previewing.
Using the Export Wizard
The Export Wizard walks you step-by-step through the process of exporting files. The wizard asks a series of questions and then suggests file types and optimization settings. You can also set a file size for the Export Wizard to use as a target for the optimization. At the end of the question dialog boxes, the Export Preview dialog box opens with optimization suggestions.
-
STEP-BY-STEP 6.1: Exporting an Image to a Set Size
- Open the banner6.png file from the data files supplied with this course.
- Click the File menu, and then click Export Wizard. The Export Wizard dialog box opens, as shown in Figure 6-1a.
FIGURE 6-1a:
First step of the Export Wizard
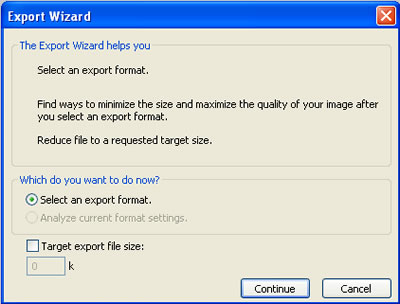
Note: If you select the Target Export File Size option, Fireworks attempts to optimize the file at that size by adjusting the quality of JPEG files, modifying the smoothing for JPEG files, changing the number of colors for GIF files, and changing dithering settings for GIF files. This feature is especially important when you want to create images or animated GIF files that don't exceed maximum file size limits for banner ads on commercial sites.
- Click the Target Export File Size check box, enter 15, and click Continue to go to the second step of the wizard, as shown in Figure 6-1b.
FIGURE 6-1b:
Second step of the Export Wizard
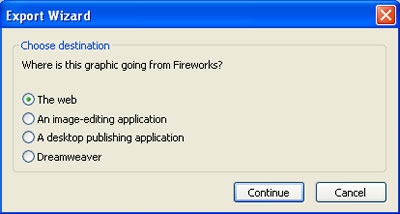
- This is where you select a destination type for the image. Make sure The Web is selected. Then click Continue to go to the final step of the wizard. The wizard recommends optimization settings based on your feedback, as shown in Figure 6-1b.
FIGURE 6-1c:
Analysis Results of the Export Wizard
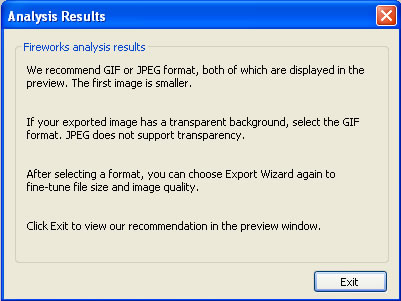
- Click Exit to go to the Export Preview window shown in Figure 6-1c. The upper-right panel displays the image in GIF format; the lower-right panel displays the image in JPEG format. The left panel shows the recommended optimization settings for the currently selected panel-in this case, the GIF format. Exporting now would export the file as a GIF file.
Figure 6-1d:
Export Preview window
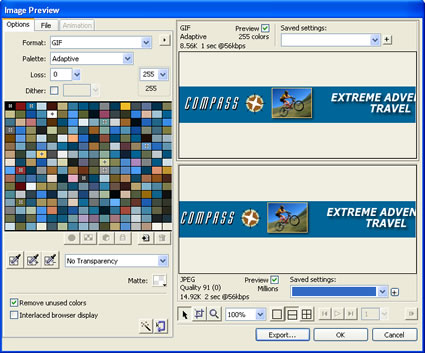
- Click twice (Windows-not a double-click) or click once (Macintosh) on the JPEG image in the lower-right panel to display the recommended JPEG settings. Exporting now would export the file as a JPEG file.
- Change back to the GIF settings by clicking twice (Windows) or clicking once (Macintosh) on the GIF image, and click Export. The Export dialog box opens.
- Make sure the new filename is banner.gif and that Images Only is selected in the Save as Type (Windows) or Save As (Macintosh) box.
- Display the folder to which you are saving course files, and click Save to export. A new file named banner.gif is placed in the folder.
- Close the banner6.png file. Do not save changes if you are asked. Leave Fireworks open for the next Step-by-Step.
Optimizing the Image
When you use the Export Wizard, Fireworks recommends optimization settings based on how you answer the wizard's questions. You can also select your optimization settings by using the Optimize panel. The first step is to determine which type of file you plan to export, such as GIF or JPEG. You can then select the detailed settings.
Exporting GIF images
GIF images are generally used for line art and images with solid colors. GIF images can contain transparent areas and can be used for animation files. If you choose GIF as your export file format, you need to pick the color palette for the export. The disadvantage of GIF images is that they are restricted to 256 colors.
When you export GIF images, you choose a color palette for the file. The color palette is a group of colors from which the image is created. Fireworks contains 10 preset palettes. The following list describes the default palettes:
- Adaptive: Creates a custom palette containing the majority of the colors in the image.
- WebSnap Adaptive (also called Web Adaptive on the Optimize panel): Creates a bridge between the Web 216 palette and the Adaptive palette. Colors within a tolerance of seven color steps are snapped to the closest Web-safe color.
- Web 216: A palette of the 216 colors that have a similar appearance on both Windows and Macintosh computers. This is sometimes called a Web-safe or browser-safe palette because it generates the most consistent results on different platforms and different browsers.
- Exact: Contains the exact colors in the image when the image contains 256 colors or fewer.
- Macintosh, Windows: Contains 256 colors as defined by either the Windows or Macintosh system colors.
- Grayscale: A palette of 256 (or fewer) shades of gray. Using this palette converts your image to grayscale.
- Black & White: A palette of only two colors: black and white.
- Uniform: A mathematical palette based on RGB pixel values.
- Custom: Gives the user the option of importing another color table (an *.act file). You can also import another GIF file that contains the colors you want to use.
-
STEP-BY-STEP 6.2: Selecting GIF Optimization Settings and Exporting a GIF File
- Open the compass logo6.png file from the data files supplied with this course.
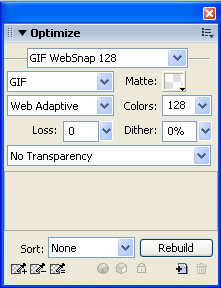
Click the Window menu, and then click Optimize to open the Optimize panel shown in Figure 6-2a. You can change the format for the exported file by using the Export File Format pop-up menu.
FIGURE 6-2a: Optimize panel
- Click the arrow on the Export File Format box. You see several formats, such as GIF, Animated GIF, JPEG, WBMF PNG, and TIFF, from which you can select.
- Make sure GIF is selected.
- Click the arrow on the Indexed Palette pop-up menu. As shown in Figure 6-2c, you see several color palettes from which you can choose.
FIGURE 6-2b:
Indexed palette pop-up menu
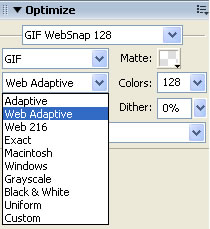
- Make sure Web Adaptive is selected. You can set the number of colors for the palette by using the Maximum Number of Colors pop-up menu. If you want a smaller file size, use a smaller number. If you pick a number that is smaller than the actual number of colors in the image, some colors are lost. The pixels with the lost colors are converted to the closest remaining colors on the palette.
- Make sure Maximum Number of Colors is set to 128. You can enter a dither amount if you want that option.
- Make sure Dither is set to 0%. If your image was intended to include transparent areas, you could use Index Transparency to create the transparent areas based on color. You could also click the Matte box and use the eyedropper to pick a color that is used as the background color when exported.
Note:
Dithering is a process of approximating colors not on the current palette. A dithered image often looks "noisy" (grainy); however, dithering can help smooth the banding created by a gradientlike transition of colors.
- Make sure No Transparency is selected.
- Click Rebuild to update the palette based on your current selection and the colors in your image.
- Click the File menu, and then click Export to open the Export dialog box.
- Make sure the new filename is compass_logo6.gif and that Images Only is selected in the Save as Type (Windows) or Save As (Macintosh) box.
- Display the folder to which you are saving course files, and click Save to export. A new file named compass_logo6.gif is placed in the folder.
- Close the compass_logo6.png file. Do not save changes if you are asked. Leave Fireworks open for the next Step-by-Step.
Hot Tip: For even more optimization settings; open the Options menu on the Optimize panel. For example, you can choose Remove Unused Colors to create the smallest file with the least number of colors. Or choose Interlaced if you want images to partially load in the browser at a low resolution and then transition to full resolution as they continue to download.
Exporting as JPEG
Use JPEG to export photographs or any artwork with gradations or millions of colors in the image. JPEG files cannot be transparent or animated. Unlike GIF images, JPEG images don't need a color palette. JPEG uses a lossy compression scheme, meaning it looks at your image and removes information as part of its compression algorithm. This causes a loss in quality. You set the level of quality for the compression on the Optimize panel.
-
STEP-BY-STEP 6.3: Selecting the JPEG Optimization Settings and Exporting a JPEG File
- Open the girl_pumpkin6.png file from the data files supplied with this course.
- On the Optimize panel, make sure the Export File Format pop-up menu is set to JPEG. The Optimize panel displays settings for JPEG files, as shown in Figure 6-7. JPEG images are always saved in 24bit color, so you can't optimize a JPEG image by editing its color palette. The color table is empty when a JPEG image is selected.
FIGURE 6-3:
Optimization settings for the JPEG format
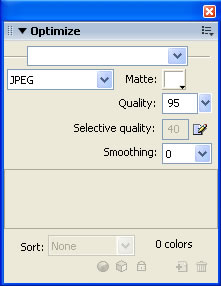
- Highlight the value in the Quality box and enter 100. Quality determines the amount of data loss when compressing the file. The lower the number, the greater the compression and the smaller the file, but the poorer the quality of the image.
- Make sure the value in the Smoothing box is 0. Smoothing blurs the hard edges of the image, which do not compress well in JPEG format. The higher the number, the greater the blurring and the smaller the files.
- Click the File menu, and then click Export to open the Export dialog box.
- Make sure the new filename is girl_pumpkin6.jpg and that Images Only is selected in the Save as Type (Windows) or Save As (Macintosh) box.
- Display the folder to which you are saving course files, and click Save to export. A new file named girl_pumpkin6.jpg is placed in the folder. Remain in this screen for the next Step-by-Step.
Hot Tip: For even more optimization settings, open the Optimize panel Options menu. You can choose Progressive JPEG, which is a JPEG format that supports a higher compression rate. Some browsers and image-editing programs might not support this format. Or you can choose Sharpen JPEG Edges to preserve edges between two colors. You can use this option to preserve the crispness of text against a solid color. This option increases the file size.
Previewing in the Workspace
You can preview your images within the Document window before exporting them. The Preview button (Windows) or tab (Macintosh) displays the graphic as it would appear in a Web browser, based on your optimization settings. You can even preview rollover and navigation behaviors, as well as animation.
By splitting the window into two or four preview panes, you can compare multiple optimization settings side by side before exporting. Fireworks also displays the file size and the approximate download times within each preview window.
-
STEP-BY-STEP 6.4 Previewing an Image
- Click the Preview button (Windows) or tab (Macintosh) at the top of the Document window. With Optimization set to JPEG, you see what the girl_pumpkin6.jpg file will look like in a browser. Because the Matte Color is set to white, the image will look best when placed over a white background.
Hot Tip:
Because this image has a feathered edge and JPEGs cannot be transparent, you'll want to make sure the Matte Color you select is the same as the background where you plan to use the exported image.
- Click the 2-Up button (Windows) or tab (Macintosh). This divides the document into two panes. Size the Document window so you can see both panes. Use the Preview pop-up menu at the bottom of each pane to make sure one pane is showing the Original image and the other pane is showing the Export Preview (JPEG).
- Click the 4-Up button (Windows) or tab (Macintosh). This shows one original and three JPEG preview options, as shown in Figure 6-8.
You can compare various settings by selecting a pane and then changing settings for that image on the Optimize panel.
The original image appears in the left pane when 2-Up is selected. It appears in the upper-left quadrant when 4-Up is selected.
FIGURE 6-4:
Preview window showing 4-Up tab
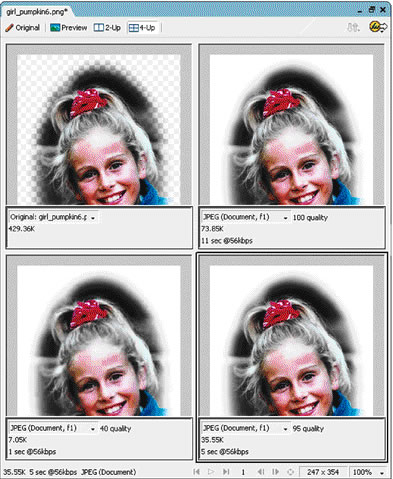
- Click the preview image in the lower-left corner, highlight the value in the Quality box on the Optimize panel, and enter 40. At 40 the file size is much smaller, but the quality isn't very good. You can compare the results of different optimization settings by experimenting with the preview panes.
- Click the preview image in the lower-right corner and change the JPEG quality to 95. At 95, the file size and download times are much better than before, and the image quality still looks good.
- Click the Original tab to accept the settings in the selected preview pane. The JPEG quality is now set to 95 for the original file.
- Close the girl_pumpkin6.png file. Do not save changes if you are asked to. Leave Fireworks open for the next Step-by-Step.
Using Quick Export
The Quick Export button, located in the upper-right corner of the Document window, offers easy access to common options for exporting Fireworks files to other applications. By using the Quick Export button, you can export to a variety of formats, including Macromedia applications and other applications such as Microsoft FrontPage.
For example, you can export Dreamweaver HTML, or you can export a Macromedia Flash SWF file.You can even use the Quick Export button to launch other applications or to preview Fireworks documents in a preferred browser. By streamlining the export process, the Quick Export button saves time and improves the design workflow.
When you use the Quick Export button, Fireworks exports graphics and slices with the settings you specify on the Optimize panel, so be sure you've optimized your graphic before using Quick Export.
-
STEP-BY-STEP 6.5: Using Quick Export
- Open the adventure_travel6.png file from the data files supplied with this course. This file was designed to be an entire HTML page, so use the Quick Export button to export the file as Dreamweaver HTML.
- Click the Quick Export button to open the Quick Export pop-up menu shown in Figure 6-5.
FIGURE 6-5:
Quick Export button and pop-up menu
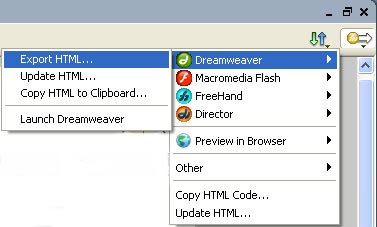
- Point to Dreamweaver, and then click Export HTML.
- Make sure the new filename is adventure6.htm and that HTML and Images is selected in the Save as Type (Windows) or Save As (Macintosh) box. Export Slices should be selected in the Slices box.
- Make sure Include Areas Without Slices is selected.
- Navigate to the Adventure Travel folder in your Student Work folder, and click Save to export. A new file named adventure6.htm is placed in the folder, along with several related images. You can open this file in a Web browser and try it out.
- Close the adventure_travel6.png file. Do not save changes to the file if you are asked.
 Back to Lesson 5: Creating Buttons Back to Lesson 5: Creating Buttons
 Go to next section: Lesson 7: Creating Animations Go to next section: Lesson 7: Creating Animations
|
