Lesson 2: The Macromedia Flash Workspace
Upon completion of this unit, you should be able to:
- Understand the purpose of the five main areas of the Flash workspace: Stage, Toolbar, Panels, Timelineand Property Inspector.
- Open, close, and configure the panels in your workspace.
- Work with Flash menu items
- Use layers.
- Use drawing tools such as the Rectangle tool.
- Use the Property inspector to modify an object's properties.
 The Flash Workspace The Flash Workspace
The Macromedia Flash MX 2004 workspace is divided into five general areas. These are shown in Figure 2-1 and then described.
FIGURE 2-1:
The Macromedia Flash workspace
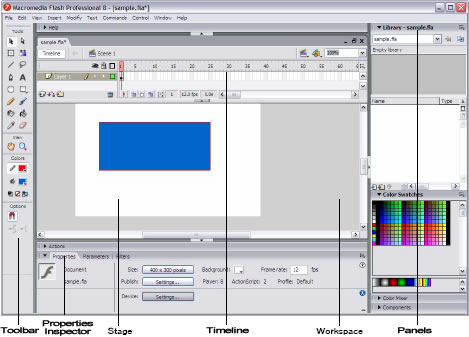
- Stage: The Stage is where you draw and import artwork, add text and sound, and add additional features such as navigation buttons or other user-interface components.
- Toolbar: The toolbar contains the tools for creating, placing, and modifying text and graphics.
- Panels: Panels in Flash help you view, organize, and modify the elements in the document.
- Timeline: The Timeline organizes and controls a document's content over time.
- Property inspector: The Property inspector enables you to specify the properties of a selected object.
Depending on whether you are a designer or a developer, you may choose to have a different collection of panels open while you work. There are several sets of panels available from the Window menu.
Design Panels
In Flash, as with other products in the Macromedia Studio suite, you can customize the workspace to your desires. If you later find you need to change the panel set, you can do so through the Window menu. Point to Panel Sets on the Window menu and then select the desired panel set from the list that appears. Notice that Default Layout is also an option. This will set your screen to panel sizes that match your monitor resolution if the one you selected does not match.
-
STEP-BY-STEP 2.1: Configuring the Flash Workspace
- Start Flash. The Start Page appears.
- Select Flash Document in the Create New center panel of the Start Page.
- You can select a different panel set to meet your work needs. Click the Window menu, point to Common Libraries, and then click Buttons. A
new panel will appear in the center of your workspace. Notice that you can drag the panel to whatever location you like.
-
Click the Options menu in the upper right hand corner of the Library - Buttons panel. (The Options menu looks like three bullets with straight lines - see arrow below)
FIGURE 2-1a:
New Panel - Library - Buttons
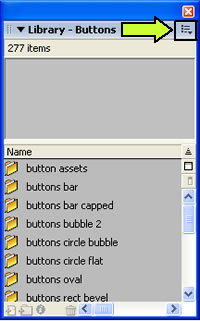
- Select Group External Library With and click Library
- The Library - Buttons panel now docks in the Panels section of the workspace, grouped with the existing Library panel.
- Once you have the Panels you want for your Custom workspace you can save the settings. Click the Window menu select Workspace Layout and click Save Current. Type in the name Custom for this Workspace Setting in the Dialog Box.
FIGURE 2-1a:
Save Workspace Layout dialog box
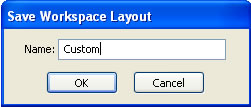
- Click OK
- Click the Window menu select Workspace Layout and click Default. This returns the panels layout to the default setting.
- Click the Window menu select Workspace Layout and click Custom. This returns the panels layout to the default setting.
Note: You may edit your custom setting at any time.
- Click on the Library tab of the Library panel. Notice that a new tab called "External Library" has been added to the Library panel. You can create tabs for other panels you wish to group in your panels section of the workspace.
- Remain in this screen for the next Step-by-Step.
Opening and Closing Panels
You can close panels that you do not use frequently. For example, you might want to close the Info panel because the majority of this panel's information is also in the Property inspector. If you need to consistently open and use a panel that is not part of your workspace, you can add that panel to your workspace. For example, you might want to add the Actions panel to your workspace.
-
STEP-BY-STEP 2.2 Closing and Opening a Panel
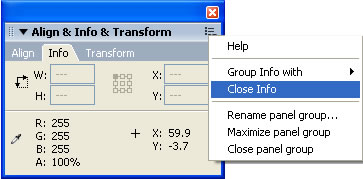
- Click Window, and then click Info to open the Info panel. (You can click the title bar of any panel to expand or collapse it.)
- Click the Options menu in the upper-right corner of the Info panel and click Close Info, as shown in Figure 2-2a. Notice the tab for Info disappears.
FIGURE 2-2a:
Closing the Info panel
- Display the Info tab again by clicking on the Window menu, and then clicking Info.
- Add the History panel to the Stage by clicking the Window menu, then select Other Panels, and then click History. The History panel appears on the Stage, undocked.
- Click the grip to the left of the panel title, as shown in Figure 2-2b. Your pointer changes to a fourheaded arrow. Drag the Actions panel between any two panels on the right. When you see a dark outline with a heavy line between the panels, drop the Actions panel. The panel docks with the panels to the right.
FIGURE 2-2b:
Moving the History panel
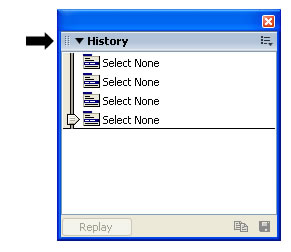
- Click the History panel grip again and drag the panel above the Property inspector at the bottom of the Stage. When you see a dark outline over the Property inspector, drop the History panel. The History panel appears expanded above the Property inspector.
- Click the History panel title bar. The History panel collapses. Drag the History panel back to the right hand panels.
- Notice that, by default, the Actions panel is located below the stage, above the Property Inspector.Click the Actions panel title bar. The Actions panel expands. Click the Actions panel title bar again. The Actions panel collapses.
- Click the Property inspector title bar. The Property inspector collapses, revealing more of the Stage, as shown in Figure 2-2c.
FIGURE 2-2c:
Collapsed Actions panel and Property inspector
- Click the Property inspector title bar again. The Property inspector opens.
- Save the new layout as your Custom Workspace Layout. Click on the Window menu, select Workspace Layout, and click Save Current. Type in "Custom" in the Save Workspace Layout dialog box and click OK. Flash will prompt that you already have a Workspace Layout saved with this name and select Yes to overwrite it with the new layout specifications.
- Remain in this screen for the next Step-by-Step.
Working in Flash
The Step-by-Steps in the following section and the rest of this lesson provide a short introduction to Flash through hands-on activities. Many of the steps are open-ended so you can explore the Flash interface and tool set prior to starting the project you will work on throughout
the rest of this unit.
In your open Flash workspace, notice the title bar at the top of the window, displaying the document title. When you first open Flash, you have a new document named Untitled-1 until you save the file with a new name. Subsequent new documents are named Untitled-2, Untitled-3, and so on, until you exit Flash.
The menu bar at the top of the display contains access to all the tools, panels, and options within Flash and contains many of the design element and manipulation functions.
As you've learned, the Stage contains all the elements that make up a Flash document. It defines the border of the final file you create (the SWF file). The contents of the Stage reflect the frame currently on the Timeline.
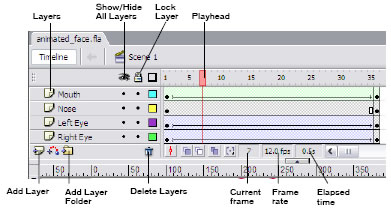
The Timeline shown in Figure 2-3 is an example of an animation and illustrates many of the features you will see and use in this unit. The Timeline is a key organizational and navigational tool for your animations. Here graphics are animated over time. You coordinate the timing of the animation and assemble the artwork in separate layers on the Timeline.
FIGURE 2-3:
Flash Timeline Lock/Unlock all layers
-
STEP-BY-STEP 2.3 Exploring the Flash Interface
- The Flash workspace should still be open. Click Edit on the menu bar and review the options on this menu. You can click outside the menu to close it.
- Click the Insert menu and review the options on this menu.
- Click the Modify menu and review the options on this menu.
- Click the Control menu and review the options on this menu.
- Explore any of the other menus or submenus. This will familiarize you with the menu selections and locations and will aid you in accomplishing tasks in the future.
- Position and hold the pointer over the icons on the Timeline to read the TooITips. Remain in this screen for the next Step-by-Step.
Layers
Layers are a way of organizing the objects on the Stage, much like a stack of transparent sheets for an overhead projector. You must use separate layers to draw overlapping shapes. Each layer has controls for hiding or showing the layer, locking it (so you won't accidentally move its contents), and displaying its contents as outlines.
-
STEP-BY-STEP 2.4: Exploring Layers
- Click the File menu, and then click Open.
- Navigate to the data files provided for this lesson. In the Sample-Movie folder, double-click Bouncing-Ball.fla.
The Bouncing Ball document opens. Notice that two layers are listed on the Timeline: Text and Ball, as shown in Figure 2-6.
FIGURE 2-6
Workspace for the Bouncing Ball document
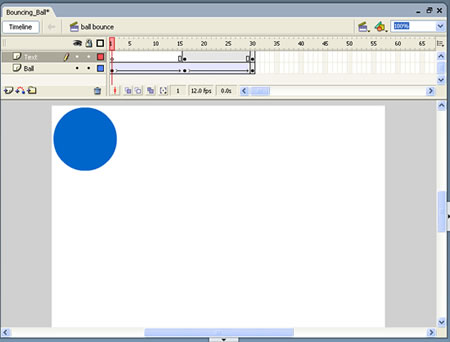
- Click the Control menu, and then click Play. The short document plays.
Note: If you cannot see the entire Stage, collapse the Property Inspector by clicking the arrow on the left side of its title bar.
- Click the Show/Hide Layer column (the eye) next to the layer named Ball. The ball disappears from the Stage. A red X appears in that space, indicating that the layer is hidden from view.
- Click Control, and then Play, or press Enter (Windows) or Return (Macintosh). The only visible object is the text.
Note:
Pressing Enter (Windows) or Return (Macintosh) again pauses the playback. You can continue to use the Enter/Return key to play and pause the animation.
- Click the Show/Hide Layer column next to the Ball layer to view the layer again.
- Explore the Timeline.
- Move the playhead to the first frame, and then using the Control menu, click Step Forward One Frame and Step Backward One Frame to advance and back up one frame at at time. (You can also
use the period and comma keys on the keyboard to advance or back up one frame at a time.)
- Click the pointer in frames on the Timeline and on objects on the Stage. How does the icon change?
- Notice where the Pencil icon appears when you click different layers. Note what appears on each layer.
- Close the Bouncing Ball document. Do not save any changes. Remain in this screen for the next Step-by-Step.
Working with the Drawing Tools

The toolbar, shown in Figure 2-5a on the left, contains tools you'll need for creating and manipulating graphics to make animations. The Tools section (at the top) contains drawing, painting, and selection tools.
The View section contains tools for zooming and panning the application window.
The Colors section contains modifiers for the selected tool that affect that tool's stroke and fill colors.
The Options section contains particular settings you can add to tool functionality, such as straightening lines or curving edges of shapes.
Hot Tip: To create a perfect shape (i.e., a perfect square or a circle instead of an oval), hold down the Shift key as you drag to create the shape.
Using the Rectangle Tool
You can use the Rectangle tool to draw rectangular shapes, including squares. When you draw a rectangle, you draw both an outline of the shape and its fill.
-
STEP-BY-STEP 2.5: Using the Rectangle Tool
- If necessary, click Create New Flash Document on the Start page to create a blank document.
- Expand the Color panel by clicking on the title bar.
- In the Colors section of the toolbar, click the Stroke Color (the pencil) pull-down menu and select a light blue color.
- Click the Fill Color pull-down menu in the Colors section of the Tools toolbar and select a dark blue color.
Note: You can also select the colors for the Stroke and Fill from the Color Swatches panel.
- Click the Rectangle tool. The pointer turns into crosshairs.
- Drag the pointer across the middle of the Stage to draw a rectangle similar to the one shown in the middle of Figure 2-5b.
FIGURE 2-5b:
Creating and coloring rectangles
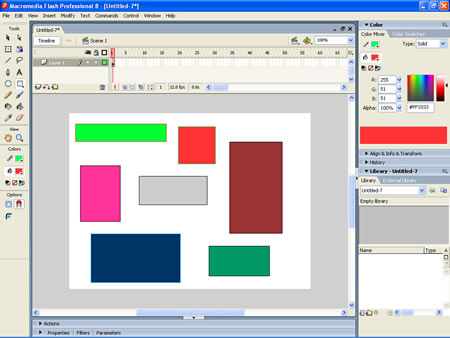
- Continue to use the Color tools, the Rectangle tool, and the Color Swatches panel to select colors and create rectangles using Figure 2-5b as a guide for your placement and colors. Remain in this screen for the next Step-by-Step.
Note: If you create an object you don't want, click the Edit menu, and then click Undo.
Hot Tip: If the Color Swatches panel does not contain the exact color you want, you can use the Color Mixer panel to select the specific color you need.
Changing Object Properties
You can specify the properties of an object, such as its color, line width, or font size, with the Property inspector that appears below the Stage.
You use the Selection tool to select the stroke or fill of one of the rectangles. Four types of selections can occur on a shape:
- Double-clicking the fill area selects the entire object (the fill and stroke); then the entire object can be edited (including its size, shape, and location).
- Clicking the fill area selects just the fill.
- Double-clicking the border selects the entire border (stroke).
- Clicking the border selects one side of the border
-
STEP-BY-STEP 2.6: Modifying the Properties of an Object
- Click the Selection tool at the top left of the toolbar (the black arrow).
- Double-click the rectangle in the middle of your Stage.
- Make sure the Property inspector panel is open. The Property inspector should appear similar to that shown in Figure 2-6.
FIGURE 2-6:
Property inspector for a rectangle object
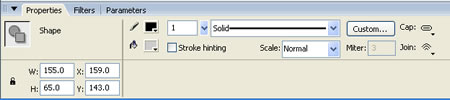
- Experiment with modifying the rectangle's properties. Using the Selection tool and the selection techniques described earlier, modify the following anyway you'd like:
- Stroke color
- Stroke height
- Fill color
- Rectangle width and height (using the W: and H: boxes)
- Rectangle location on the Stage (using the X: and Y: boxes)
- When you finish, save the document as rectangles_your_last_name and submit a copy to your instructor.
- Close the document and exit Flash.
 Back to previous page: Lesson 1: Introduction to Macromedia Flash Back to previous page: Lesson 1: Introduction to Macromedia Flash
 After this lesson, you should complete the following After this lesson, you should complete the following
- Test on Flash Lesson 2: The Flash Workspace
- Project 11: Text Animation
Go to next section: Lesson 03: Creating a Logo
|
