Lesson 10: Integrating Components and Dynamic Text Boxes with the Animated Map
Upon completion of this unit, you should be able to:
- Add controls to the map.
- Use Flash components to build a combo box for directions to the Gallery
- Configure a dynamic text box to hold directions sent from ActionScript.
- Work with ActionScript to process a user selection
- Integrate and animate the Visit section onto the main Timeline.
Creating Controls for the Animated Map
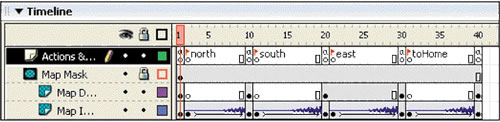
Figure 10-1a shows the Timeline for an animated map with four sections of motion tweens. These are the motion tweens you created for the Map movie in the previous lesson. There actually five states for the animated map:
- A starting point showing the Gallery location
- Coming from the north
- Coming from the south
- Coming from the east
- Coming from the city of San Francisco
FIGURE 10-1:
Motion tweens in Map movie clip
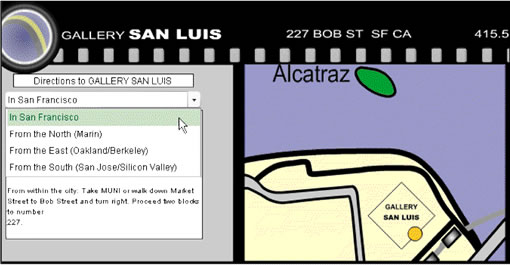
Users need a way to control when each section activates. You could create four buttons to the left of the map, but that would leave little room to add directions from the various points. A solution to this design problem is to create a combo box to the left of the map. You should be familiar with the combo box control, which is a common item you see in dialog boxes. A combo box consists of a text box in which the user can key information along with a drop-down list box that contains options the user can select.
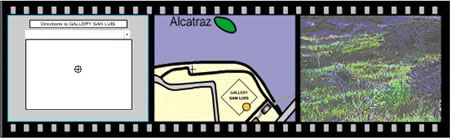
When users select the appropriate direction option in the combo box, their selection sends the map animation to the corresponding frame and populates a text box with driving directions, as shown in Figure 10-1b.
FIGURE 10-1b:
Combo box driving content and animation
Similar to creating the Map movie clip, you can create a new movie clip symbol for the driving directions and work on it in symbol-editing mode before integrating it into its cel in the Fstrip Visit movie clip.
 Creating Controls for the Animated Map Creating Controls for the Animated Map
-
STEP-BY-STEP 10.1 Creating the Directions Movie Clip
- Start Macromedia Flash and open the home.fla file you worked with in Lesson 9, which should be in the build GallerySanLuis folder.
- Make sure the Library panel is open.
- Select the Cel Background movie clip and then choose Duplicate from the Library options menu. The Duplicate Symbol dialog box opens.
Note:
If you had problems with the previous lesson, ask your instructor for the home6.fla sample solution file. Once you open this file, save it as home.fla in your build_GallerySanLuis folder and proceed with this lesson.
- Name the new symbol Directions Movie and click OK. The symbol is in the library.
- Double-click the icon beside the Directions Movie symbol in the library to enter symbol-editing mode.
- Make sure the gray rectangle is centered vertically and horizontally on the Stage and lock theBackground layer.
- Insert a layer above the Background layer and rename it Combo Box.
- Save the document and remain in this screen for the next Step-by-Step.
Working with Flash Components
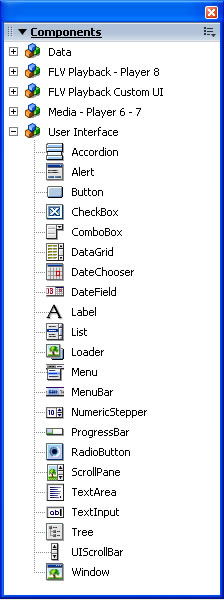
Flash features ready-made movie clips called components. Components are like templates for creating commonly used movie clip controls such as check boxes, drop-down menus, and buttons. You can use components to quickly develop complex items such as multiple-choice quizzes, e-mail forms, or-for this project-a drop-down list box that contains options for driving directions to Gallery San Luis. You find components on the Components panel (accessed through the Window menu) shown in Figure 10-2a, which is like a library for components.
Hot Tip: Macromedia has more components available on its Web site at www.macromedia.com/devnet/mx/flash . When you download new components, they appear as menu items on the Components panel.
FIGURE 10-3:
The Components panel
-
STEP-BY-STEP 10.2
Inserting and Configuring a Component
- Click the Components panel title bar to expand the panel. If the Components panel is not in your panel set, click the Window menu and then click Components.
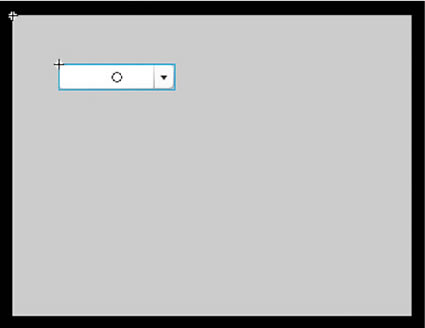
- Drag an instance of the ComboBox component onto the Stage. The ComboBox component is in the User Interface Components folder of the Components panel. The Stage will look similar to Figure 10-2b.
FIGURE 10-2b:
The ComboBox component added to the Stage
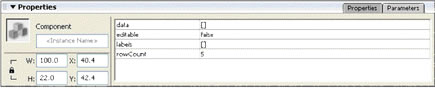
- The Property inspector enables quick customization of the look and content of a component. Click the Parameters tab. This is where you add labels for the combo box items, as shown in Figure 10-5. Leave the editable line set to false because users will have no need to change or copy the menu items.
FIGURE 10-2c:
Property inspector for the ComboBox
- Click the labels row and then click the magnifying glass to open the Values dialog box.
- Click the Add (+) button to add a line of text to the combo box. A line appears with the value of defaultValue.
- Key In San Francisco for the line value.
- Use the Add (+) button to add the following lines to the combo box, as shown in Figure 10-2d. (Note that Macintosh users will not see the line numbers.)
Line 1: From the North (Marin)
Line 2: From the East (Oakland/Berkeley)
Line 3: From the South (San Jose/Silicon Valley)
FIGURE 10-2d:
Component labels added
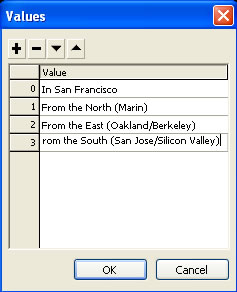
- Click OK to close the Values dialog box and enter the lines and values you created.
- Leave the Data row empty (no values are associated with the text in the combo box) and the rowCount (number of items to display before adding a scroll bar) at 5.
- On the Property inspector, click in the Instance Name box and key combo.
- Make sure the constrain padlock icon is unlocked and set the width of the combo box to 260. Leave the height set to 22.
Note:
Naming the instance is different from naming a movie clip symbol when you create it. The instance name is the name used for the combo box in ActionScript. The convention is to make this name one word and lowercase.
- On the Align panel, make sure the To stage button is set to On, and then click Align horizontal center. The combo box moves to the center of the Stage.
- Save your changes and remain in this screen for the next Step-by-Step.
Labeling a Component
You can insert a title above the combo box so users know what it is for.
-
STEP-BY-STEP 10.3: Inserting a Title Above the Combo Box
- Insert a new layer above the Combo Box layer and name it Text.
- Select the Text tool and click to add a text box just above the combo box.
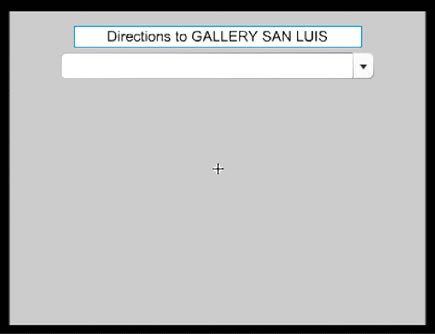
- Set the font to Arial, l2 pt., centered, black text, center aligned, and key Directions to GALLERY SAN LUIS.
- Click the Selection tool. On the Align panel, align the text box to the horizontal center of the Stage.
- Use the Selection tool and the arrow keys to select and vertically align the text box and combo box as shown in Figure 10-3.
FIGURE 10-3:
The text box and combo box aligned
- Save the document and remain in this screen for the next Step-by-Step.
Working with Dynamic Text
The next challenge is to create one text box that can hold different driving directions based on the user's selection from the combo box. You could make a big text box that users would have to scroll through to find the appropriate driving directions, but that would be difficult for users to navigate and it would defeat the purpose of the combo box. Instead you will use a dynamic text box that changes its text depending on what direction a user picks from the combo box. A dynamic text box gets its text from ActionScript, a database, or another external text source. Dynamic text boxes are typically used on the Web to hold information that is constantly changing, such as sports scores or stock prices. Creating a dynamic text box is easy-you use the now familiar Text tool.
-
STEP-BY-STEP 10.4 Creating a Dynamic Text Box
- Make sure you are on the Text layer, and select the Text tool.
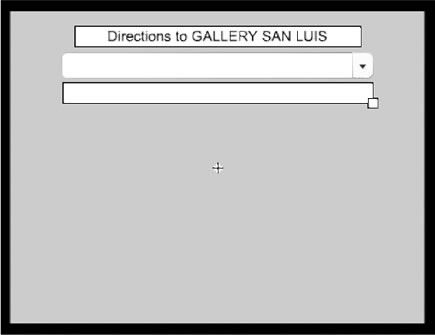
- Click below the combo box and drag to create a text box approximately the same width as the combo box, as shown in Figure 10-8.
FIGURE 10-4a:
The text box inserted
- On the Property inspector, select the following settings:
Text type: Dynamic Text (from Static Text)
Font: Arial Size: 11 pts.
Alignment: Left
Line type: Multiline
Text options (the buttons to the right of the Line type): Selectable (this allows users to copy directions from this box), Render text as HTML, and show border around text.
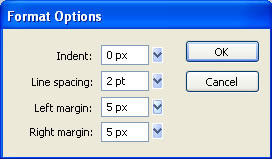
- Click the Edit Format ( ¶ ) button (next to the Justify button) and set the following in the Format Options dialog box, as shown in Figure 10-4b:
Line Spacing: 2 pt.
Left Margin: 5 px.
Right Margin: 5 px.
FIGURE 10-4b:
The Format Options dialog box
- Click OK (Windows) or Done (Macintosh) to close the Format Options dialog box.
- In the Var (Variable) box, key directions. Setting a variable name tells Flash which text box will receive the text for the selected directions. This is different from the instance name in that the instance name is used in ActionScript to control the entire text box (its position, color, and such), not its contents. Variables are discussed in more detail later in this lesson.
- Double-click in the text box, and then drag the handle (the box in the lower-right corner) of the text box to stretch the box to near the bottom of the background.
- Click the Selection tool, which selects the text box. Then, on the Property inspector, set W: to 260 and H: to 170. Adjust the position of the box as needed to line up under the combo box.
- Save the document and remain in this screen for the next Step-by-Step.
Tying It All Together with ActionScript
The three interacting components are now in place:
- The combo box, named combo, which holds four possible directions from which the user can select.
- The dynamic text box, which is named with the variable directions for its contents.
- The Map movie clip, which is configured with four animations: east, south, north, and toHome (San Francisco) directions.
To tie these three elements together, you create ActionScript in a frame of the Directions Movie movie clip.
-
STEP-BY-STEP 10.5:
Creating ActionScript for the Directions Movie Clip
- Create a new layer above the Text layer and rename it Actions.
- Expand the Actions panel. You might also want to drag the top border of the panel to lengthen the Script pane, as shown in Figure 10-5a.
FIGURE 10-5a:
Resizing the Actions panel
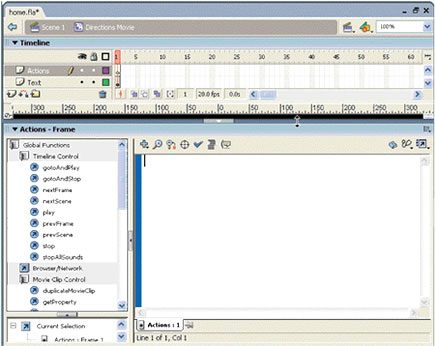
- Click in the Script pane and key // Create variables for the four different directions text. Press Enter (Windows) or Return (Macintosh). This is just a comment, which merely explains the scripting that follows. It does not affect the final document; it's more of a note to the reader.
- Key sf = "Gallery <b>SAN LUIS</b> is located at 227 Bob Street in the South Beach neighborhood of San Francisco, California. <br><br>If you are coming from outside the city, select a direction from the drop box above. <br><br>From within the city: Take MUNI or walk down Market Street to Bob Street and turn right. Proceed two blocks to number 227:"
- Follow Table 10-1 to check the variable you just created. Now, use the table to create the variables for north, east, and south. (Key north = "From Marin, etc." {Be sure to include quotation marks around the text value.})
TABLE 10-5b: Variable values
Hot Tip: Seeing all the text, in the Script pane might be difficult. Use the arrow keys to scan the text for errors after typing. Or click the ' View Options button above the Script pane, and click Word Wrap.
Note: <br> indicates a line break.
- When you finish creating the four variables, add a new comment. Key // Sets the default value for the dynamic text box variable "directions:" Press Enter (Windows) or Return (Macintosh).
- Key directions=sf;
- Press Enter (Windows) or Return (Macintosh).
- To add another comment, key //Create a function to take a user's selection from the combo box, set the correct directions in the text box, and send the map animation to the correct frame.
- Press Enter (Windows) or Return (Macintosh).
- Save your work and remain in this screen for the next Step-by-Step.
Variables are amazingly useful in ActionScript and many other scripting languages. They are short words that can refer to a larger amount of information or a calculation. You know it's time to start using variables when you have certain objects in your movie that need to change to specific values with user input. For example, a movie clip of a shirt might have a color variable that changes based on a user's selection, or a spaceship movie clip could have a speed variable that increases as a thrust button is pressed. In your Fstrip Visit movie clip, you will use the variables listed below.
Creating the ActionScript
There are a couple of ways to get the ActionScript for the map to work, but one of the most common is to search a reference Web site such as www.macromedia.com/devnet/mx/flash or www.flashkit.com for preconfigured scripts. On these sites you can find ActionScript for common objects such as combo boxes. When you download a preconfigured ActionScript, you will usually have to customize certain variables and path names to your document. An example ActionScript that meets your needs for this project is supplied with the data files for this unit. This script is given to you in a generic form as you might find it on a Web site. You will copy this ActionScript and paste it into the Script pane. Then you will have to edit it to meet your needs, just as you would a downloaded script.
-
STEP-BY-STEP 10.6
Creating Action Script from an External Source
- Open a text-editing program such as WordPad, Notepad, or TextEdit.
- Choose Open from the File menu and navigate to the scripts folder (in your build_GallerySanLuis folder). Select the visitScript.txt file and click Open.
- Select all the text in the file, click the Edit menu, and then click Copy.
- Close the text editor and switch to Macromedia Flash. Click the Script pane on the Actions panel to activate it.
- Right-click (Windows) or Control-click (Macintosh) in the Script pane after the last comment and choose Paste.
- The script is inserted into the Script pane in generic form. You will now customize the script.
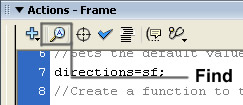
- Click the Find button at the top of the Script pane, as shown in Figure 10-6b. The Find and Replace dialog box opens. Here you can replace all general names with the proper names from your file.
FIGURE 10-6b:
The Find button
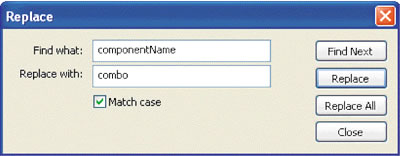
- In the Find what text box, key componentName. This is the general name from which a component gets data. In our case, the component name is combo.
- In the Replace with text box, key combo.
- Click Match case to select it, and then click Replace All, as shown in Figure 10-6c.
FIGURE 10-6c:
The Replace dialog box
- When the search and replace is complete, click OK in the message box that appears indicating that the process has finished.
- Repeat steps 8-11 to replace the items listed in Table 10-6d.
TABLE 10-2: Customizing script code
- When you have replaced all the text, click Close to close the Replace dialog box.
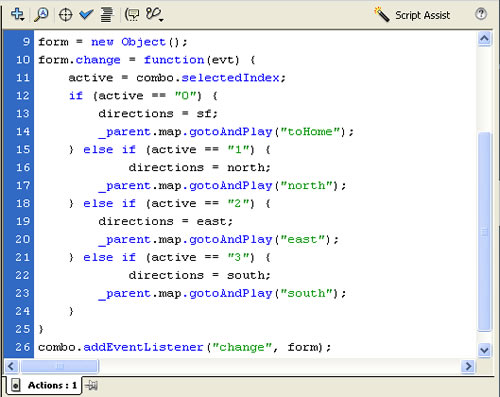
- Inspect your text to make sure it looks like Figure 10-6e below.
(Check this carefully now - word by word - to avoid problems later.)
- Collapse the Actions panel.
- Click on Scene 1 on the Information bar to close the Directions Movie movie clip.
- Save the document and remain in this screen for the next Step-by-Step.
FIGURE 10-6e: Completed ActionScript
Finishing the Fstrip Visit Movie Clip
You have almost finished the visit section of the site. You need to update the right cel, and then you will integrate the entire movie clip into the main site.
-
STEP-BY-STEP 10.7
Filling the Right Cel of the Fstrip Visit Movie Clip
- On the Library panel, double-click the icon beside the Fstrip Visit movie clip to open it in symbolediting mode.
- Click the image in the right cel. Click File, point to Import, and then click Import to Stage.
- Navigate to the images folder, and double-click grasses.jpg. The grasses.jpg image is imported into the Fstrip Visit movie clip on the Right layer. On the Property inspector, change the size of W: to 345 and H: to 260.
- Line up the grasses.jpg image over the artist.jpg image on the Right layer.
- Click the Edit menu, and then click Cut to place the grasses.jpg file on the Clipboard.
- Delete the artist.jpg image from the right cel, click the Edit menu, and then click Paste in Place. The grasses.jpg file is pasted in the correct location on the Right layer.
- Repeat steps 4-6 for the following items:
Map movie clip: Drag from the library and replace image on the Center layer.
Directions Movie movie clip: Drag from the library and replace the background on the Left layer. The Fstrip Visit movie clip should now look like Figure 10-7.
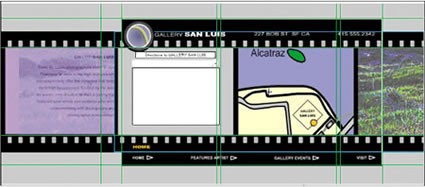
FIGURE 10-7:
Fstrip Visit movie clip configured correctly
- Click the Map instance on the Center layer.
- Make sure the Property inspector is expanded, and enter map in the Instance Name text box. The path name you configured in the ActionScript for the Directions Movie now has the correct target. (Although the symbol has been named map, this name is not recognized in ActionScript. You must give an instance an instance name to target it in ActionScript.)
- On the Information bar, click Scene 1.
- Save the document and remain in this screen for the next Step-by-Step.
Integrating the Fstrip Visit Movie Clip onto the Main Timeline
Most of the following steps will be familiar from Lesson 8. You can try doing this section on your own for a challenge.
-
STEP-BY-STEP 10.8
Creating a Motion Tween for the Fstrip Visit Section
- Inside the Filmstrip folder on the Timeline, insert a new layer above the Artist layer. Rename the new layer Visit.
- With the Visit layer selected, select the Fstrip Visit movie clip symbol from the Library panel and drag an instance of it onto the Stage.
- On the View menu, point to Guides, and then click Show Guides if necessary to turn the guides on.
- Drag the Fstrip Visit movie clip until it is within the vertical guides of the filmstrip area. (You might need to zoom out to see the guides better.)
- To adjust the horizontal placement of the Fsrip Visit movie clip, use the arrow keys on the keyboard to slide the movie clip horizontally until the left edge of the left cel is just beyond guide line, as shown in Figure 10-8.
FIGURE 10-8:
Aligning the Fstrip Visit movie clip on the main Stage
- Click and drag frame 1 of the Visit layer to frame 21 of the same layer.
- Click frame 25 of the Visit layer, click Insert, point to Timeline, and then click Keyframe.
- Click frame 30 of the Visit layer, click Insert, point to Timeline, and then click Keyframe.
- Click frame 21 of the Visit layer.
- Using the Selection tool, hold down Shift and drag the Fstrip Visit movie clip to the left until the left cel is off the Stage. (Holding down the Shift key lets you drag something in a perfectly straight line so its vertical position doesn't change.)
- Click the keyframe in frame 25 of the Visit layer.
- Hold down Shift and drag the filmstrip to the right until the right cel is to the right of the Stage.
- Click frame 21 of the Visit layer.
- On the Property inspector, choose Motion from the Tween menu.
- Click frame 25 of the Visit layer. On the Property inspector, add a motion tween there.
Note:
Because you inserted keyframes in frames 11 and 21 of the Page Name layer, frames 1-10 still have the HOME title and frames 11-20 still have the FEATURED ARTIST title.
- Save your work and remain in this screen for the next Step-by-Step.
Extending Layers
Now you want to extend the other layers.
-
STEP-BY-STEP 10.9: Extending the Other Layers
- Click frame 30 of the Border layer, click Insert, point to Timeline, and then click Frame.
- Insert frames in frame 30 of the Logo and Navigation layers.
- Insert a keyframe in frame 21 of the Page Name layer.
- In the library, duplicate the Title Home symbol. Name the new symbol Title Visit.
- Double-click the symbol in the library to enter its symbol-editing mode.
- Change the text to read as follows: VISIT THE GALLERY Mon-Wed 11 a.m. - 6 p.m. Fri-Sun11 a.m. - 8 p.m. You might need to widen the text box. The text should all fit on one line.
- On the Information bar at the top of the Stage, click Scene 1 to return to the main Timeline.
- Click frame 21 of the Page Name layer.
- Drag an instance of the Title Visit graphic symbol onto the Stage and position it so its left edge lines up vertically and horizontally with the left edge of the Featured Artist title. You may need to Zoom in to do this.
- With the Title Visit symbol selected, click Cut on the Edit menu.
- Select the Title Artist instance and delete it from the Stage.
- On the Edit menu, click Paste in Place. An aligned instance of the Title Visit symbol appears on the Stage.
- Click frame 30 of the Page Name layer, click Insert, point to Timeline, and then click Frame.
- Save your changes and remain in this screen for the next Step-by-Step.
Configuring the Visit Button
To continue, you now want to configure the Visit button.
-
STEP-BY-STEP 10.10 Configuring the Visit Button
- Using the Selection tool, double-click the Visit button (on the Stage) to enter its symbol-editing mode. The button has only an Up state, configured with the text and an arrow symbol.
- Insert keyframes in both the Over and Hit frames. The Timeline now covers all four states.
- Click in the Hit frame, select the Rectangle tool, and draw a rectangle over the text and the arrow symbol to indicate the area where a user can click.
- Click the frame for the Over state.
- Select the Selection tool, and click on the edge of the Stage to deselect the objects.
- Click the Visit text to select it. On the Property inspector, change its color to orange (#FFCC00).
- Select the arrow graphic. On the Property inspector, change the Color selection to Tint.
- On the Color Picker, choose orange (#FFCC00). The arrow changes to the same color as the text.
- Add a new layer above Layer 1 and rename it Sound.
- Create a keyframe in the Down frame and then, on the Window menu, point to Common Libraries, and then click Sounds.
- Make sure the Down frame of the Sound layer is selected, and then drag the Camera Shutter 35mm SLR sound onto the Stage. The sound is inserted into the Down state and the Hit state.
- Click Scene 1 on the Information bar to exit the symbol-editing mode for the Visit button.
- Save your changes and remain in this screen for the next Step-by-Step.
Adding Actions and Frame Labels
The last thing you need to do is add actions and frame labels.
-
STEP-BY-STEP 10.11
Adding Stop Actions, Frame Labels, and Goto Actions
- Insert a keyframe in frame 30 of the Actions & Labels layer. The keyframe is to hold a stop action for the Visit section.
- Expand the Actions panel. Open the Global Functions category and then the Timeline Control category, if they're not already open.
- Double-click the stop action. The stop action appears in the Script pane and is added to frame 30 of the Actions & Labels layer.
- Collapse the Actions panel.
- Click frame 21 of the Actions & Labels layer, click Insert, point to Timeline, and then click Keyframe. A keyframe is added to hold the label for the Visit section.
- Make sure the Property inspector is expanded.
- In the Frame Label text box, key Visit Section.
- Click the Visit button to select it. The text and arrow show a blue outline.
- Click the title bar of the Actions panel to open the Actions panel.
- Double-click the on action in the Movie Clip Control category (within the Global Functions category). Double-click the release event.
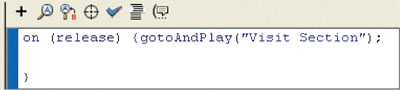
- Click after the open curly bracket, and then double-click gotoAndPlay in the Timeline Control category. Type "Visit Section" (be sure to include the quotes). It's case-sensitive, so don't forget the capital letters. Your ActionScript should look like Figure 10-11.
FIGURE 10-11:
ActionScript for the Visit button
- Collapse the Actions panel.
- Test the movie. Try all the buttons and test the Visit section. The directions combo box should drive the text box and animated map in the Visit section. The navigation buttons should control the advance of the filmstrip.
- Save the document and then close it. Exit Flash.
 Back to previous page: Lesson 9: Creating an Animated Map Back to previous page: Lesson 9: Creating an Animated Map
 After this lesson, you should complete the following After this lesson, you should complete the following
- Test on Flash Lesson 10 - Components
- Project 13 - Individual Flash Project
Go to next section: Lesson 11: Building the Events Components
|
