Lesson 6: Working with Movie Clips
Upon completion of this unit, you should be able to:
- Create a movie clip symbol out of existing layers or from another movie clip symbol .
- Work in symbol-editing mode to edit a movie clip instance.
- Edit and align text boxes .
The Gallery San Luis Web Site Progress
When you started designing the Gallery San Luis Web site in Lesson 4, you outlined the list of items the client wanted incorporated into the site. Let's take a quick look at how the Gallery San Luis project has progressed:
A Home page that is both appealing and speaks photography.- A Featured Artist page with a slide show of photographs and featured photographer information (and perhaps video interviews with the featured artists).
- An Events page for requesting tickets to gallery events.
- An animated Map page to indicate where the gallery is located.
- Sound incorporated on buttons.
- Slick transitions between pages.
An overall photography metaphor for the site.
 Building Out From the Home Page Building Out From the Home Page
The next step in the project list is to build the Featured Artist's page within the home.fla document. Unlike building a HTML site in which you have a home page and three separate HTML pages for the Featured Artist, Gallery Events, and Visit content, you can create all the content for the site in one Flash movie document.
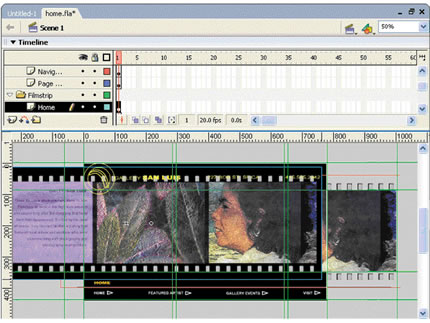
One way to meet the challenge is by creating four movie clip symbols within the home.fla document, one for each section of the Web site. Each of the movie clip symbols is based on the content you've already created in the filmstrip area, because this is where new site content appears, as shown in Figure 6-1.
FIGURE 6-1:
Changes to filmstrip content for Featured Artist page
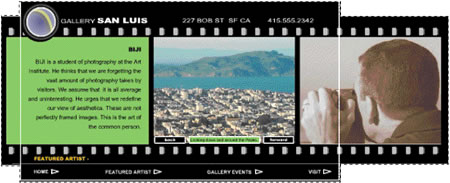
This is the idea for the Featured Artist page, based on the center film strip area of Home page. When the Featured Artist button is clicked, three cells in the filmstripstrip change accordingly.
Converting Layers to a Movie Clip Symbol
To create the four movie clips, you start by creating one movie clip symbol from all the layers in the Filmstrip folder. That gives you all the components you need to make the other movie clip symbols.
Flash makes it easy to convert a set of layers, with all their contents, into a single large movie clip symbol. You select and copy frames, insert a new movie clip symbol, and then paste the frames into the new movie clip.
-
STEP-BY-STEP 6.1: Creating a Movie Clip from Layers
- Start Flash. Open the home.fla file you worked with in Lesson 5, which should be in the build_GallerySanLuis folder.
Note: If you had problems with the project in the previous lesson, ask your instructor for the home2.fla sample solution file. Once you have opened this file, save it as home.fla followed by your initials in the main
build _GallerySanLuis folder (overwriting the file with which you had problems) and proceed with this lesson.
- Make sure the Timeline is expanded so you can see all the Layers. If the Filmstrip folder is collapsed, expand it.
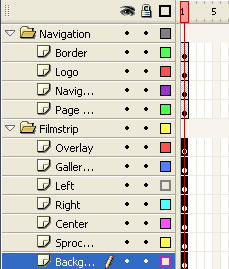
- Drag in the first frame of the Timeline to select the first frames of the Overlay, Gallery Text, Left, Right, Center, Sprocket Holes, and Background layers shown in Figure 6-1a.
Hot Tip: In addition to dragging to select, you can select multiple frames by clicking on the first frame you want to select, holding down the Shift key, and clicking on the last frame you want to select. You can also hold the Ctrl key (Windows) or Command key (Macintosh) to select several noncontiguous frames.
FIGURE 6-1a: Selecting frames
- On the Edit menu, point to Timeline, and click Copy Frames.
Note: If you just choose the Copy command on the Edit menu, you lose the layer structure and end up with all the elements on one layer.
- Click the Insert menu, and click New Symbol.
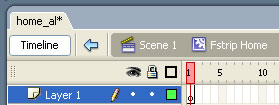
- Name the symbol Fstrip Home, select Movie Clip for the Behavior, and click OK. Notice that the Stage has changed. You are no longer in Scene 1. You are inside the Fstrip Home movie clip. You can tell what you are editing by looking at the Information bar. When you were working Information bar just displayed Scene 1. Now "Fstrip Home" appears next to Scene 1, Figure 6-1b.
on the original movie, the as shown in
FIGURE 6-1b: Fstrip Home movie clip
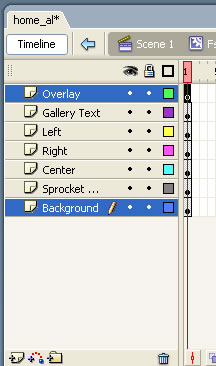
- Select Layer 1, open the Edit menu, point to Timeline, and then click Paste Frames. All the frames from the Home filmstrip are pasted, retaining their layer names and structure, as shown in Figure 6-3c.
FIGURE 6-1c: Pasting frames
- Save your document and remain in this screen for the next Step-by-Step.
Replacing Layers with a Movie Clip
Because you have created a movie clip of the Home filmstrip layers, you can now replace the original filmstrip layers in Scene 1 with the Fstrip Home movie clip. Using movie clips makes your Timeline much less complicated and animating the filmstrip much easier.
-
STEP-BY-STEP 6.2: Replacing Original Layers with a Movie Clip Symbol
- On the left side of the Information bar, click Scene 1 to return to the main movie Timeline.
- Insert a new layer above the Overlay layer and rename it Home.
- Make sure the Library panel is expanded and the Home layer is selected.
- With the Home layer selected, drag the Fstrip Home movie clip symbol from the library onto the Stage. An instance of the Fstrip Home movie clip appears on the Stage, as shown in Figure 6-2.
FIGURE 6-2:
Movie clip symbol in frame 1 of the Home layer
- Because Fstrip Home is a movie clip, you can move the entire contents of the movie clip at once. Using the Selection tool and the arrow keys, position the Fstrip Home movie clip instance to align it with the original layers below it.
Hot Tip: One way to align exactly is to zoom in and line up the movie clip instance with the corners of the background layer.
- Click the Overlay layer and then scroll down the layer list. Hold down the Shift key and click the Background layer. All the original filmstrip layers are selected.
- Drag the selected layers into the trashcan. This is a quick way to delete multiple layers.
- Save the document and remain in this screen for the next Step-by-Step.
Note: The advantage of creating a movie clip for the home page film strip is that the filmstrip can all fit on one layer, which will save time when you animate it later.
Creating a New Movie Clip from Another Movie Clip Symbol
The Featured Artist section of the Gallery San Luis site includes three elements:
- An artist's biography in the left section.
- A Photo Viewer of the artist's work in the center section.
- A photograph of the artist in the right section.
Your first task is to create the artist's biography section, which is similar to the gallery text on the home page except that you will be aligning the text without a comp image to which to match it.
Because the Featured Artist section is similar to the home page, you can copy the Fstrip Home movie clip and edit the new symbol to contain the featured artist content.
You edit a symbol by changing the window from the Stage view to a view of only the symbol, using the symbol-editing mode.
-
STEP-BY-STEP 6.3 Duplicating a Symbol
- Select the Fstrip Home movie clip in the library.
- Click the Options button (upper-right corner of the Library panel). From the menu, choose Duplicate. The Duplicate Symbol dialog box opens.
- Name the new symbol Fstrip Artist and click OK. The movie clip symbol Fstrip Artist is added to the library. No instances of this symbol will appear in the document until you drag the symbol onto the Stage.
- Save your document and remain in this screen for the next Step-by-Step.
Symbol Editing
You have created the Fstrip Artist symbol from the Fstrip Home movie. Now you need to customize the content of the Fstrip Artist symbol so it contains the artist's biography and photographs. You can customize a library symbol by editing it.
A word of caution: When you edit a symbol, you change all its instances throughout a movie document. Also, after you exit symbol-editing mode, you cannot use the Undo command to undo changes you made to the symbol in the editing mode.
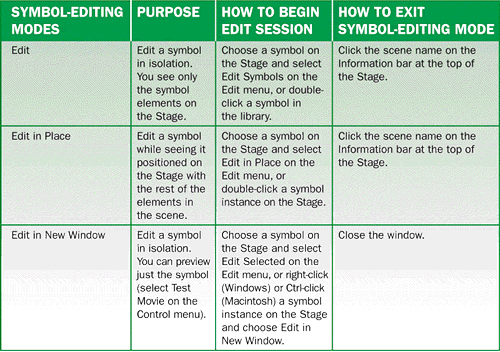
There are actually three symbol-editing modes in Macromedia Flash MX. Table 6-1 lists when and how to use them.
TABLE 6-3: Symbol-editing modes
-
STEP-BY-STEP 6.4: Editing a Mopvie Clip Instance
- Double-click the icon for the Fstrip Artist movie clip in the library. (Make sure you double-click on the icon, not the name.) The Fstrip Artist movie appears by itself on the Stage. You are now in symbol-editing mode. Notice that the Information bar has changed. It displays "Fstrip Artist" next to "Scene 1."
- Select the Overlay layer and drag it to the trashcan. The Overlay layer is deleted from the Fstrip Artist symbol. There will be no overlay image for this page.
- Select the purple background in the Left layer.
- On the Properties inspector, choose Tint from the Color menu.
- Change the tint fill to green (#99CC66). You can key this number directly into the Color Definition box, as shown in Figure 6-6. Make sure the Tint amount is set to 100%.
FIGURE 6-4a:
Manually entering a fill color
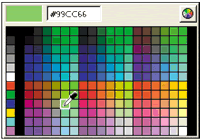
Note: You are altering only one instance of the Home Left Background symbol. As long as you don't enter editing mode on an instance, you can change its size, transparency, or color without affecting other instances of
that symbol.
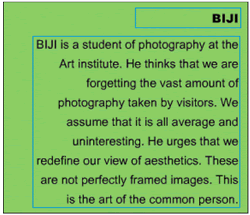
- Double-click the title text GALLERY SAN LUIS at the top of the left cell to enter text-editing mode. Select the text within the text box and key BIJI in all caps.
- Select the text you just typed and set the following text attributes: Arial Black or Helvetica Bold, 14 and right-aligned. Notice that the text boxes aren't symbols, so their font doesn't change.
- Double-click the body text to enter text-editing mode. Select all the text within the box and then change the font to 14-point Arial.
Important:
Macintosh and Windows computers might display text differently in Flash movies. Specifically, some browsers display smaller `text in Macintosh browsers. One way to avoid differing text displays is to break apart the text by clicking the Modify menu and then clicking Break Apart before you publish your movie. If you're developing on a Macintosh, keeping font sizes above 9 points is also helpful. This movie uses fonts of 12 points and larger, so you don't need to break it apart.
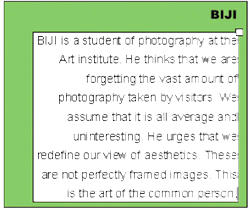
- As shown in Figure 6-4b, replace the text with the following text:
BIJl is a student of photography at the Art institute. He thinks that we are forgetting the vast amount of photography taken by visitors. We assume that it is all average and unirteresting. He urges that we redefine our view of aesthetics. These are not perfectly framed images. This is the art of the common person.
FIGURE 6-4b:
Artist's biography text box
- Save your document and remain in this screen for the next Step-by-Step.
Using the Align Panel
You can make sure objects on the Stage line up exactly with each other by using the Align panel. On the Align panel, you can align selected objects horizontally and vertically to each other or to the Stage.
-
STEP-BY-STEP 6.5 Aligning Objects Accurately
- Using the Selection tool, double-click the text describing Biji. The cursor blinks to indicate text-editing mode.
- Drag the size handle in the upper-right corner to size the text box, as shown in Figure 6-5, if necessary.
- Select the Selection tool. The text box is selected automatically.
- Use the arrow keys to position the text until it is approximately in line with the title.
- Hold down the Shift key and click the BIJI title. Both text boxes are selected.
- If necessary, click the Window menu, point to Design Panels, and then click Align to open the Align panel. On the Align panel, click the To stage button to turn it off. (When you align to the Stage, objects align to the whole space on the Stage as well as to each other.)
- Click the Align right edge button (the third button in the top row of buttons under the Align label). The two text boxes align precisely along their right edges, as shown in Figure 6-5.
FIGURE 6-5:
Aligning the text boxes
- Save the document, close it, and then exit Flash.
Web Design Skills
You can use special "device fonts" in Flash as an alternative to embedding font information (for horizontal text only). Device fonts are not embedded in the Flash SWF file. Instead, the Macromedia Flash Player uses whatever font on the local computer most closely resembles the device font. Because device font information is not embedded, using device fonts yields a somewhat smaller Flash movie file size. In addition, device fonts can be sharper and more legible than embedded fonts at small point sizes (below 10 points). However, because device fonts are not embedded, if users do not have a font installed on their system that corresponds to the device font, text might look different than you expect on the user's system. The following table shows how Windows and Macintosh computers typically interpret device fonts.
sans serif

In general, device fonts work best on a page with few design elements and a lot of text, such as a print article. Device fonts would not be appropriate for a site with as many visual elements as the Gallery San Luis site.
 Back to previous page: Lesson 5: Adding Text and Navigation Back to previous page: Lesson 5: Adding Text and Navigation
 After this lesson, you should complete the following After this lesson, you should complete the following
- Test on Flash Lesson 6: Using Movie Clips
Go to next section: Lesson 7: Creating Buttons
|
