Lesson 11: Building the Events Components
Upon completion of this unit, you should be able to:
- Import JPEG images into a Flash file dynamically.
- Create invisible buttons for functionality.
- Configure the registration point of a movie clip symbol.
- Import script from a Script file.
- Use check boxes and input text boxes to create an e-mail form.
The Gallery San Luis Web Site Progress
When you started designing the Gallery San Luis Web site in Lesson 4, you outlined the list of items the client wanted incorporated into the site. Let's take a quick look at how the Gallery San Luis project has progressed:
A Home page that is both appealing and speaks photography.A Featured Artist page with a slide show of photographs and featured photographer information (and perhaps video interviews with the featured artists)- Video interviews with the featured artist.
An animated Map page to indicate where the gallery is located.- An Events page for requesting tickets to gallery events.
Sound incorporated on buttons.Slick transitions between pages.An overall photography metaphor for the site.
Designing the Events Section
Gallery San Luis has monthly show openings (free parties) to welcome the work of a new artist. They would like people to easily get information about these events on their Web site and sign up to attend the parties. The challenge is to design a Macromedia Flash form that lets users browse through upcoming events and then submit their names and e-mail adresses for the events that interest them. Users must be able to quickly view a sample of different artists' work in the three-cel design of the site.
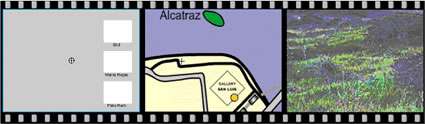
As illustrated in Figure 11-1, in the left cel will be a narrow Event Picker, presenting three thumbnail (small) images of artists' work. Clicking these images will create an enlargement of the artist's work in the center cel and populate a dynamic text box with information about the gallery event. In the right cel, the design calls for a form where users can input contact information, select events that interest them, and send a note with their preferences to the gallery.
FIGURE 11-1:
Design outline for the Fstrip Events movie
 Designing the Artist's Work Sampler Designing the Artist's Work Sampler
As noted in the design outline, small thumbnail-image buttons in the left cel bring up enlargements of these images in the center cel when a user clicks. From a Flash design perspective, bringing in separate images for the thumbnails and the enlargements would take up too much memory. There are two solutions to this problem:
Use the same image for both the thumbnail and the enlargement. Rather than having two versions (a standard size and a thumbnail size) of the images, use the Flash Transform panel to create the thumbnails.
Load the images into Flash dynamically. Instead of importing the images into the Flash Library and increasing the file size, use the loadMovie ActionScript command and keep the files in the images folder.
To make the first solution possible, you can create movie clips that automatically shrink the images when they arrive in the left cel. This technique saves time and creates smaller, faster SWF (Flash) files. First you need a movie clip for the left cel. Then you will create the thumbnail images for the left cel and configure the left and center cels with buttons and ActionScript so the thumbnails bring up enlarged images of the artist's work and descriptions of their gallery event(s).
-
STEP-BY-STEP 11.1:
Creating a Movie Clip for the Thumbnails
- Start Flash and open the home.fla file you worked build GallerySanLuis folder.
with in Lesson 10, which should be in the build _GallerySanLuis folder.
Note:
If you had problems with the previous lesson, ask your instructor for the home7.fla sample solution file. Once you open this file, save it as home.fla in your build _GallerySanLuis folder and proceed with this lesson.
- Open the Library panel if it is not already open.
- Select the Cel Background movie clip and then choose Duplicate from the Library Options menu. The Duplicate Symbol dialog box opens.
- Name the new symbol Events Left and click OK. The symbol is in the library.
- Double-click the icon beside the Events Left symbol in the library to enter symbol-editing mode.
- Lock the Background layer.
- Save your work and remain in this screen for the next Step-by-Step.
Creating Thumbnail Images for the Left Cel
You want to create buttons that represent each thumbnail image. As you create the buttons, you need to be aware of their registration points. The registration point determines where an exterior image will load into the button. An image starts loading at its upper-left corner (not from the center point out). You must place the registration point in the upper-left corner if you want the loaded image to be centered over the button.
The next Step-by-Step creates the thumbnail buttons into which the images will be loaded.
-
STEP-BY-STEP 11.2: Creating Thumbnail Buttons
- Insert a new layer above background and rename it Buttons.
- With the Buttons layer highlighted, select the Rectangle tool and draw a white (both stroke and fill) rectangle.
- Select the Selection tool and double-click the white rectangle to select it.
- On the Property inspector, change the white rectangle's W: setting to 345 and H: to 260. You will later use the Transform panel to reduce these buttons to thumbnail size.
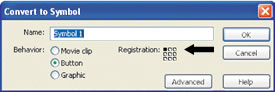
- Convert the rectangle to a button symbol (Convert to Symbol on the Modify menu) and name it Thumbnail. Configure its registration point to the upper-left corner, as shown in Figure 11-2a. Click OK.
FIGURE 11-2a:
Creating a symbol with its registration point in the upper-left corner
- On the Property inspector, name the instance of the Thumbnail symbol Thumb1.
Note:
Because you are not changing any text or images within the symbol, you can copy and paste it. You could not use copy and paste to create the site navigation buttons in Lesson 5 because you were actually changing the text within the buttons.
- On the Transform panel, constrain the proportions and size the button to 20%. The instance size should be W: 69 and H: 52. If it is not, use the Property inspector to adjust the size. This will also automatically reduce to 20% any images imported into the Thumb1 instance.
- Copy the Thumb1 symbol and paste two copies on the Stage. You now have thumbnails for three artist samples.
- On the Property inspector, name the second and third instances Thumb2 and Thumb3.
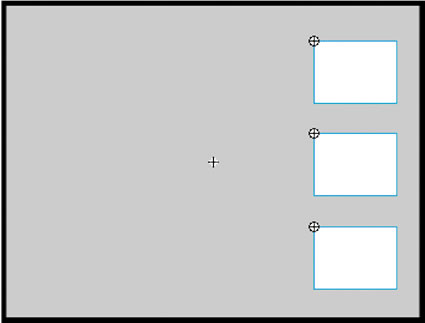
- Drag the three thumbnail instances to the right side of the gray background area. Be sure to place Thumb1 at the top, Thumb2 in the middle, and Thumb3 at the bottom. Hold down Shift and click to select all three.
- On the Align panel, toggle To stage to off.
- Click Space evenly vertically and Align left edge.
- Use the arrow keys to move the three instances until they appear to be spaced approximately like those in Figure 11-2b.
FIGURE 11-2b:
Lining up the instances
- Insert a layer above the Buttons layer and rename it Text.
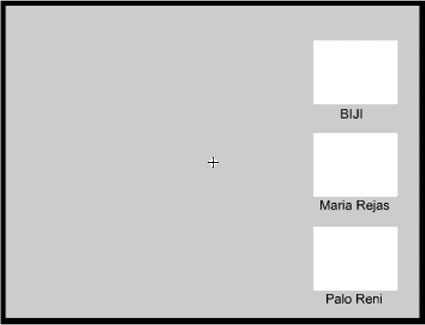
- On the Text layer, create three text boxes for the following captions in Static Text, Arial, 11 pt., black, and center-aligned:
Thumb1 BIJI
Thumb2: Maria Rejas
Thumb3: Palo Reni
- Using the Selection tool, drag the captions below the boxes, as shown in Figure 11-3d.
- Hold down the Shift key, and select the three text boxes. On the Align panel, click the Align horizontal center button. The text boxes should appear as shown in Figure 11-2c.
FIGURE 11-2c: Aligned button text
- Save your work and remain in this screen for the next Step-by-Step.
Configuring the Left Cel with ActionScript
You can use the loadMovie command to load SWF files, MP3 files, or JPEG files into a level or target in a Flash movie. In this case you will be loading JPEG files into button targets. The target name comes from the instance names: Thumb 1, Thumb2, and Thumb3.
-
STEP-BY-STEP 11.3: Thumbnail Images by Using ActionScript
- Insert a layer above the Text layer and rename it Actions.
- Click the first frame on the Actions layer and open the Actions panel.
Hot Tip:
It is customary to place the frame actions for a movie on the top layer.
- On the Actions panel, click on the Global Functions category to expand it (if it is not already), and then click the Browser/Network category to expand it.
- Double-click loadMovie.
Note:
You will test the movie later to see the thumbnail images load.
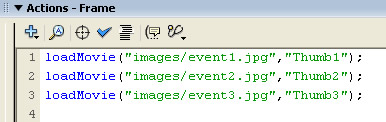
- In the parentheses next to the loadMovie function in the Script pane, key "images/event1.jpg", "Thumb1"
- Click after the semicolon and press Enter.(Windows) or Return (Macintosh).
- Double-click loadMovie again and key "images/event2.jpg", "Thumb2"
- Click after the semicolon and press Enter (Windows) or Return (Macintosh).
- Double-click loadMovie again and key "images/event3.jpg", "Thumb3"
FIGURE 11-2c: ActionScript to Load Images
- Save your work and remain in this screen for the next Step-by-Step.
Integrating the Events Section onto the Main Timeline
From a design perspective, building a movie clip without seeing it in the Preview window can be hard. Although you are only halfway finished with the Events Left movie clip, you might want to integrate it onto the main Timeline. This will let you test the functionality of the cels as you build them out.
Creating a Partial Movie Clip
The first step is to create a partially finished Fstrip Events movie clip. Then you will integrate it onto the main Timeline.
Next to audio and video, imported JPEGs and GIFs can pump up a Flash file's size, greatly increasing download times over the Internet. Although you should always optimize your images (high quality balanced with small file size) before bringing them into Flash, the major question is whether to use the Import function or the IoadMovie command. Your decision should rest on design needs. If you need to see and/or animate the image in Flash, use the Import command. But if you simply need to bring a picture into a fixed area and keep file size to a minimum, use IoadMovie.
-
STEP-BY-STEP 11.4: Creating a Movie Clip for the Events Section
- In the Library, select the Fstrip Visit movie clip symbol and duplicate it.
- Name the new movie Fstrip Events and then click OK.
- Double-click the Fstrip Events movie clip to enter symbol-editing mode.
- Collapse the Actions panel so you can see the Stage. Select the Left layer. Drag the Events Left movie clip from the Library over the left cel.
- Use the arrow keys to line up the movie clip over the object in the left cel.
- Click Cut on the Edit menu to place the Events Left movie clip on the Clipboard.
- Delete the object from the left cel.
- Click Paste in Place on the Edit menu. The Events Left movie clip is in the left cel, as shown in Figure 11-4a.
FIGURE 11-4a:
Left cel configured for Fstrip Events
- Click the View menu, point to Snapping, and make sure Snap to Objects is selected (note the check mark next to the option).
- Select the image in the center cel.
- Select the Rectangle tool and set the stroke and fill colors to gray (#CCCCCC).
- Position the pointer on the upper-left corner of the center image, and then drag diagonally to the lower-right corner of the center image. A gray rectangle is drawn behind the center image, snapped to its size.
- Use the Selection tool to select the center image of the map and delete it. The gray rectangle remains on the Center layer, properly aligned in its cel.
- Double-click the gray rectangle on the center layer.
- Click the Modify menu, and then click Convert to Symbol.
- Confirm that the registration point is set to the upper-left corner, as shown in Figure 11-4b.
FIGURE 11-4b:
Registration point set to upper-left corner
Note: The registration point determines from what point objects load into the movie clip. Because you will be bringing JPEGs into this center cel and a JPEG's registration point is automatically set to the upper-left corner, the registration point of the Events Center movie clip must also be in the upper-left corner to center the JPEG in the cel.
- Name the symbol Event Center, select the Movie clip behavior, and click OK. The movie clip is selected on the Center layer.
- On the Property inspector, key center as the instance name. You give the movie clip a name so the loadMovie command can target it. (The instance name is case-sensitive and will be in lowercase when it is called later.)
- Save the document and remain in this screen for the next Step-by-Step.
Integrating the Partial Movie Clip onto the Timeline
Now you are ready to create the Events section on the main Timeline. This section will have a moving filmstrip introduction like the other sections.
-
STEP-BY-STEP 11.5 Creating the Events Section on the Main Timeline
- Click Scene 1 on the Information bar to return to the main Timeline.
- Inside the Filmstrip folder on the Timeline, insert a new layer above the Visit layer and rename it Events.
- With the Events layer selected, select the Fstrip Events movie clip symbol on the Library panel and drag an instance of it onto the Stage.
- Make sure guides are turned on. (On the View menu, point to Guides, and click Show Guides.)
- Drag the Fstrip Events movie clip until it is within the vertical guides of the filmstrip area.
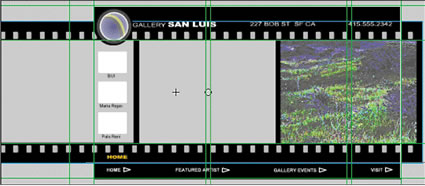
- To adjust the horizontal placement, use the arrow keys to move the movie clip horizontally until the three thumbnail images in the Fstrip Event's left cel are just to the right of the left Stage border, as shown in Figure 11-5a.
FIGURE 11-5a:
Aligning the Fstrip Events movie clip in the main movie
- Drag frame 1 of the Events layer to frame 31 of the same layer, as shown in Figure 11-5b.
FIGURE 11-5b:
Moving the Fstrip Events movie clip to the starting point Timeline
- Click frame 35 of the Events layer, click the Insert menu, point to Timeline, and then click Keyframe.
Click frame 40 of the same layer, click Insert, point to Timeline, and then click Keyframe again.
- Click frame 31 on the Events layer and select the Selection tool. Then hold down the Shift key and drag the Fstrip Events movie clip to the left until the left cel is just off the Stage.
- Click the keyframe in frame 35 of the Events layer. Then hold down Shift and drag the filmstrip to the right until the right cel is just to the right of the Stage.
- Click frame 31 of the Events layer. On the Property inspector, choose Motion from the Tween menu.
- Click frame 35 of the Events layer. On the Property inspector, add a motion tween between frames 35 and 40. Remain in this screen for the next Step-by-Step.
Extending Layers and Creating a Title Symbol
Now that you have begun the creation of a movie clip for the Events section and placed it on the main Timeline, you need to extend the other layers to the same frame as the Events section. You also need to create a new Title symbol for the Events section. You will do this by duplicating an existing symbol, editing it, and then placing it in the main Timeline.
-
STEP-BY-STEP 11.6: Extending the Other Layers and Creating a Title Symbol
- Click frame 40 of the Border layer, click Insert, point to Timeline, and then click Frame.
- Click frame 40 of the Logo layer, click Insert, point to Timeline, and then click Frame.
- Click frame 40 of the Navigation layer, click Insert, point to Timeline, and then click Frame.
- Insert a keyframe in frame 31 of the Page Name layer.
- In the Library, duplicate the Title Home symbol. Name the new symbol Title Events.
- Double-click the Title Events symbol in the library to enter its editing mode.
- Change the text to GALLERY EVENTS.
- On the Information bar, click Scene 1 to return to the main movie Stage.
- Click frame 31 of the Page Name layer.
- Drag an instance of the Title Events graphic symbol onto the Stage and line up its left edge with the left edge of the Visit title, as shown in Figure 11-6a.
FIGURE 11-6a:
Lining up the Events title
- With the Title Events symbol selected, select Cut on the Edit menu.
- Delete the Title Visit instance in frame 31 of the Page Name layer.
- Select Paste in Place on the Edit menu. An aligned instance of the Title Events symbol appears on the Stage.
- Click frame 40 of the Page Name layer, click Insert, point to Timeline, and then click Frame. Your Timeline should look like Figure 11-6b.
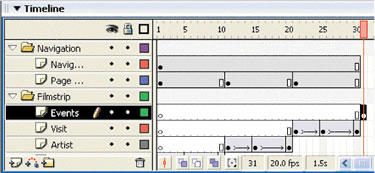
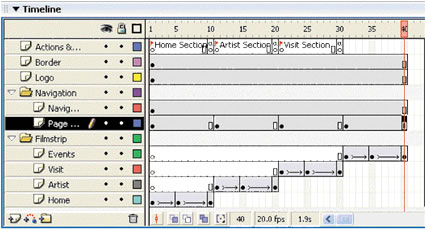
FIGURE 11-6b:
The Timeline with an Events section
Configuring the Gallery Events Button
Now that there is a movie clip for the Gallery Events (even if it is only partially completed), you can configure the Gallery Events button to link it to the clip.
-
STEP-BY-STEP 11.7: Configuring the Gallery Events Button
- Using the Selection tool, double-click the Gallery Events button instance (not the Gallery Events title you just placed) on the Stage to enter its symbol-editing mode. The button has only an Up state, configured with the text and an arrow symbol.
- Insert keyframes in both the Over and Hit frames. The Timeline now covers all four states.
- Click in the Hit frame, select the Rectangle tool, set the stroke and fill colors to None, and draw a rectangle over the text and the arrow symbol to indicate the area where a user can click.
- Click the frame for the Over state.
- Click the Edit menu, and then click Deselect All. You are now ready to edit the button text for rollover effects.
- Using the Selection tool, click the Gallery Events text to select it. On the Property inspector, change the color of the text to orange (#FFCC00).
- Select the arrow graphic. On the Property inspector, change the color selection to Tint.
- On the color picker, choose orange (#FFCC00). The arrow changes to the same color as the text. The Tint Amount should be set to 100%.
- Add a new layer above Layer 1 and rename it Sound.
- Insert a keyframe in the Down frame and then, on the Window menu, point to Common Libraries, and then click Sounds.
- Click the Down frame of the Sound layer and drag the Camera Shutter 35mm SLR sound onto Stage. The sound is inserted into the Down state of the button.
the button.
- Click Scene 1 on the Information bar to exit the symbol-editing mode for the Gallery Events button.
- Click the Control menu, and then click Test Movie.
- Roll the pointer over the Gallery Events button and click the button to test it.
Note:
When you test the Gallery Events button, you should see the text color change and hear the camera shutter sound when you click. However, you do not see any of the gallery events because you have not linked these to the buttons yet.
- Close the Preview window and save the document. Remain in this screen for the next Step-by-Step.
ActionScript for the Events Section
In the next two Step-by-Steps, you will add the ActionScript for stop actions and frame labels as well as for the goto actions that drive the navigation for the Events section.
-
STEP-BY-STEP 11.8: Adding stop Actions and Frame Labels
- Click frame 40 of the Actions & Labels layer, click Insert, point to Timeline, and then click Keyframe. The keyframe is to hold a stop action for the Gallery Events section.
- Expand the Actions panel. Make sure the Global Functions category and the Timeline Control category are open.
- Double-click the stop action.
- Collapse the Actions panel.
- Click frame 31 of the Actions & Labels layer, click Insert, point to Timeline, and then click Keyframe. A keyframe is added to hold the label for the Events section.
- Make sure the Property inspector is expanded.
- In the Frame Label text box, key Events Section. Press Enter (Windows) or Return (Macintosh). The label, Events Section, appears in frame 31 on the Actions & Layers layer.
- Save your work and remain in this screen for the next Step-by-Step.
-
STEP-BY-STEP 11.9: Adding goto Actions r Section Navigation
- Using the Selection tool, click the Gallery Events button to select it. (The button shows a blue outline.)
- Click the Actions title bar to expand the panel.
- Double-click the on action in the Movie Clip Control category, and then double-click the release event.
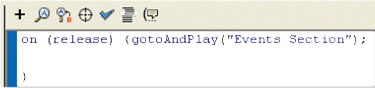
- Click after the open curly bracket, and then double-click the gotoAndPlay action from the Timeline Control category. Key "Events Section" (be sure to include the quotation marks). The actions appear in the Script pane, as shown in Figure 11-9.
FIGURE 11-9:
Actions for the Gallery Events button
- Collapse the Actions panel by clicking its title bar.
- Test the movie and test the navigation buttons. Each navigation button now advances the movie to a different section on the main Timeline.
- Close the Preview window and save the document. Remain in this screen for the next Step-by-Step.
Finishing the Artists' Work Sampler
Now that the Fstrip Events movie is on the main Timeline, you can test it to make sure its images and script are working properly. The next step in the construction of the Events section is to add a description box in the center cel, giving users information on specific events and naviga tion features of the section. This description box will be a dynamic text box so its content can change as users click on different events.
-
STEP-BY-STEP 11.10: Creating a Dynamic Text Box
- Click frame 40 of the Events layer to select the Fstrip Events movie clip.
- Using the Selection tool, double-click the center cel on the Stage. The Fstrip Events movie clip enters editing mode.
- Insert a new layer above the Left layer and name it Event Description.
- Select the Text tool and drag to make a text box approximately the width of the center cel.
- On the Property inspector, set the properties shown in Table 11-10a.
TABLE 11-10a:
Text box parameters
- Click the Selection tool and double-click the text box to enter text-editing mode.
- Drag the corner size handle until the box is the width of the center cel and approximately 50 pixels high, and position the text box at the bottom of the center cel, as shown in Figure 11-12. You don't want to change the size on the Property inspector, because the text will become distorted.
FIGURE 11-10b:
Sizing the Description dynamic text box

- Save the document and remain in this screen for the next Step-by-Step.
Adding ActionScript and Button Functionality to the Event Picker
The left and center cels of the Events section now need ActionScript to add descriptive text and images to the center cel. This ActionScript will be associated with the three thumbnail images in the left cel, because these will be the triggers for different events.
Loading images into the thumbnail buttons means they can't be easily scripted for sound effects and loading commands. The best solution to this problem is to insert another set of invisible buttons on top of the thumbnail buttons to hold the scripting and sound functionality. Invisible buttons have graphic elements only in the Hit state and appear on the Stage as semitransparent aqua-colored objects. They will not show up in the published file.
In Flash, you can give button functionality to movie clips. Instead of adding invisible buttons as in the following example, you could put ActionScript on the thumbnail movie clips with onPress commands to load images and change dynamic text. Here's an example:
OnPress (gotoAndPlay _root (15))
This ActionScript can get a little complicated and labor-intensive, especially if you want to add rollover and click sounds.
-
STEP-BY-STEP 11.11 Creating Invisible Buttons
- Using the Selection tool, double-click the Events Left movie clip symbol in the library to enter its editing mode.
- Insert a new layer above the Buttons layer and name it Invisible Buttons.
- Draw a rectangle in any color on the Stage on the Invisible Buttons layer.
- Click the Selection tool and then double-click to select the rectangle and its border.
- On the Property inspector, change the rectangle's W: setting to 69 and H: to 52.
- On the Modify menu, click Convert to Symbol.
- Name the symbol Invisible Button, set the behavior to Button, and then click OK.
- Double-click the button on the Stage to enter its editing mode.
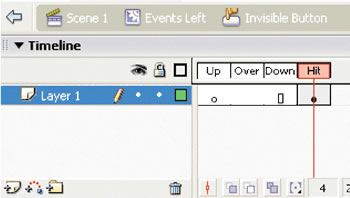
- Click the Up keyframe and drag it to the Hit frame, as shown in Figure 11-11a. The Up, Over, and Down states are now empty.
FIGURE 11-11a:
Leave only the Hit state
- Add a new layer above Layer 1 and name it Sound.
- Create a keyframe in the Down frame of the Sound layer and then expand the Library-Sounds panel.
- With the Down frame on the Sound layer selected, drag the Polaroid Shutter sound onto the Stage. The sound is inserted into the Down state.
- Click Events Left on the Information bar. The button appears as a semitransparent aqua shape.
- Click Copy on the Edit menu, and then click Paste in Center on the Edit menu two times. Two more instances of the button appear on the Stage.
Note:
Keep in mind that the URL you place in the IoadMovie ActionScript is always in reference to the directory or drive in which the Flash file is being saved. In our case, the home.fla file is being saved in the build_GallerySanLuis folder. As long as the images folder that is referenced is also in that folder, the ActionScript will be able to locate the graphics indicated. This method allows entire Flash sites to be moved from location to location without breaking links-as long as all of the files stay in the same relative location.
- Drag the button instances over the three white movie boxes.
- Select the invisible button over the BIJI button and click the Actions panel title bar to expand the Actions panel.
- Configure the ActionScripting on the buttons as shown in Table 11-11b. Remember to select each button before entering the ActionScript. (Hint: You might want to copy and paste the BIJI script onto the other buttons and then customize it.)
TABLE 11-11b: ActionScripts for buttons
| Button |
ActionScript |
BIJI
|
on (release) {
loadMovie("images/event1.jpg","_parent.center");
_parent.description = "BIJI's opening will feature San Francisco vistas. He will be dressed as a tourist. Bring your own Bermudas at 7 p.m., April 5.";
} |
Maria Rejas
|
on (release) {
loadMovie("images/event2.jpg","_parent.center");
_parent.description="Maria will be showing some of the plant photos under black light. Wear bright colors to the opening on May 7th, at 6 p.m.";
} |
Palo Reni
|
on (release) {
loadMovie("images/event3.jpg","_parent.center");
_parent.description="Palo's opening reception will feature mixed media photography and Afro-Brazilian music. Reception starts at 8 p.m. on June 10th.";
} |
18. Collapse the Actions panel. Save and test the movie. The Gallery Events button should bring up working thumbnail images.
19. Click Scene 1 on the Information bar to return to the main movie. Remain in this screen for the next Stepby-Step.
Hot Tip: As you create these ActionScripts, you might need to resize some panels and collapse others so you can see and select the buttons while still having access to the Actions panel.
Creating a Form in Flash
Forms in Flash have been made fairly simple with components. As you might recall from the Visit sections, components are like templates for creating commonly used movie clips such as check boxes, drop-down menus, and buttons. The major challenge when creating an e-mail form for the gallery events is converting the user information from check boxes and input text boxes. This challenge is met by some serious ActionScripting. To make it simpler, you will import the ActionScript for the form from a text file.
As you might have guessed, the form will fall into the right box when a user clicks on Gallery Events. It will be a separate movie loaded into the main movie.
-
STEP-BY-STEP 11.12 Designing the Form
- Expand the Library panel and select the Cel Background movie.
- Duplicate the movie and name the new movie Events Right.
- Double-click the Events Right movie clip to enter its editing mode.
- Insert a new layer above the Background layer and name it Arch Shadow.
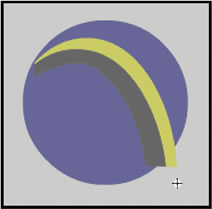
- With the Arch Shadow layer selected, import the file arch.swf from the Images folder to the Stage.
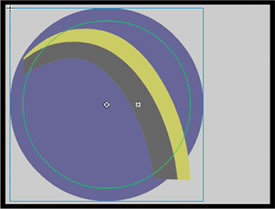
- Convert the arch.swf image into a movie clip symbol and name it Arch Shadow. The image looks pretty good, but the bottom of the arch is sticking out of the circle, as shown in Figure 11-12a.
FIGURE 11-12a: The Arch image
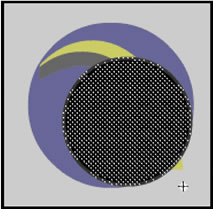
- Insert a new layer above the Arch Shadow layer and rename it Mask. You will use the Mask layer to crop the Arch image.
- Hold down Shift and use the Oval tool to draw a black circle (you have to change the fill and stroke colors) on the Mask layer a little smaller than the circle behind the arch, as shown in Figure 11-12b.
FIGURE 11-12b:
Arch image with a small circle on top
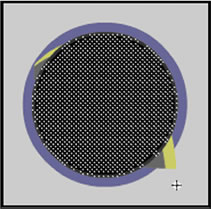
- Using the Selection tool, double-click the black circle. Then use the arrow keys to center the circle over the arch image, as shown in Figure 11-12c.
FIGURE 11-12c:
Mask centered over image
- With the Mask layer selected, click Modify, point to Timeline, and then click Layer Properties.
- In the Layer Properties dialog box, select Show and Lock.
- Select Mask for the type and select View layer as outlines. Then click OK. The mask appears as an outline over the arch image.
- If the Mask layer is locked, unlock it. Drag the Arch Shadow layer above the Mask layer, and then drag it back below the Mask layer.
- Select the first frame of the Arch Shadow layer. Then hold down Shift and select the first frame of the Mask layer. Both the mask and the arch image are selected.
- On the Transform panel, constrain the proportions and increase to 350%.
- Drag the image to the left center of the Stage, as shown in Figure 11-12d. (The positioning does not have to be precise; this will be a background image.)
FIGURE 11-12d:
Enlarged arch image centered left on the Stage
- Click the Arch Shadow layer, and then click on the arch to select the instance of the Arch Shadow. On the Property inspector, change the color to Alpha, 20%.
- Save the document and remain in this screen for the next Step-by-Step.
Now you are ready to create the form items.
-
STEP-BY-STEP 11.13: Creating Form Items
- Insert a new layer above the Mask layer and name it Text.
- Lock the Mask, Arch Shadow, and Background layers.
- Select the Text tool and create a text box at the top of the Stage. Set the following text attributes:
Static Text
Arial, 11 pt., black
Left-aligned
Left margin: 0
- Key NOTIFY ME OF GALLERY SAN LUIS EVENTS.
- Select the SAN LUIS EVENTS text and change its font to Arial Black
- Click the size handle on the text box and drag horizontally until all the text is on one line, as shown in Figure 11-13a.
FIGURE 11-13a:
Dragging the text box handle

- Click the Selection tool to select the text box.
- Align the text box to X: -161 and Y: -122.
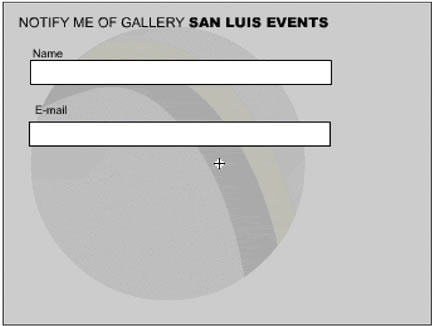
- Click the Text tool again and create a static text box in Arial, 9 pt., left-aligned, and black that says Name.
- Create another text box below the Name box, dragging its size handle to make it about as long as the title. Users can enter their names in this box.
- On the Property inspector, change the Text Type to Input Text.
- Click the Selection tool to select the text box, and then use the Property inspector to apply the settings shown in Table 11-3b.
TABLE 11-13b:
Property settings for Name text box
- Select and then drag the Name box or the Input Text box until they are close to one another vertically. (You will align all boxes on this form horizontally a little later.)
- Hold down Shift and select both the Name and Input Text boxes.
- Click Copy on the Edit menu.
- Click Paste in Center on the Edit menu.
- Change the new static text field from Name to E-mail. (Resize the box if necessary to fit all the text on one line.)
- Align the new text fields under the Name fields, as shown in Figure 11-13c.
FIGURE 11-13c: Copied text fields
- Select the second input text field, and then on the Property inspector, change the Var field to userEmail.
- Save your work and remain in this screen for the next Step-by-Step.
Adding a Check Box
After viewing the images and descriptions of the various upcoming Gallery openings, users can check off which events they are interested in attending and send an e-mail message to the Gallery requesting an invitation and a reminder for the event. From the Components panel, you will build check boxes for the events and then a submit button for the form.
-
STEP-BY-STEP 11.14 Adding a check box
- Expand the Components panel and drag the CheckBox component onto the Stage below the input boxes, as shown in Figure 11-14a. If a message appears indicating the component already exists, select Use existing component, and click OK.
FIGURE 11-14a:
A check box on the Stage
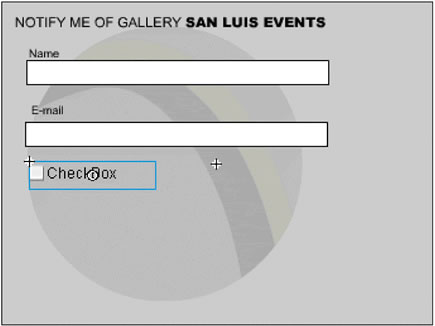
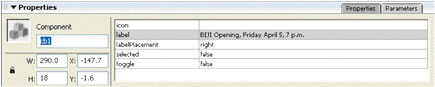
- In the Label text box on the Property inspector, key BIJI Opening, Friday April 5, 7 p.m. (including the periods in "p.m.").
- Set W: to 290 and H: to 18.
- Key cb1. for the Instance Name, as shown in Figure 11-14b.
If you see a message box indicating that a component with the same name already exists, select Replace existing component and then click OK.
FIGURE 11-14b:
Setting the check box instance name
- With the check box selected, click Copy on the Edit menu.
- Paste three more instances of the check box on the Stage.
- Place the instances below the top check box and label them on the Property inspector as follows:
cb2: Maria Rejas Opening, Thursday, May 6, 6 p.m.
cb3: Maria Rejas Silent Auction, Monday, May 20, 5 p.m.
cb4: Palo Reni Opening, Friday, June 3, 8 p.m.
- Click the keyframe on the Text layer to select all the text items.
- On the Align panel, toggle To stage to Off and align the left edge of the text boxes.
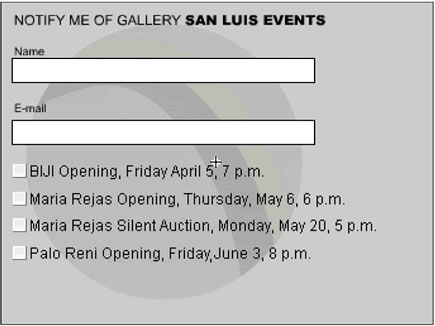
- Select the four check boxes and then choose Space evenly vertically on the Align panel. The Events Right cel should look similar to Figure 11-14c.
FIGURE 11-14c:
Text and check box alignment
- Save the document and remain in this screen for the next Step-by-Step.
Sending Data from a Flash Site
The basis of e-commerce and the Internet in general is the power to communicate and to connect people to the things they want. Small businesses love the new channel of sales and feedback they can get from the Internet. The technical trick is in making information easy to send and receive. Some Web sites use server-side software to send information (order forms, polls, and such). You can also send information by e-mail.
E-mail links work pretty much the same in Flash as they do on an HTML page, with a mailto: name@service.com statement that tells the browser to bring up a new e-mail message to that address. The challenge of the Events form isn't just to bring up the e-mail message but to populate (fill in) the Subject and Body of the message with information from the fill-in and check boxes. You do this by using a script. Like any script you might get from a book or a Macromedia Flash support Web site, some customization is involved (for example, the e-mail address for the Gallery and the names of check and fill-in boxes). To call up the script, you use the Button component.
-
STEP-BY-STEP 11.15: Creating a Submit Button
- Select the Text layer.
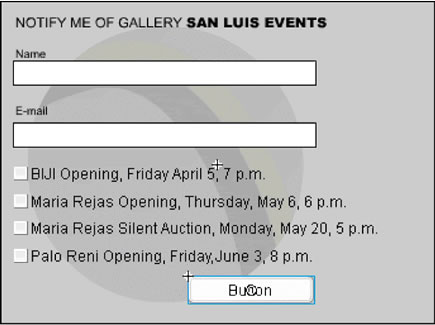
- Drag the Button component from the Components panel to the Stage under the bottom check box, as shown in Figure 11-15a. If a message appears indicating the component already exists, select Use existing component, and click OK.
FIGURE 11-15a:
Putting a push button on the Stage
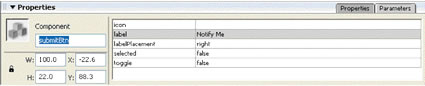
- In the Label area of the Parameters tab on the Property inspector, enter Notify Me.
- In the Instance Name text box, enter submitBtn. Your choices should look like those in Figure 11-15b.
FIGURE 11-15b: Button parameters
- Create a new layer above the Text layer and rename it Actions.
- Select the first frame of the Actions layer and open the Actions panel.
- On the Actions panel, click the Options menu in the upper-right corner and choose Import Script. If you cannot see the Options button on the Actions panel, undock the panel.
- Browse to the scripts folder and double-click the eventsScript.as file. The script is imported into the first frame of the Actions layer.
- Browse through the script and find the script that reads as follows:
getURL("mailto:you@youraddress.com?subject=" add subject add "&body=" add body);
- Replace you@youraddress.com with events@gallerysanluis.org. (The rest of the line of script remains the same.)
- Save the document and remain in this screen for the next Step-by-Step.
Note:
In a generic script, items such as e-mail addresses need to be customized.
Your last task in this lesson is to integrate the form into the Fstrip Events movie.
-
STEP-BY-STEP 11.16:: Integrating the Form into the Fstrip Events Movie
- Double-click the Fstrip Events movie clip in the library to enter symbol-editing mode.
- Make sure the Actions panel is collapsed, and select the right cel on the Stage. The Right layer is selected.
- Drag an instance of the Events Right movie clip onto the Stage.
Note: You will be setting the default value for the dynamic text box, which is a description of how to work in the Events section.
- Drag the Events Right movie clip over the image in the right cel, and select Cut on the Edit menu.
- Delete the image from the right cel.
- On the Edit menu, click Paste in Place. The form is aligned in the right cel of the Fstrip Events movie clip.
- Insert a new layer above the Event Description layer and rename it Actions.
- Select the first frame of the Actions layer and expand the Actions panel.
- Click in the Script pane.
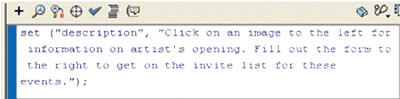
- Key set ("description", "Click on an image to the left for information on artist's opening. Fill out the form to the right to get on the invite list for these events:");
The ActionScript you just entered should look like Figure 11-16.
FIGURE 11-16: Set variable action
- Collapse the Actions panel, click Scene 1 to return to the main Timeline, and then save the document.
- Test the form in a browser by opening the File menu and pointing to Publish Preview and then clicking Default. The Flash document will appear in your default browser.
- Close your browser, close the document, and exit Flash.
 Back to previous page: Lesson 10: Integrating Components Back to previous page: Lesson 10: Integrating Components
 After this lesson, you should complete the following After this lesson, you should complete the following
- Test on Flash Lesson 11: Building the Events Components
Go to next section: Lesson 12: Video in Macromedia Flash
|
