Lesson 8: Motion Tweening
Upon completion of this unit, you should be able to:
- Insert motion tweens to create animated transitions between sections of the Web site.
- Insert keyframes and frames to extend the Timeline.
- Create frame actions to stop the movie clip.
- Create button actions so users can navigate the Gallery site.
The Gallery San Luis Web Site Progress
When you started designing the Gallery San Luis Web site in Lesson 4, you outlined the list of items the client wanted incorporated into the site. Let's take a quick look at how the Gallery San Luis project has progressed:
A Home page that is both appealing and speaks photography.A Featured Artist page with a slide show of photographs and featured photographer information.- Video interviews with the featured artists.
- An animated Map page to indicate where the gallery is located.
An Events page for requesting tickets to gallery events.Sound incorporated on buttons.- Slick transitions between pages.
An overall photography metaphor for the site.
 Adding a Movie Clip Instance to a Macromedia Flash Document Adding a Movie Clip Instance to a Macromedia Flash Document
In this lesson you will work on creating the slick transitions between pages. First, however, you must bring the Featured Artist section into the main Timeline.
It might seem a little strange that you have been building the Featured Artist section for a while now and still haven't seen it appear on the main Timeline. Think of it as if you're making a Hollywood film and have been working on a scene from the middle of the movie and now it's finally time to edit the scene into the overall movie. In this phase of the project, you incorporate the Featured Artist page onto the main Timeline with the home page.
Additionally, you need to create animated transitions between the sections of the Gallery San Luis site. You must use an animation that goes with the overall theme of photography. You must also be able to control the animation with the navigation buttons at the bottom of the page.
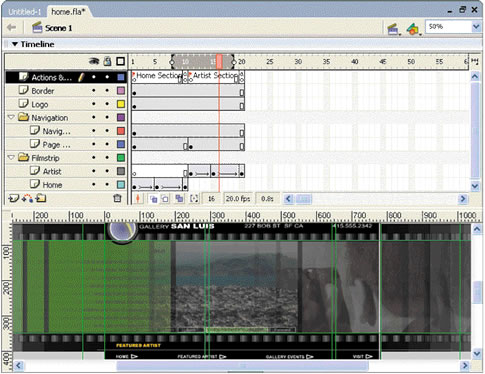
In going from one section of the site to the other, you will make the filmstrip movie clips slide back and forth, like film advancing in a camera. You will use the Timeline of the main movie to build this animation. This technique takes advantage of Macromedia Flash's capability to stream-to load information in the background. You will place the home page at the beginning of the Timeline. Further down the Timeline are the other pages of the site, which can load in the background while the user is viewing the home page. The navigation buttons at the bottom of the page provide a means for moving down the Timeline to the Featured Artist section and other sections of the site, as shown in Figure 8-1a.
FIGURE 8-1:
Motion tweening transitions into the Artist section
-
STEP-BY-STEP 8.1: Inserting the Featured Artist Section
- Start Flash and open the home.fla file you worked with in Lesson 7, which should be in the build_GallerySanLuis folder.
Note:
If you had problems with the previous lesson, ask your instructor for the home4.fla sample solution file. Once you open this file, save it as home.fla in your build_GallerySanLuis folder and proceed with this lesson.
- Make sure you're on the main Timeline (click on Scene 1 on the Information bar if necessary.)
- Inside the Filmstrip folder on the Timeline, insert a new layer above the Home layer. Rename the layer Artist.
- Make sure the Library panel is open.
- With the Artist layer still selected, drag an instance of the Fstrip Artist movie clip symbol from the Library to the Stage.
- From the View menu, point to Guides, and then click Show Guides if the guides are not already turned on.
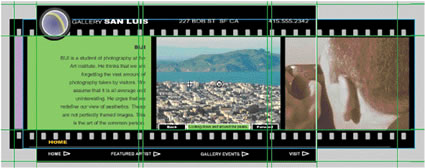
- Use the Selection tool and the arrow keys to move the Fstrip Artist movie clip until it is within the vertical guides of the filmstrip area and the left cell is just to the right of the left border beyond the left edge of the Stage, as shown in Figure 8-1b. You might need to zoom out to do this.
FIGURE 8-1b:
Lining up the Featured Artist movie clip
- Click the Control menu, and then click Test Movie. The movie enters Preview mode. The Featured Artist section is lined up vertically inside the filmstrip border and extends off-stage to the right.
- To test the Photo Viewer, click the Forward and Back buttons. It is okay that you can see the home page images behind the Featured Artist section. You will correct this later.
- Close the Preview window and save the document. Remain in this screen for the next Step-by-Step.
Creating an Animated Transition Between Sections
The design of the Gallery San Luis Web site uses camera and filmstrip metaphors. You can apply this design in the transition between sections (also referred to as pages) of the Web site by moving the filmstrip back and forth like film advancing in a camera. You do this by creating an animation along the Timeline of the movie. Before you create the transitions, take a moment to get familiar with the basics of Flash animation.
Flash Animation
There are two methods for creating an animation sequence: in Flash: tweened animation and frame-by-frame animation. Frame-by-frame animation involves a series of keyframes with different images in every frame. Although this can be helpful with complex animations, Flash is capable of automatically creating animation by tweening images. The word. tween comes from an animation technique in which an artist draws the starting point of a motion animation-such as a dog wagging its tail to the left-and the stopping point of the motion-a wag to the right. Then the artist has to draw all the stages in between to make it look like the tail is actually moving. In Flash, you set the starting and ending frames for an object on the Stage, and then Flash automatically fills in the frames between. There are two types of tweens in Flash: shape tweens and motion tweens.
Motion Tween
For a motion tween to work, you need two things:
- A symbol (graphic, button, or movie clip)
- Two keyframes containing the same symbol
In a motion tween, you can change the following properties:
- Color (tint)
- Alpha (fade)
- Position
- Size
Shape Tweening
A shape tween morphs one image into another. The major requirement for a shape tween is that both the start and ending images are NOT symbols but are bitmap images. Thus you must break apart any symbols in the beginning and end frames. Note: Shape tweens can be much more memory intensive than motion tweens.
For Shape tweening to work, you need two things:
- A non-symbol object (shape drawn in Macromedia Flash or an imported bitmap image)
- Two keyframes designating the start and end
In a shape tween, you can change the following properties.
- Color (tint)
- Alpha (fade)
- Shape
In this project, you will use motion tweens to create transitions between the sections of the Gallery San Luis Web site. So far, the Gallery San Luis site's main movie exists only in frame 1. By adding keyframes down the Timeline, you can create a motion tween of the film advancing.
Planning a Motion Tween
Before you create a motion tween, you should come up with a general animation plan. Table 8-1c is an example.
TABLE 8-1c:
Example of animation plan
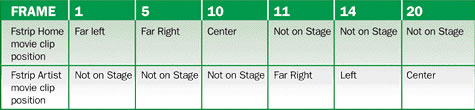
Remember that your movie plays 20 frames per second. We choose fewer frames for the first part of our animation so it moves faster at the beginning. This technique creates a more fluid movement, imitating the way an object naturally slows down before it stops.
Creating a Motion Tween
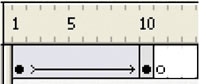
When visitors arrive at the Gallery San Luis Web site, they see the home page. If they click the Featured Artist navigation button, the Featured Artist section (the Fstrip Artist movie clip symbol) slides into view. The transition between the home page and the Artist Section should resemble the way a filmstrip advances inside a camera. To create this animation, use a motion tween. Motion tweens are represented on the Timeline by light blue shading and a solid arrow, as shown in Figure 8-1d.
FIGURE 8-1d:
A motion tween is represented on the Timeline by light blue shading and a solid arrow
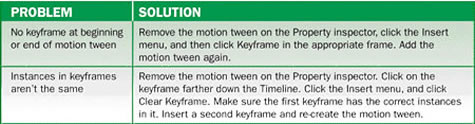
If you don't create the motion tweens correctly, you will get a dashed arrow instead of a solid arrow between the keyframes. Table 8-1e gives some troubleshooting causes and solutions for motion tweening.
TABLE 8-1e:
Motion tweening solutions
In the following Step-by-Step, you will add keyframes to the Artist layer. You will then adjust the horizontal position of the Fstrip Artist movie clip symbol in each keyframe and apply motion tweens to make the Artist Section appear to slide into view.
-
STEP-BY-STEP 8.2 Inserting keyframes and Adding the Motion Tween
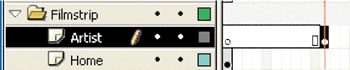
- Click and drag frame 1 of the Artist layer to frame 11 of the same layer. The keyframe moves to frame 11, leaving blank frames in frames 1-10 of the Artist layer, as shown in Figure 8-2a. Now the Featured Artist section won't be visible until the movie reaches frame 11.
FIGURE 8-2a:
Setting the Fstrip Artist movie at its starting point
- Click frame 15 of the Artist layer, click the Insert menu, point to Timeline, and then click Keyframe.
Note: A keyframe tells Flash that something is going to change in that frame without affecting the frames before it. You must insert a keyframe-not a regular frame-for motion tweening to work.
- Insert another keyframe in frame 20 of the Artist layer.
- Click on the Home layer and insert keyframes at frames 5 and 10. The Timeline should now look like Figure 8-2b.
FIGURE 8-2b:
Keyframes added to the Timeline

- The next step is to show changes in the keyframes. Click frame 1 on the Home layer.
Note: Holding the Shift key lets you drag something in a perfectly straight line so its vertical position doesn't change.
- Make sure the Selection tool is selected. Then hold down the Shift key and drag the Fstrip Home movie clip to the left until the left cel is off the Stage, as shown in Figure 8-2c.
FIGURE 8-2c:
Sliding the filmstrip to the left
- Click the keyframe in frame 5 of the Home layer.
- Make sure the Selection tool is selected. Then hold down the Shift key and drag the filmstrip to the right until the right cel is to the right of the Stage. Don't worry about the positioning right now-you'll be able to tweak all these positions after you add motion tweening.
- Click in frame 1 of the Home layer.
- On the Property inspector, choose Motion from the Tween menu.
- Click in frame 5 of the Home layer. On the Property inspector, add a motion tween for this frame. (Frame 10 is already in the correct stop position.)
- Click in frame 11 of the Artist layer and (using the Shift key) slide the filmstrip to the right until the center cel is slightly off the Stage.
- Click in frame 11 of the Artist layer and choose Motion from the Tween menu on the Property inspector.
- Click in frame 15 of the Artist layer and (using the Shift key) slide the filmstrip to the left until the left cel is off the Stage.
- Click in frame 15 of the Artist layer and choose Motion from the Tween menu on the Property inspector. The Timeline should look like Figure 8-2d.
FIGURE 8-2d:
Timeline for the Home and Artist transitions

- Test the movie. The filmstrips move across the Stage continuously, and the navigation and logo areas
disappear after the first frame.
- Close the test window and save the document. Remain in this screen for the next Step-by-Step.
Extending Layers Across the Timeline
You might have noticed that the logo and navigation areas of the Gallery site are not visible during the animation. These areas disappear as the motion tween starts, because their instance occupies only frame 1 of a document that is now 20 frames long. You can insert frames on these layers to extend the appearance of these areas on the Timeline so they continue to be visible.
-
STEP-BY-STEP 8.3: Extending Layers Down the Timeline
- Click in frame 20 of the Border layer, click the Insert menu, point to Timeline, and then click Frame. The Timeline for the Border layer is extended to frame 20. A small rectangle (the Instance box) appears in frame 20, indicating the end of the instance in a Timeline segment.
- Insert frames in frame 20 of the Logo and Navigation layers.
- Insert a keyframe in frame 11 of the Page Name layer. This allows you to change the title for the Featured Artist section. Frames 1-10 will contain the "Home" title, which switches to "Featured Artist" when the new section begins in frame 11.
- In the Library, duplicate the Title Home symbol. Name the new symbol Title Artist.
- Double-click the Title Artist symbol in the library to enter its symbol-editing mode.
- In Title Artist symbol-editing mode, select the Text tool, and change the text to read FEATURED ARTIST. You might need to widen the text box to fit the title.
- On the Information bar above the Timeline, click on Scene 1 to return to the main Timeline.
- Click frame 11 of the Page Name layer.
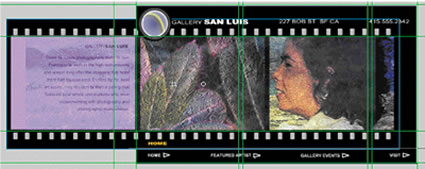
- Drag an instance of the Title Artist graphic symbol onto the Stage and line up its left edge with the left edge of the HOME title, as shown in Figure 8-3.
FIGURE 8-3:
Inserting the Featured Artist title

- With the Title Artist symbol selected, click the Edit menu, and then click Cut.
- Click the Title Home instance in frame 11 of the Page Name layer. The instance has a blue outline, indicating it is selected.
Note:
Because you inserted a keyframe in frame 11 of the Page Name layer, frames 1-10 still have the HOME title.
- Delete the Title Home instance from the Stage.
- Click the Edit menu, and then click Paste in Place. An aligned instance of the Title Artist symbol appears on the Stage.
- Click in frame 20 of the Page Name layer, click the Insert menu, point to Timeline, and then click Frame.
- Test the movie. The border, logo, section title, and navigation buttons remain visible throughout the motion tween. The section title changes to Featured Artist during that motion tween.
- Close the test window.
- Save your changes and remain in this screen for the next Step-by-Step.
Adding Actions to the Main Navigation Buttons
You've added the Featured Artist movie clip to the main Timeline, and you've created animated transitions between the sections. However, a user still cannot move from Home to the Featured Artist section, because the buttons don't work. Currently the Home and Featured Artist sections play continuously.
Just as you did for the Photo Viewer buttons, you can add actions to the main navigation buttons at the bottom of the Stage for moving from section to section.
-
STEP-BY-STEP 8.4: Adding Button Actions to Control Movie Clips
- Click the Control menu, click Test Movie, and roll your pointer over the site navigation buttons at the bottom of the Stage. The buttons are active only when the pointer is exactly over the letters of the words or the arrow. You need to configure Hit states for these buttons so the entire button area is clickable.
Note: The rectangular area around the text is where the button becomes active when the user moves the pointer over it. You can choose any stroke and fill to show the Hit state, because the rectangle is not visible when the movie is played.
- Close the Preview window.
- Double-click the Featured Artist button (the one with the arrow next to it) to enter its symbol-editing mode. The button has only an Up state configured with the text and arrow symbol.
- Insert keyframes in both the Over and Hit frames, as shown in Figure 8-4a. The Timeline now covers all four states.
FIGURE 8-4a:
Adding keyframe to the Down and Hit states of a button

- Click in the Hit frame, select the Rectangle tool, and draw a rectangle over the text and arrow symbol to indicate the area where a user can click, as shown in Figure 8-4b.
FIGURE 8-4a:
Drawing the Hit state

- Click the frame for the Over state.
- Select the Selection tool and click on the edge of the Stage to deselect all items on the Stage.
- Click the Featured Artist button text to select it. On the Property inspector, change the text color to orange (#FFCC00).
- Select the arrow graphic next to the Featured Artist text. On the Property inspector, select Tint from the Color list. On the color picker, choose orange (#FFCC00). The arrow changes to the same color as the text.
- Add a new layer above Layer 1 and rename it Sound.
- Create a keyframe in the Down frame and then, on the Window menu, point to Common Libraries, and then click Sounds.
- Click the Down frame of the Sound layer, and drag the Camera Shutter 35mm SLR sound onto the Stage. The sound is inserted into the Down state.
- Click on Scene 1 on the Information bar to exit the symbol-editing mode for the Featured Artist button.
- Save the document.
- Repeat steps 3-14, this time editing the Home button and its arrow.
- Test the movie and the buttons. You should get a satisfying camera-shooting sound when you click the buttons.
- Close the Preview window and save your work. Remain in this screen for the next Step-by-Step.
Adding Navigation ActionScript to the Main Movie
As with the Photo Viewer in the Fstrip Artist movie clip, you need frame actions and button actions to control the main movie. In the following Step-by-Step, you add a stop action to the first frame so the movie doesn't automatically play all the frames on the Timeline. Then you add actions to the navigation buttons so that when you click a button, the animations end up at the initial frame of the selected section.
You also add labels to identify the frames within the movie. These labels can then be referenced in other ActionScript functions.
-
STEP-BY-STEP 8.5: Adding Stop Actions and Frame Labels
- Insert a new layer above the Border layer and label it Actions & Labels
- Click frame 10 of the Actions & Labels layer, click Insert, point to Timeline, and then click Keyframe.
- Insert another keyframe at frame 20 of the same layer. The keyframe is to hold a stop action for the Featured Artist section.
- Expand the Actions panel.
- If they're not already open, open the Global Functions category and then the Timeline Control category.
- Double-click the stop action. The stop action appears on the Script pane and is added to frame 20 of the Actions & Labels layer.
- Click the keyframe in frame 10 of the Actions & Labels layer.
- From the Actions panel, add a stop action to this frame.
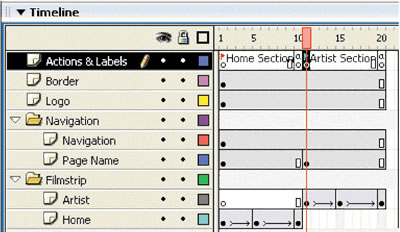
- Click in frame 11 of the Actions & Labels layer, click Insert, point to Timeline, and then click Keyframe. You will add labels to frames 1 and 11 of the Actions and Labels layer.
- Click the title bar of the Actions panel to collapse the panel.
- Expand the Property inspector, if necessary.
- Click frame 1 of the Actions & Labels layer. The Property inspector shows frame properties.
- Click in the Frame Label text box and key Home Section.
- Click frame 11 of the Actions & Labels layer and key Artist Section in the Frame Label text box. Your Timeline should now look like Figure 8-5.
FIGURE 8-5:
Labels identify the Home and Artist sections on the main Timeline
- Test the movie. The movie plays and then stops at frame 10.
- Close the Preview window and save your work. Remain in this screen for the next Step-by-Step.
Site Navigation Using the GotoAndPlay ActionScript
Currently there is no way to advance to the Featured Artist section. That's the next thing to add. To do this you will use the frame labels placed in the previous Step-by-Step combined with the GotoAndPlay ActionScript. Frame labels are easy to understand, and if you move the frame, the frame still has its name and thus the ActionScript doesn't have to change. For example, if you decide to drag the motion tweens to start on frames 5 and 15 instead of frames 1 and 10, all you have to do is drag the frames labeled Home Section and Artist Section. The ActionScript on the buttons remains the same.
-
STEP-BY-STEP 8.6: Adding gotoAndPlay Actions for Site Navigation
- Using the Selection tool, click the Featured Artist navigation button to select it. The button shows a blue outline.
- Click the title bar of the Actions panel. The Actions panel appears. Its title bar reads Actions - Button.
- Double-click the on action in the Movie Clip Control category. The on action appears on the Script pane. Double-click the release event.
- Click after the open curly bracket and double-click the gotoAndPlay action. The gotoAndPlay action appears on the Script pane. The insertion point is between the parentheses. This is where you indicate which frame to go to when the button is clicked.
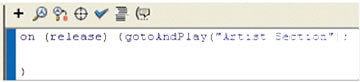
- Key "Artist Section" (make sure to include the quotation marks). The action script in the Script pane should look like Figure 8-6.
FIGURE 8-6:
Actions applied to the Featured Artist navigation button
- Collapse the Actions panel by clicking its title bar.
- Click the Home button.
- Click the title bar of the Actions panel to expand it.
- Double-click the on action, and then double-click the release event.
- Click after the open curly bracket, double-click the gotoAndPlay action, and then key "Home Section" (be sure to include the quotation marks).
- Collapse the Actions panel by clicking its title bar.
- Test the movie and try both the Home button and the Featured Artist button. The buttons should now control the advance of the filmstrip.
- Close the Preview window.
- Adjust the horizontal position of the filmstrips in keyframes 1, 5, 11, and 15 to speed up or slow down their animations. You should also make sure the filmstrips don't slide too far off the Stage in the motion tweens.
Note:
Moving the filmstrips farther off the Stage results in faster animation because they have more distance to cover in the same amount of time.
- When you are satisfied with the animations, save the movie. Then close the document and exit Flash.
 Back to previous page: Lesson 7: Creating Buttons Back to previous page: Lesson 7: Creating Buttons
 After this lesson, you should complete the following After this lesson, you should complete the following
- Test on Flash Lesson 8: Motion Tweening
- Project
Go to next section: Lesson 9: Creating an Animated Map
|
