Lesson 12: Video in Macromedia Flash
Upon completion of this unit, you should be able to:
- Import a Video into Flash.
- Create a new scene for a preloader.
- Develop the ActionScript and loading animation for a preloader.
- Create buttons to control video in Flash
- Configure ActionScript to control the timeline of another movie.
- Use the loadMovie command and a blank movie target to bring the video SWF into the main movie.
The Gallery San Luis Web Site Progress
When you started designing the Gallery San Luis Web site in Lesson 4, you outlined the list of items the client wanted incorporated into the site. Let's take a quick look at how the Gallery San Luis project has progressed:
A Home page that is both appealing and speaks photography.A Featured Artist page with a slide show of photographs and featured photographer information (and perhaps video interviews with the featured artists).- Video interviews with the featured artist.
- A
n Events page for requesting tickets to gallery events.
An animated Map page to indicate where the gallery is located.Sound incorporated on buttons.Slick transitions between pages.An overall photography metaphor for the site.
 Importing Video into Flash Importing Video into Flash
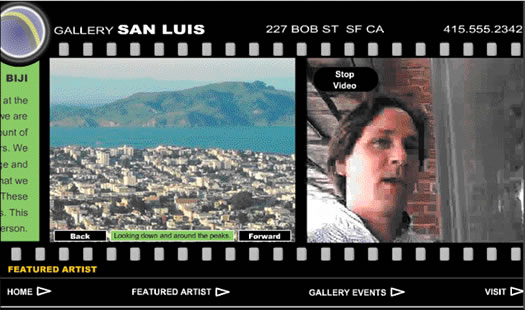
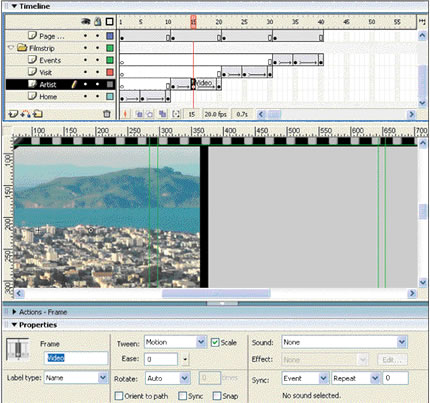
Macromedia Flash MX 2004 supports complete integration of video. Unlike some Web sites in which video is shown in a pop-up window, the Gallery San Luis site will have video integrated into its design, as shown in Figure 12-1. You will import a previously edited video of the artist, Biji, explaining his work.
FIGURE 12-1:
The artist video playing in the Artist section
Design Challenge
Because a video is a large file, it can greatly increase the file size of your SWF and slow down load time over the Internet. Another difficulty in incorporating the video in our particular case is that it will sit in the right cel, which is off the Stage. To show the video, the Play button must not only start the video but bring the right cel fully onto the Stage. The Stop button must then stop the movie and return the right cel to its original position.
Did You Know? Software such as DigiDesign Final Cut Pro and Adobe Premiere can be used to edit video.
Solution
A solution to the size problem is to place the video in a separate SWF file with a preloader built in and then use the loadMovie command to import this SWF file into a blank movie in the left cel of the Artist section. For the Play/Stop button, you will use the with command in ActionScript, which gives you control over more than one Timeline with a single button. The first step is to create a SWF file to hold the video. Then you create the Play/Stop button and its ActionScript. Finally, you create the preloader for this video SWF and integrate it into home.fla with the loadMovie command.
-
STEP-BY-STEP 12.1: Creating a F file for the Video
- Start Flash and create a new document.
- Save the document in the build_GallerySanLuis folder and name it bijivideo.fla.
- Select Document from the Modify menu. In the Document Properties dialog box, set the width to 345 and the height to 260 (leave the frame rate at 12 fps) and click OK.
- Rename Layer 1 to Video.
- Save the document and remain in this screen for the next Step-by-Step.
Embedding a Video
In the next Step-by-Step, you will import and embed an existing video into the Flash document you just created. Although embedding a video creates a larger SWF (Flash file), you can control the appearance of the video better because you can see it on the Stage. This saves time and usually improves the layout for the video in Flash.
Note: The video that has been created for importing in Step-by-Step 12.2 has the extension mov. To import this file, you must have QuickTime installed on your computer and an association set for QuickTime to run automatically for MOV file types. If you do not have QuickTime installed, you can download it from the Apple Web site: www.apple.com.
-
STEP-BY-STEP 12.2 Importing Video into a Document
- With the Video layer selected, click the File menu, point to Import, and then click Import to Stage.
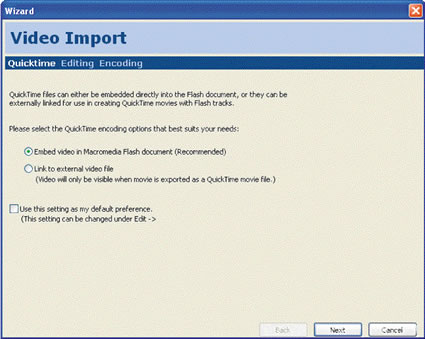
- Browse to the video folder and choose bijiSpeaks.mov. Then click Open (Windows) or Import (Macintosh) to open the Video Import Wizard shown in Figure 12-2a. The Embed video in Macromedia Flash document option is selected.
FIGURE 12-2a:
The Video Import Wizard
3. Click Next to embed the video in Macromedia Flash. The second step of the wizard appears, as shown in Figure 12-2b.
FIGURE 12-2b:
The Second Step of the Video Import Wizard
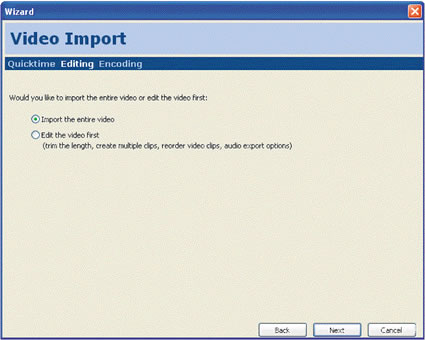
4. Confirm that Import the entire video is selected, and then click Next. The next step is to select compression settings for the video, as shown in Figure 12-2c. This is determined by the most common type of Internet connection used by the visitors to your site.
FIGURE 12-2c:
The Import Video Settings dialog box
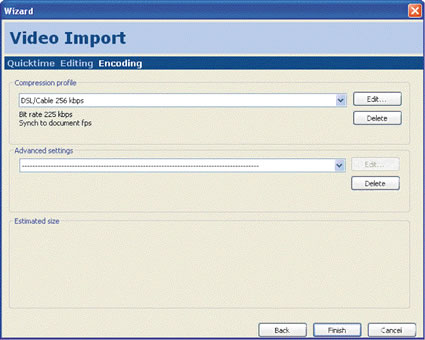
5. Click Finish to accept the default settings. The video is imported.
6. When the frame length warning appears, click Yes to insert the correct number of frames for the video to play.
7. Select the video on the Stage. On the Property inspector, make sure the video is lined up to X:0, Y:0.
8. Select the video on the Stage and press Enter (Windows) or Return (Macintosh) to play the video. (You won't hear the sound at this point.)
Did You Know? By default, Flash imports and exports video by using the Sorenson Spark codec, a compression/decompression formula that controls how multimedia files are compressed and decompressed during import and export. If QuickTime 4 is installed on your computer, Flash supports AVI, MPEG, MPG, MOV, and DV video formats.
9. Save the document and remain in this screen for the next Step-by-Step.
Creating On-Screen Buttons
In the next two Step-by-Steps you will create the on-screen buttons that will, when pressed, cause the video to play or to stop playing. As you have done with other navigation buttons, you will first create the buttons and configure their various states. Then, in later Step-by-Steps, you will add the ActionScript that actually controls the video playback.
-
STEP-BY-STEP 12.3: Creating a Play Button for the Video
- Insert a layer above the Video layer and rename it Buttons. You now have a layer for the Play Video and Stop Video buttons.
- Select the Rectangle tool.
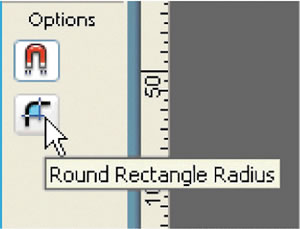
- In the Options area of the toolbar, click the Round Rectangle Radius button shown Figure 12-3a.
FIGURE 12-3a:
The Round Rectangle Radius button
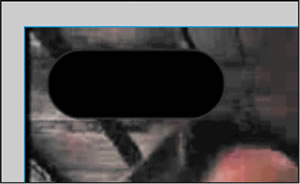
- In the Rectangle Settings dialog box, set the corner radius to 30 points and click OK.
- In the upper-left corner of the video, draw a rectangle as shown in Figure 12-3b. Using the Selection tool, double-click the rectangle and change the stroke and fill to black.
FIGURE 12-3b:
Play Button position
Note:
The exact position of the rectangle isn't important, but make it large enough to hold two readable words, one on top of the other. The width should be at least 55 and the height at least 35.
- With the rectangle still selected, choose Convert to Symbol from the Modify menu. Name the symbol Play Video, set the Behavior to Button, and then click OK.
- Double-click the button instance on the Stage to enter symbol0editing mode.
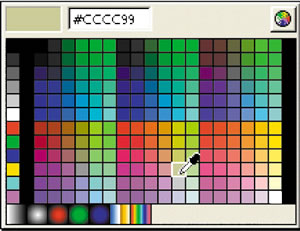
- Insert a keyframe in the Over state.
- On the toolbar, change the fill color to beige (#CCCC99) as in Figure 12-3c.
FIGURE 12-3c:
Choosing a color for the Over state
- Insert a keyframe in the Hit state. The hit area is set to the entire button.
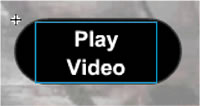
- Insert a new layer above Layer 1 and rename it Text.
- Select the Text tool and click on the button to begin a new text box. On the Property inspector, set the following text attributes:
Static Text, Arial, l2 pts., white, bold, centered.
- Key Play Video. Press Enter (Windows) or Return (Macintosh) after "Play" so the label will be on two lines, as shown in Figure 12-3d.
FIGURE 12-3d:
Adding the button text
- Use the Arrow keys or the Align panel to center the text on the button. Make sure the button is large enough to hold the text.
Note: Selecting both the text and the button on the Stage can be a little difficult. The best way to select them both is by shiftclicking the first keyframes of Layer 1 and the Text layer.
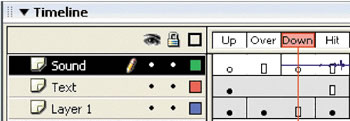
- Add a layer above the Text layer and rename it Sound.
- On the Sound layer, insert a keyframe in the Down state.
- Click the Window menu, point to Common Libraries, and then click Sounds. Drag an instance of the Polaroid Shutter sound onto the Stage, as shown in Figure 12-3e. A shutter sound will play when users click the Play Video button.
FIGURE 12-3e:
Inserting a Polaroid Shutter sound
- On the Information bar at the top of the Stage, click Scene 1 to return to the movie clip instance.
- Save the document and remain in this screen for the next Step-by-Step.
Obviously, the Play Video button you just created will appear in the right cel when the Featured Artist section is opened. Once the video starts playing, you want the Stop Video button to appear.
-
STEP-BY-STEP 12.4 Creating a Stop Video Button
- From the library, select the Play Video button.
- Use the options menu in the upper-right corner of the library to Duplicate the symbol.
- Name the new button symbol Stop Video, and then click OK.
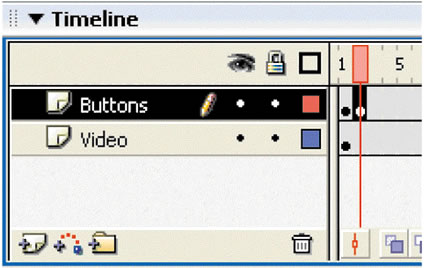
- Insert a keyframe into frame 2 of the Buttons layer of the main Timeline, as shown in Figure 12-4a.
FIGURE 12-4a:
Creating a keyframe for the Stop Video button
- Select the instance of the Play Video button on the Stage and note its X and Y coordinates on the Property inspector.
- Delete the instance of the Play Video button on the Stage in frame 2.
- Drag the Stop Video symbol from the library onto the Stage in frame 2 of the Buttons layer.
- On the Property inspector, enter the X and Y coordinates from the Play Video button. The Stop and Play Video buttons are now in the same position on the Stage.
- Double-click the instance of the Stop Video button on the Stage.
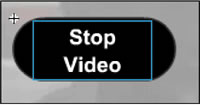
- Double-click the text on the button and change Play to Stop, as shown in Figure 12-14b.
FIGURE 12-4b:
Configuring the Text for the Stop Video button
- On the Information bar, click Scene 1 to return to the movie clip instance.
- Click on frame 1 and play the movie by pressing Enter (Windows) or Return (Macintosh). Notice how the buttons change as the movie progresses.
- Save the document and remain in this screen for the next Step-by-Step.
Controlling Video Playback
The buttons need ActionScript to work properly. The Timeline also needs some ActionScript so the video doesn't start playing before the Play Video button is clicked.
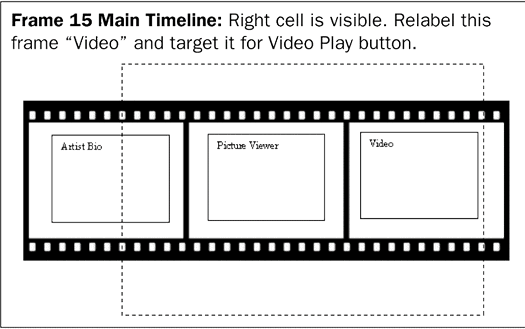
A with command lets you target other movie clips or objects on the Stage. The Biji Video movie clip you are designing will eventually be located in the right cel of the Fstrip Artist movie. However, the Fstrip Artist movie ends its motion tween with the right cel barely visi ble, as shown in Figure 12-5a. You can use a with command to send the main Timeline of home.fla back to frame 15, where the right cel is entirely visible. You will later label frame 15 "Video" for further clarity when you configure home.fla to load the video at the end of this lesson, as shown in Figure 12-5b.
FIGURE 12-5a:
The movie clip with the right cel barely visible
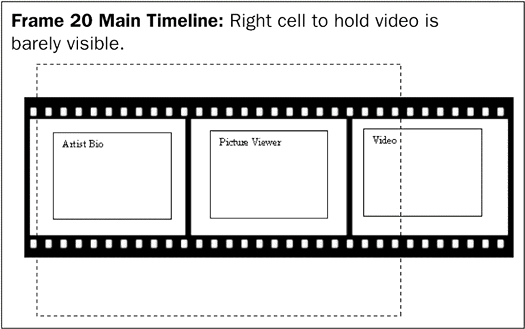
FIGURE 12-5b:
The movie clip with the right cel entirely visible
-
STEP-BY-STEP 12.5: Creating ActionScript to Control Video Playback
- Insert a layer above the Buttons layer and rename it Actions.
- Select the first frame of the Actions layer and, on the Property inspector, label it StartVideo. This will create a target frame for the preloader developed later in this lesson.
- Click on the Actions title bar to expand the Actions panel. In the Timeline Control category of the Global Functions category, double-click stop. A stop action is added to the first keyframe of the Actions layer. The video will no longer run automatically.
- Scroll on the Timeline to the end of the movie clip and insert a keyframe in the last frame of the Actions layer, as shown in Figure 12-5c.
FIGURE 12-5c:
Inserting a keyframe in the last frame of the Actions layer

- With this keyframe selected, double-click gotoAndPlay in the Timeline Control category.
- Key 1. When the movie reaches the last keyframe, it will go to and play frame 1.
- Collapse the Actions panel. Select the instance of the Play Video button on the Stage in frame 1 of the Buttons layer.
- Expand the Actions panel.
- Add the following ActionScript to the Script pane, as shown in Figure 12-5d:
on(release){
gotoAndPlay(2);
with (_root){
gotoAndStop("Video");
}
}
FIGURE 12-5d:
Action Script for the Play Video button
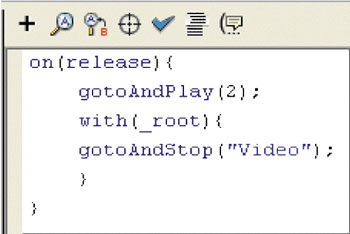
- When the Play Video button is pressed and released, the playhead will go to and play frame 2 and will go to and stop on the frame labeled "Video" in the main Timeline.
Note:
Playing from the Video frame of the main Timeline slides the video back to its resting point, Stage right.
- Collapse the Actions panel.
- Select frame 2 of the Buttons layer and click the Stop Video instance on the Stage.
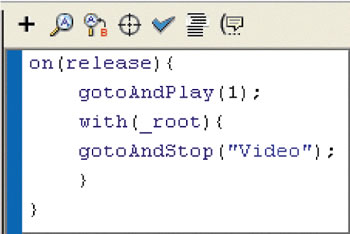
- Expand the Actions panel and add the following ActionScript to the Script pane, as shown inFigure 12-5e:
on(release){
gotoAndPlay(1);
with (_root){
gotoAndStop("Video");
}
}
FIGURE 12-5e:
ActionScript for the Stop Video button
- Collapse the Actions panel, Save the document and remain in this screen for the next Step-by-Step.
Creating Preloader Controls for a Movie
Because large Flash movies can take a while to load on the Internet (depending on connection and processor speed), many movies use a preloader: a short animation indicating that the main movie is loading. When the main movie is fully loaded (or partially loaded, depending on the designer's preference), the preloader automatically moves to the first frame of the main movie. There are three primary steps for creating a preloader:
- Create a new scene for the preloader (completed in Step-by-Step 12.6)
- Insert ActionScript to constantly check the load status of the main movie (completed in Step-by-Step 12.7)
- Create an animation or load bar indicating that the preloader is working (completed in
Step-by-Step 12.8)
Currently, bijivideo.swf is approximately 550 KB-fairly large for a Flash movie. A user trying to view this file over the Internet with a 56K modem would see a black screen for a while, unaware that the video is loading. The following sections walk you through the creation of a preloader for bijivideo. You might also want to create a preloader for home.fla.
A scene in Flash enables designers to organize content thematically. Each scene has its own Timeline and automatically jumps to the next scene when its Timeline or scripting loop ends.
-
STEP-BY-STEP 12.6: Creating a New Scene for a Preloader
- Click the Window menu, point to Other Panels, and then click Scene. The Scene panel opens, with Scene 1 selected.
- Click the Add scene (+) button at the bottom of the panel.
- Double-click Scene 2 and rename it Preloader, as shown in Figure 12-6.
FIGURE 12-6:
Naming the Preloader scene
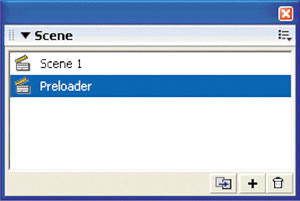
- Drag the Preloader scene above Scene 1 so it will play before Scene 1.
- Rename Scene 1 Video.
- Select the Preloader scene. You are presented with a blank Stage in the Preloader scene.
- Save your work and remain in this screen for the next Step-by-Step.
-
STEP-BY-STEP 12.7: Writing the ActionScript for the Preloader
- Double-click Layer1 and rename it Actions.
- Click the first keyframe of the Actions layer and, on the Property inspector, label it Start.
- Click frame 3 of the Actions layer and insert a Keyframe.
- With frame 3 selected, expand the Actions panel. Frames 1 and 2 will be the beginning of a loop that constantly checks the loading status of the movie. In frame 3 you need to enter the ActionScript that does the checking.
- Enter the following ActionScript in the Script pane, as shown in Figure 12-7:
if (_framesloaded >= _totalframes){
gotoAndPlay("Video", "StartVideo");
} else {
gotoAndPlay("Start"); }
FIGURE 12-7:
Final ActionScript for the Preloader
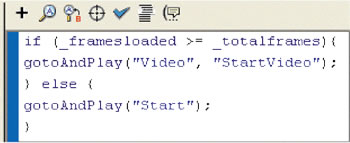
The gotoAndPlay action is set below the if statement, meaning that if all the frames of the entire movie are loaded, the movie will go to the first frame of the Video scene. The else action sets the action for when the if condition is not met. The second gotoAndPlay action is set for the else statement, meaning that if all the frames of the entire movie are not loaded, the scene loops back to the first frame and plays again until all the movie frames are loaded.
- Collapse the Actions panel, save the document, and remain in this screen for the next Step-by-Step.
-
STEP-BY-STEP 12.8: Creating an Animated Message for the Preloader
- Insert a new layer and rename it Animation. Drag the Actions layer above the Animation layer.
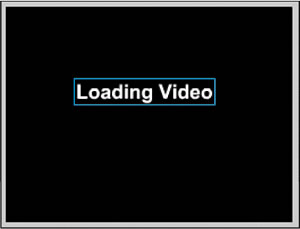
- Select frame 1 of the Animation layer, select the Text tool, and click on the Stage to create a text box with the following attributes: Static Text, Arial, 24 pt., white, bold, and left-aligned. Key Loading Video, as shown in Figure 12-8a. If you cannot see the white text, you might need to change the Background color of your document to black.
FIGURE 12-8a:
Text for the preloading animation
- Use the Selection tool to select the text box.
- Choose Convert to Symbol from the Modify menu.
- Name the new symbol Loading Text, set its Behavior to Movie clip, and then click OK.
- On the Align panel, toggle the To stage button to On and click Align horizontal center and Align vertical center.
- Double-click the Loading Text instance on the Stage to enter symbol-editing mode.
Now create a short animation to remind viewers that the Macromedia Flash Player is loading content.
- Insert keyframes in frames 2, 3, and 4 of Layer1 in the Loading Text symbol.
- Click frame 2, select the Text tool, and click in the text box to edit it. Add a period (.) at the end of the text, as shown in Figure 12-8b.
FIGURE 12-8b:
Adding a period to the Video Loading text

- Click frame 3, select the Text tool, and click in the text box to edit it. Add two periods (..) at the end of the text.
- Click frame 4, and click in the text box to edit it. Add three periods (...) at the end of the text.
- Select the Selection tool and click elsewhere on the Stage. Press Enter (Windows) or Return (Macintosh) to play the text animation.
Note:
The SWF is already stored on your computer. The preloader will play only briefly because the entire SWF doesn't require any load time. If you want to see the preloader in action, you must post the file to the Internet and view it with a fairly slow modem connection.
- On the Information bar, click Preloader to exit symbolediting mode.
- Select Test Scene from the Control menu. You can see the
preloader animation.
- Close the preview window.
- Select Test Movie from the Control menu. Try the Play Video and Stop Video buttons.
- Close the preview window and save the document. Then close bijivideo.fla but leave Flash open for the next Step-by-Step.
Loading bijivideo.swf into the Gallery San Luis Web Site
To load the video into the Featured Artist section of home.fla, you can use the loadMovie action, which loads a SWF file into a level or target in a document. To locate the video precisely in the right cel of the Featured Artist section, you will use a blank movie called "Holder" as the target for loading bijivideo.swf.
-
STEP-BY-STEP 12.9: Creating a New Right Cel for the Featured Artist Section
- Open home.fla.
Note: If you had problems with the previous lesson, ask your instructor for the home8.fla sample solution file. Once you open this file, save it as home.fla in your build_GallerySanLuis folder and proceed with
this lesson.
- Make sure the Library panel is open. Duplicate the Cel Background movie.
- Name the new symbol Video Biji and click OK to save the symbol in the library.
- Double-click the Video Biji symbol in the library to enter symbol-editing mode.
- Add a new layer above the Background layer and rename it Video.
- Save the document and remain in this screen for the next Step-by-Step.
-
STEP-BY-STEP 12.10: Creating aBlank Movie to Hold bijivideo.swf
- Select New Symbol from the Insert menu.
- Name the symbol Holder, set the Behavior to Movie clip, and then click OK. The Holder symbol is inserted in the library and you are in its symbol-edit mode.
- Double-click the Video Biji movie clip symbol to enter its symbol-editing mode.
- Select the first frame of the Video layer and drag an instance of the Holder movie clip symbol onto the Stage. A white dot with a center cross appears on the Stage on the Video layer.
- On the Property inspector, give the instance of Holder the instance name holder. The movie clip can now be targeted as a holder in ActionScript.
- Use the Selection tool to drag the Holder instance to the upper-left corner of the background rectangle. Zoom in to locate the instance precisely in the corner, as shown in Figure 12-10a.
FIGURE 10a:
Aligning the Holder movie clip instance

- Insert a new layer above the Video layer and rename it Actions.
- Click the first frame of the Actions layer and expand the Actions panel.
- Make sure the Global Functions category is expanded and click the Browser/Network subcategory to expand it.
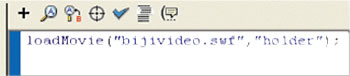
- Double-click the loadMovie command. Key "bijivideo.swf","holder" as shown in Figure 12-10b.
Note:
Both home.fla and bijivideo.swf must be in the same folder (build_GallerySanLuis) for this URL in step 10 to work.
FIGURE 12-10b:
Configuration for the loadMovie command
- Save the document and collapse the Actions panel. Remain in this screen for the next Step-by-Step.
-
STEP-BY-STEP 12.11: Inserting the Video Biji Movie Clip into the Fstrip Artist Movie Clip an Main Timeline
- On the Library panel, double-click the Fstrip Artist movie clip to enter its symbol-editing mode. (If you zoomed in for the previous Step-by-Step, you will need to zoom out now.)
- Select the Right layer and drag an instance of Video Biji onto the Stage. An instance of Video Biji is inserted into the Right layer of the Fstrip Artist movie clip symbol.
- Line the instance up over the image in the right cel and choose Cut from the Edit menu. The Video Biji movie clip is placed on the Clipboard.
- Delete the image in the right cel and then choose Paste in Place from the Edit menu. The Video Biji movie clip is centered in the right cel.
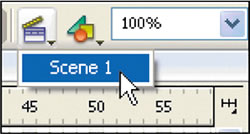
- In the Scene Selector at the top of the Stage, click Scene 1 to return to the main Timeline, as shown in Figure 12-11a.
FIGURE 12-11a:
Using the Scene Selector to return to the main Timeline
- Click frame 15 of the Artist layer.
- On the Property inspector, key Video in the Frame Label box, as shown in Figure 12-11b. The ActionScript for the Play and Stop Video buttons will now work.
FIGURE 12-11b:
Naming the Video frame referred to by the Video Stop/Play buttons
- Test the movie. Go to the Featured Artist section. The Play Video button brings the video cel onto the Stage and plays the video. The Stop Video button returns the video to frame 1 of the video and stops the video, as shown in Figure 12-11c.
FIG 12-11c:
The Biji video playing as an integrated unit
9. Close the preview window. Save the document, close it, and exit Macromedia Flash.
 Back to previous page: Lesson 11: Building the Events Components Back to previous page: Lesson 11: Building the Events Components
 After this lesson, you should complete the following After this lesson, you should complete the following
- Test on Flash Lesson 12: Video in Macromedia Flash
- Project
Go to next section: Lesson 13: Publishing a Flash Movie
|
