Lesson 9: Creating an Animated Map
Upon completion of this unit, you should be able to:
- Create a mask to control the view of a large graphic.
- Create motion tweens that zoom in and shift position.
- Use the Pen tool to draw map highlights.
- Add sounds to animation.
- Use a stop action to control movie segments.
The Gallery San Luis Web Site Progress
When you started designing the Gallery San Luis Web site in Lesson 4, you outlined the list of items the client wanted incorporated into the site. Let's take a quick look at how the Gallery San Luis project has progressed:
A Home page that is both appealing and speaks photography.A Featured Artist page with a slide show of photographs and featured photographer information.- Video interviews with the featured artists (optional).
- An animated Map page to indicate where the gallery is located.
- An Events page for requesting tickets to gallery events.
Sound incorporated on buttons.Slick transitions between pages.An overall photography metaphor for the site.
 Creating the Visit Movie Clip Creating the Visit Movie Clip
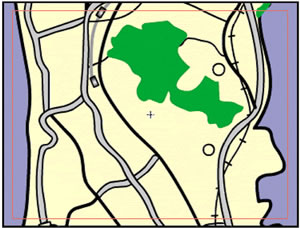
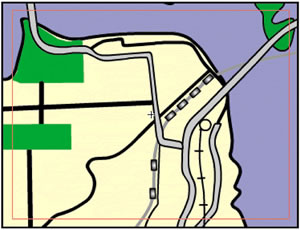
The Visit page of the Gallery San Luis Web site offers a handy animated tool for getting directions to the Gallery from four different starting points. As illustrated in Figure 9-1a, after a user chooses a starting point in a drop-down menu, the section displays step-by-step directions and zooms into a section of a San Francisco map to show the route. The Visit page truly models how you can use Macromedia Flash to create complex graphics easily.
FIGURE 9-1a:
The Visit page
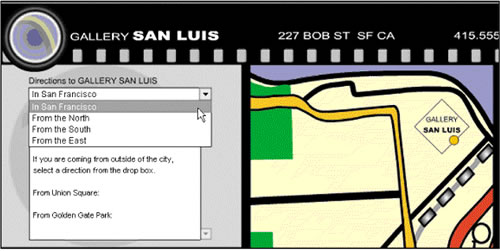
The Visit page features a single map that customizes its view depending on where Gallery visitors say they are coming from. On a typical HTML page, you would need four maps on four pages or one long page to scroll through to get different views of the appropriate map and direc tions. A much better design incorporates one image that can graphically shift to the correct area, depending on the starting point of the user.
Flash movie clip symbols can use the Timeline to fluidly move from one image to another. As seen on the main Timeline, ActionScript on frames and buttons can be used to control what point of the Timeline displays according to user selection. Thus you will be creating a map movie clip with four sections on the Timeline. The images will present animations indicating how to get to Gallery San Luis from the north, south, and east of San Francisco, as well as from within the city of San Francisco. You will have to create motion tweens for each of these sections and use a technique called masking to crop out the unneeded portions of the map for each direction. You will then add highway highlights by using the Pen tool.
The Fstrip Visit Movie Clip
Because the Visit page has three cels-directions, map, and a decorative image-you can use the Fstrip Artist movie clip as your starting point. You first modify it by deleting the Text layer and changing the background color of the left cel.
-
STEP-BY-STEP 9.1: Creating the Fstrip Visit Movie Clip
- Start Flash and open the home.fla file you worked with in Lesson 8, which should be in the build_GallerySanLuis folder.
Note: If you had problems with the previous lesson, ask your instructor for the home5.fla sample solution file. Once you open this file, save it as home.fla in your build_GallerySanLuis folder and proceed with this lesson.
- Click the Window menu, and then click Library to open the Library panel if it is not already open.
- Select the Fstrip Artist movie clip in the library.
- Open the Options menu from the Library panel and click Duplicate, as shown in Figure 9-1b. The Duplicate Symbol dialog box opens.
FIGURE 9-1b:
Duplicating the Fstrip Artist movie clip symbol
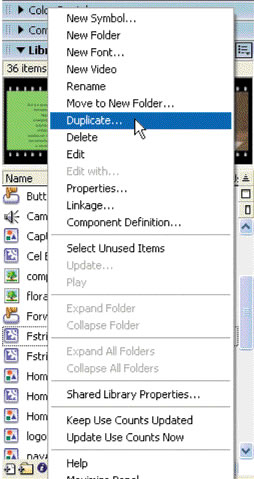
- Name the new symbol Fstrip Visit and click OK. The movie clip symbol Fstrip Visit is added to the library. No instances of this symbol will appear in the movie document until you drag the symbol onto the Stage.
- Double-click the icon for the Fstrip Visit movie in the library. The Fstrip Visit movie appears by itself on the Stage. You are now in symbol-editing mode.
- Delete the Gallery Text layer by dragging it into the trashcan. You will not need text in the left cel.
- Save the document and remain in this screen for the next Step-by-Step.
The Map Movie Clip
To add the map to the center cel, you create a new movie clip for the map. Then you import a map of San Francisco as a SWF document.
-
STEP-BY-STEP 9.2 Creating the Map Movie Clip
- Click the Insert menu, and then click New Symbol.
- Name the symbol Map, select Movie clip as its Behavior, and click OK. You enter symbol-editing mode for the map symbol.
- Rename Layer 1 Map Image.
- Click the File menu, point to Import, and then click Import to Library to open the Import window.
- Browse to the images folder and double-click map_image.swf.
- Drag the map-image graphic symbol from the library onto the Stage to create an instance of the symbol in the Map movie clip. If a message appears warning that fonts are missing from your system, click Use Default.
- Click the Window menu and then click Transform. Or, click the Transform tab on the Align & Info & transform panel title bar to expand it.
- Select the Constrain check box to keep the horizontal and vertical proportions of the graphic the same.
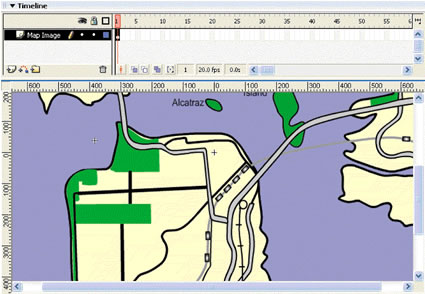
- Double-click in the Height box on the Transform panel, key 400%, and press Enter (Windows) or Return (Macintosh). The map graphic expands to a size where you can see specific streets. The image is 2880 x 2205.6 pixels (see the size on the Property inspector), much larger than the 360 x 260 center box of the filmstrip. That's OK. You'll use the Mask Layer feature to control how much of the map the user sees.
Note:
The horizontal configuration might only increase to 355% because the work area is not large enough for a full 400% increase in the size of the graphic.
- Save your work and remain in this screen for the next Step-by-Step.
Creating Masks
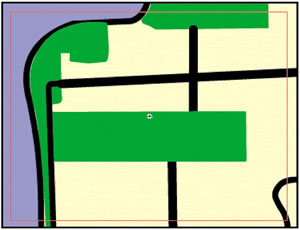
Mask layers are an extremely useful design element in Flash. You can use a mask layer to create a hole through which underlying layers are visible. You can think of a mask as a viewing frame. Objects in layers within this viewing frame can be seen. Objects outside this viewing frame cannot be seen, as shown in Figure 9-3a. You create objects on the mask layer that are the holes that show the layers below.
FIGURE 9-3a:
Masking illustrated
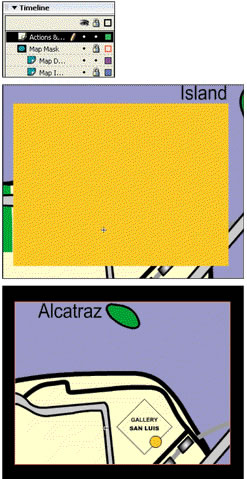
You can use a mask to show a selected part of the map in the center cel of the filmstrip. A 345 x 260 rectangular mask keeps the viewing area constant and correct for the center box of the Map movie clip. The mask remains stable while the map-image instance moves and zooms in and out beneath the mask.
Using an Animation Plan
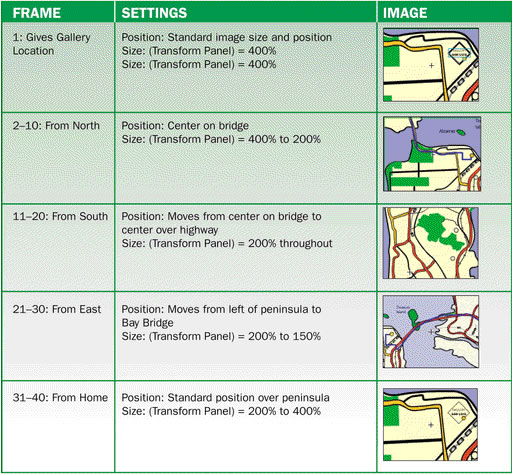
To visualize the map animation before creating it, designers create an animation plan. The animation plan helps a designer visualize and lay out complex animation, often involving several graphic elements, size changes, and fading. The plan contains sketches or rough images of what the transformations will look like. It is similar to a storyboard for a cartoon or a film, but it also contains information on the numerical transformation and position changes of the map-image graphic.
The animation plan in Table 9-1 shows how the San Francisco map moves and resizes to show the different routes to the Gallery San Luis.
TABLE 9-3b:
Animation plan for map image
Using a Mask and Motion Tweens
To build this plan, you first create a mask and then add the appropriate motion tweens to the Map Image layer.
-
STEP-BY-STEP 9.3 Creating a Mask
- If you are not in symbol-editing mode for the Map movie clip, double-click its icon in the library.
- Click the View menu, point to Magnification, and then click 50% (Windows) or zoom out to 50% (Macintosh). Using the Selection tool, drag the map until the upper-right corner of the San Francisco peninsula is visible on the Stage, as shown in Figure 9-3c.
FIGURE 9-3c:
Upper-right corner of the San Francisco peninsula
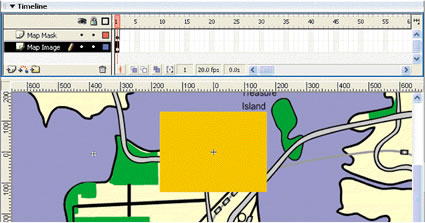
- Create a layer above the Map Image layer and rename it Map Mask.
- Select the Rectangle tool and change its Stroke to None. (Note: The image is easier to select when it is only a fill, with no stroke. The fill color of a mask doesn't matter; the rectangle only shows the shape of the mask area.)
- Draw a rectangle over the map on the Map Mask layer. (Don't worry about the specific size or location at this point.)
- Use the Selection tool to select the rectangle.
- On the Property inspector, set W: to 345 and H: to 260.
- On the Align panel, make sure the To stage button is toggled on, and then click Align horizontal center and Align vertical center. The rectangle is centered on the Stage.
- Select the Map Image layer, and use the Selection tool and arrow keys to move the map. (Do not move the rectangle - move the map under the rectangle!) Move the map until the upper-right corner of the San Francisco peninsula is within the rectangle, as shown in Figure 9-3d.
FIGURE 9-3d:
Map lined up beneath the rectangle on the Mask Layer
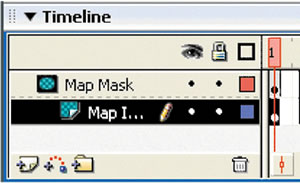
- Click the Map Mask layer, click the Modify menu, point to Timeline, and then click Layer Properties to open the Layer Properties dialog box.
- Select Mask from the Type category in the Layer Properties dialog box and click OK. The mask layer has a mask icon, but the Map Image layer is not masked. To mask a pre-existing layer, you must drag it below the mask layer.
- Drag the Map Image layer above the Map Mask layer. Then drag it below the Map Mask layer. The Map Image layer is masked, as shown in Figure 9-3e.
FIGURE 9-3e:
Masking the Map Image layer
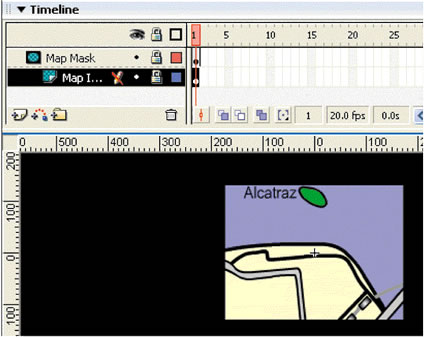
- Click the padlock icon above the layers to lock all the layers in this movie. When you lock the layers, the mask effect becomes visible on the Stage, as shown in Figure 9-3f.
FIGURE 9-3f:
The mask in effect
- Save the document. Remain in this screen for the next Step-by-Step.
Working with Masks
You can use the outline feature of layers to help you work with masks. With the Mask layer set to Outline mode, you can tell where the mask is and can work with the masked layers below it.
-
STEP-BY-STEP 9.4 Keeping a Mask in View
- Click the padlock icon on the Map Image layer to unlock the layer.
- Click the Outline View box on the Map Mask layer, as shown in Figure 9-8. The outline of the mask appears and the layer remains locked.
FIGURE 9-8 Outline View box
- Save the document and remain in this screen for the next Step-by-Step.
Animating the Map
You have created a mask layer that shows the right amount of the map. Now you need to change the map to the right size and position it beneath the mask so it shows the roads and streets that are listed in the directions.
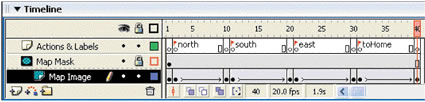
Setting Up the Timeline
This animation is similar to the animation that changes the filmstrip between sections of the Gallery site. You use keyframes along the Timeline to indicate when the map view changes, as shown in Figure 9-5a. In each keyframe, you position the map under the mask and resize it to show the San Francisco area described in one of the sets of directions.
FIGURE 9-5a:
The Timeline configured for animation
-
STEP-BY-STEP 9.5: Setting Up the Timeline for Animation
- On the Map Image layer, click frame 2, click the Insert menu, point to Timeline, and then click Keyframe.
- Insert keyframes in frames 11, 21, 31, and 40 on the Map Image layer. These keyframes will be the starting points of the various motion tweens indicated in the animation plan.
- Click frame 40 of the Map Mask layer, click Insert, point to Timeline, and then click Frame. The mask is extended to be visible in all the frames-of the Map Image layer.
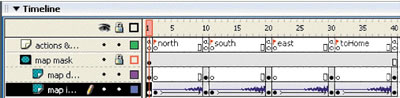
- Click the Map Mask layer and then click the Insert Layer button. Rename the new layer Actions & Labels. This layer will be important when you are creating ActionScript for the map.
- Insert keyframes in frames 2,10,11, 20, 21, 30, 31, and 40 of the Actions & Labels layer.
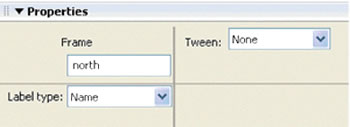
- Click frame 2 on the Actions & Labels layer. On the Property inspector, label frame 2 north, as shown in Figure 9-5b.
FIGURE 9-5b:
Labeling frames on the Property inspector
- On the Actions & Labels layer, name the following frames (remember that the names are case-sensitive):
Frame 11: south
Frame 21: east
Frame 31: toHome
- Save your work and remain in this screen for the next Step-by-Step.
Animating the Map Image
The animation plan will guide you as you animate the map for different driving directions. Recall that the map mask stays in one place while the map image below it moves, increasing and decreasing in size as necessary. The first animation, for directions coming from north of San Francisco, is in frames 2-10 on the Map Image layer.
-
STEP-BY-STEP 9.6 Animating the Map Image Layer
- Click frame 2 on the Map Image layer. This selects the instance of the map in frame 2.
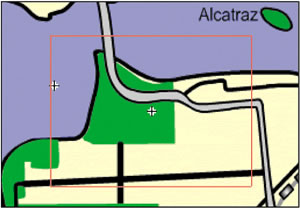
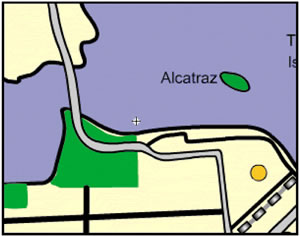
- Using the arrow keys, slide the map image until the mask outline is over the northwest tip of the San Francisco peninsula, as shown in Figure 9-6a.
FIGURE 9-6a:
Lining up the north animation
- Click frame 10 on the Map Image layer, click Insert, point to Timeline, and then click Keyframe. An endpoint is created for a motion tween to zoom into the map.
- Make sure the Transform panel is expanded (click the tab, if necessary).
- Make sure the Constrain option is checked. Double-click in the Height box, key 200%, and then press Enter (Windows) or Return (Macintosh). You might need to zoom out and scroll to locate the map after it has been sized. If the new size of the map does not match Figure 9-6b, repeat this step.
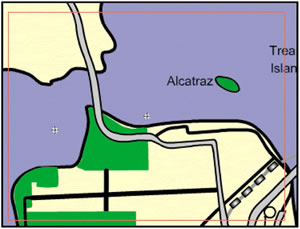
- Use the Selection tool and the arrow keys to slide the map until the Golden Gate Bridge is in the center of the mask, as shown in Figure 9-6b.
FIGURE 9-6b:
Lining up the north animation over the bridge
- Click frame 2 on the Map Image layer. On the Property inspector, create a motion tween.
Hot Tip:A motion tween, in spite of its name, can include rotation, size, tint, and transparency changes.
- Click and drag the playhead (the red rectangle at the top of the Timeline) from frame 2 to frame 10 or press Enter (Windows) or Return (Macintosh) to inspect the motion tween. Notice that this tween does not shift position; instead, it changes the size of the map, creating a zoom effect.
- Click frame 11 on the Map Image layer. On the Transform panel, make sure Constrain is checked and change the dimensions to 200%. (Again, you might have to do this twice to achieve the map size shown in Figure 9-13.)
- Using the Selection tool and arrow keys, slide the map until the middle of the San Francisco peninsula is centered in the mask, as shown in Figure 9-6c.
FIGURE 9-6c:
Lining up the beginning of the south animation
- Click frame 20 on the Map Image layer, click Insert, point to Timeline, and then click Keyframe. An endpoint is created for a motion tween to zoom up from the south.
- Using the Selection tool, select the map and slide it until the upper-right side of the San Francisco peninsula is centered in the mask, as shown in Figure 9-6d..
FIGURE 9-6d:
Lining up the end of the south animation
- Click frame 11 on the Map Image layer. On the Property inspector, create a motion tween.
- Click and drag the playhead from frame 11 to frame 20 or press Enter (Windows) or Return (Macintosh) to inspect the motion tween.
- Click frame 21 on the Map Image layer. Slide the map until the upper-left side of the San Francisco peninsula is centered in the mask, as shown in Figure 9-6e.
FIGURE 9-6e:
Lining up the beginning of the east animation
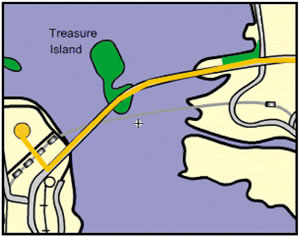
- Click frame 30 on the Map Image layer, click Insert, point to Timeline, and then click Keyframe. An endpoint is created for a motion tween to zoom from west to east.
- Click the map to select it.
- On the Transform panel, make sure Constrain is checked and change the dimensions to 150%. (You might have to enter the desired value twice.)
- Click on the map and then slide it until the Bay Bridge is centered in the mask, as shown in Figure 9-6f. (Hint: Make sure you don't show the edge of the map where the bay is cut off.)
FIGURE 9-6f:
Lining up the end of the south animation
- Click frame 21 on the Map Image layer. On the Property inspector, create a motion tween.
- Click and drag the playhead from frame 21 to frame 30 or press Enter (Windows) or Return (Macintosh) to inspect the motion tween.
- Click frame 31 on the Map Image layer. On the Transform panel, make sure Constrain is checked and change the dimensions to 200%. (Repeat if necessary.) Frame 31 is configured to be the starting point of a zoom.
- Slide the map until the upper-right side of the San Francisco peninsula is centered in the mask, as shown in Figure 9-9g.
FIGURE 9-9g:
Lining up the beginning of the toHome animation
- Click frame 40 in the Map Image layer. Note that the endpoint is already configured.
- Click frame 31 in the Map Image layer and, on the Property inspector, create a motion tween.
- Click and drag the playhead from frame 31 to frame 40 or press Enter (Windows) or Return (Macintosh) to inspect the motion tween. The Timeline for the Map movie clip symbol should now look like Figure 9-6h.
FIGURE 9-6h:
Timeline for the Map Image layer
- Save the document and remain in this screen for the next Step-by-Step.
Adding a Graphic
Next, add a graphic to indicate the specific location of Gallery San Luis.
-
STEP-BY-STEP 9.7: Adding a Gallery Location Graphic
- Click the Map Image layer and insert a new layer above it. Rename the layer Map Details. The layerappears masked by the map mask.
- Lock the Map Image layer. You might want to zoom in on this area for the detailed drawing steps to follow.
- Select the Rectangle tool. Change its Stroke to black and its Fill to None.
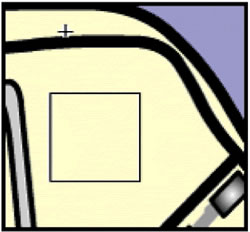
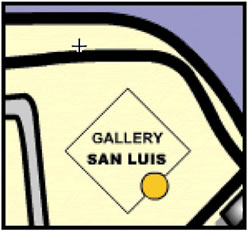
- In the first frame of the Map Details layer, hold down the Shift key and draw a square that is approximately the size and location shown in Figure 9-7a. (After you have drawn the rectangle, select it and you can view and edit its size on the Property inspector.) A square appears on the map, indicating the location of the gallery, as shown in Figure 9-7a.
Did You Know? If you're not satisfied with wha you draw, use the Undo command on the Edit menu and do it again.
FIGURE 9-7a:
Map detail of the gallery's location
- Using the Selection tool, double-click to select the square.
- On the Transform panel, select the Rotate option, and enter 45 in the Rotation box. Press Enter (Windows) or Return (Macintosh). The box rotates 45 degrees.
- Select the Oval tool. Make sure the Stroke color is black and the Fill is orange (#FFCC33).
Note:
An interesting aspect of objects drawn in Flash is that they can erase each other. For example, if you drag the circle away from the square, a piece of the square is missing. You can avoid this effect by converting drawn objects into symbols, but because you are drawing so little and will actually be deleting part of the square in later frames, you don't need to turn these objects into symbols.
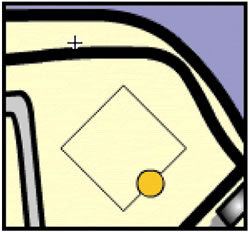
- Create a small circle on the lower-right side of the box, as shown in Figure 9-7b. You can hold down Shift while drawing to draw a perfect circle. If the circle is not placed as shown in the figure, use the Selection tool to select it and then drag it, or use the arrow to move it to the desired location.
FIGURE 9-7b:
Box with circle indicating gallery location
- Insert keyframes at frames 10, 20, 30, and 40 of the Map Details layer. You have created keyframes for details specific to the direction from which visitors are coming. (Creating these keyframes places the graphic you have just created in each of those
- Click frame 1 on the Map Details layer.
- Select the Text tool, and key the following in the middle of the square, applying the formats indicated, as shown in Figure 9-7c:
Line 1: GALLERY (Arial, 9 pt., all caps, centered, black color)
Line 2: SAN LUIS (Arial Black or Helvetica bold, 9 pt., all caps, centered, black color)
FIGURE 9-7c:
Text box for gallery location
- Drag the playhead over frames 2-10. The location graphic stays in place as the map moves. To remove the location graphic during the animation, you can insert a blank keyframe in frame 2 of the Map Details layer.
Note:
If the text does not fit within the' box, you can resize the box so that the text does fit. (using the Property inspector)
- Click frame 2 on the Map Details layer, click Insert, point to Timeline, and then click Blank Keyframe.
- Drag the playhead over frames 2-10 again. The location graphic no longer interferes with the moving map.
- Save the document and remain in this screen for the next Step-by-Step.
Using the Pen Tool
Adding Highlights
Next you will add features to indicate the specific routes to Gallery San Luis by using the Pen tool to trace along the route from each starting point. The routes are stored in different keyframes on the Map Details layer.
-
STEP-BY-STEP 9.8: Adding Highway Highlights
- Click frame 10 on the Map Details layer.
- Using the Selection tool, click the blue background of the map to deselect the location graphic.
- Double-click the circle to select it. Drag the circle to the approximate location of the gallery, as shown in Figure 9-8a.
FIGURE 9-8a:
Dragging the location point
- Select the sides of the box graphic and delete them.
- Select the Pen tool and change the Stroke to orange (#FFCC00) and a stroke height of 9
- Click just above the gray road at the top of the graphic. A point is created to start the pen stroke.
- Click again at each point where the road bends and then off the road at the circle indicating the gallery location.
- Double-click just to the left of the gallery circle to end the line. (If the circle changes colors, use the Undo command on the Edit menu to turn it back to its original color without erasing the line.)
- If the line is not thick enough to show up well, select the Selection tool and double-click the line to select it. On the Property inspector, increase the stroke height.
- Click frame 11 on the Map Details layer, click Insert, point to Timeline, and then click Blank Keyframe. Now the highlight will pop up only at the end of the north animation.
- In frames 20 and 30, repeat steps 2-10 to move the location circle and highlight the highway, as shown in Figures 9-8b and 9-8c.
FIGURE 9-8b:
Map details for south
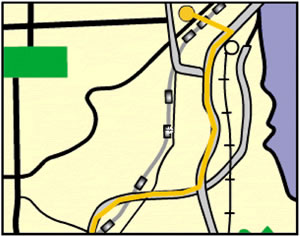
FIGURE 9-8c:
Map details for east
- Click frame 1 on the Map Detail layer to select the text boxes and the rectangle/circle. Click the Edit menu, and then click Copy. This will make a nice addition to frame 40.
- Click frame 40 on the Map Details layer, and then click Paste in Place on the Edit menu.
- Step through the document by using the playhead or the comma and period keys to move frame by frame through the animation.
- Save the document and remain in this screen for the next Step-by-Step.
Adding Sound
To enhance the animation, you can add sounds. Flash has an entire library of sounds to choose from.
-
STEP-BY-STEP 9.9: Adding Sound to the Transitions
- On the Window menu, point to Common Libraries, and then click Sounds.
- Make sure the Map Image layer is unlocked.
- Select frame 2 on the Map Image layer.
- Select the Beam Scan sound from the Sounds library and drag it onto the Stage. The sound is inserted into frame 2 of the Map Image layer.
- Drag the Beam Scan sound into frames 11, 21, and 31
on the Map Image layer.
- Press Enter (Windows) or Return (Macintosh) to play and pause the map animation. The animations should run with the sounds.
- Save the document and remain in this screen for the next Step-by-Step.
Hot Tip:
You can also use the caret keys to slowly advance forward and back through the animations to test them.
Adding an Action
You might have noticed that the movie plays all the map directions continuously. To divide the movie into segments that just play when people want specific directions, you can add stop actions on the Actions & Labels layer.
-
STEP-BY-STEP 9.10: Adding stop Actions to the Map Movie Clip
- Click frame 1 on the Actions & Labels layer.
- Expand the Actions panel and double-click stop in the Timeline Control category. A stop action is added to the first frame on the Actions & Labels layer.
- Add stop actions to frames 10, 20, 30, and 40 on the Actions & Labels layer.
- Collapse the Actions panel.
- Save the document. Then close it, and exit Flash.
 Back to previous page: Lesson 8: Motion Tweening Back to previous page: Lesson 8: Motion Tweening
 After this lesson, you should complete the following After this lesson, you should complete the following
- Test on Flash Lesson 9: Creating an Animated Map
- Project
Go to next section: Lesson 10: Integrating Components and Dynamic Text
|
