Lesson 7: Creating Buttons
Upon completion of this unit, you should be able to:
- Create button symbols to control photograph navigation.
- Add ActionScript to buttons and frames to control movement on the Timeline.
- Insert keyframes and frames.
 Creating a Photo Viewer Creating a Photo Viewer
You have already created the artist's biography in the Featured Artist section. Now you're ready to create a Photo Viewer to display samples of the artist's work. To create the Photo Viewer, you insert a set of images into your document and create Macromedia Flash buttons that let users browse through the images.
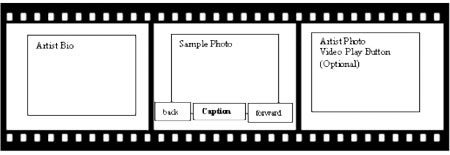
You can use a single movie clip to store all the photos in different keyframes and then build buttons that will advance the movie to the next frame or move it back to the previous frame to browse the photos. Finally, you need to insert an instance of the Photo Viewer movie clip in the center cel of the Fstrip Artist movie clip, as shown in Figure 7-1a.
FIGURE 7-1:
Design of the Photo Viewer
Importing a Sequence of Images
You can import one image at a time or, if you have a series of images that you want to appear in sequence, you can import a group of images simultaneously by giving them the same name followed by a numerical sequence, such as picture0, picturel, and so on. When you do this, all the images are imported as a sequence in the current layer. The images come in on individual frames. You will see only the first image because you are viewing only the first frame in the sequence. If you click on subsequent frames, you will see the subsequent images.
-
STEP-BY-STEP 7.1 Importing a Sequence of Images
- Start Flash and open the home.fla movie you worked with in Lesson 6, which should be in the build_GallerySanLuis folder.
Note: If you had problems with the previous lesson, ask your instructor for the home3.fla sample solution file. Once you open this file, save it as home.fla in your build_GallerySanLuis folder and proceed with this lesson.
- Make sure the Library panel is open.
- On the Library panel, double-click the icon beside the symbol name Fstrip Artist. You are in symbol-editing mode for the Fstrip Artist movie clip symbol, which appears by itself on the Stage.
- Click the Insert menu, and then click New Symbol.
- Name the movie Artist Photo Viewer, set the Behavior to Movie clip, and click OK. You are in symbol-editing mode for the Artist Photo Viewer movie clip symbol, which appears as a blank Stage.
- Click the File menu, point to Import, and click Import to Stage, and open the photographs folder.
The images in this file have already been optimized and sized to fit the middle cel of the filmstrip area.
- Double-click picture0.jpg. A dialog box appears, asking if you want to import a sequence of images.
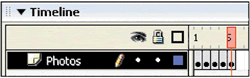
- Click Yes. All five images are imported as a sequence on
Layer 1 because they have been named picture0.jpg through picture4.jpg.
- Double-click the Layer 1 title and rename it Photos, as shown in Figure 7-1b.
FIGURE 7-1b:
The Photos layer
- Save the document and remain in this screen for the next Step-by-Step.
Aligning Images
The photographs have been imported into the Artist Photo Viewer movie clip symbol slightly off center. You can center one or more images by using the Align panel.
-
STEP-BY-STEP 7.2: Aligning Images to the Center of the Stage
- Select frame 1 of the Photos layer and click the Align tab of the Align & Info panel title bar. If you need to, expand the panel.
- On the Align panel, make sure the To stage button is turned on. Then, as shown in Figure 7-2, click Align horizontal center and Align vertical center to align the photograph in frame 1 to the horizontal and vertical center of the Stage.
FIGURE 7-2: The Align panel
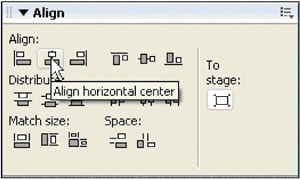
- Click in frames 2 through 5 one at a time and repeat step 2 to align each of the other four photographs to the center of the Stage.
- Save your work and remain in this screen for the next Step-by-Step.
Creating Navigation Between the Photographs
Although you could see each of the photographs by clicking frames on the Timeline, Web users will need buttons for browsing photographs. You need to create Forward and Back button symbols.
As you learned in Lesson 5, buttons are four-frame movie clips. Following is a review:
- Frame 1: The Up state, representing the button whenever the pointer is not over the button.
- Frame 2: The Over state, representing the button's appearance when the pointer is over it.
- Frame 3: The Down state, representing the button's appearance as it is clicked.
- Frame 4: The Hit state, defining the area that will respond to the mouse click. This area is invisible in the movie.
The Forward and Back buttons you create will have color changes in the Over state and they will have a camera shutter sound and color changes in the Down state. First, however, you must configure the Up state of one button.
-
STEP-BY-STEP 7.3 Creating a Button's Up State
- Create a new layer above the Photos layer and name it Navigation. Click on frame 1 of the Navigation layer.
- Select the Rectangle tool and draw a small rectangle near the bottom left of the picture.
- Select the Selection tool, select the rectangle (by double-clicking), and set the following properties on the Property inspector:
Width: 73
Height: 15
Stroke: White
Fill: Black
- Convert the rectangle to a symbol. In the Convert to Symbol dialog box, name the symbol Back Button and select Button as the behavior. Click OK.
- Double-click the instance of the Back Button symbol on the Stage to enter symbol-editing mode. Notice that the symbol has its own Timeline, with individual frames for Up, Over, Down, and Hit.
- Select the Zoom tool from the toolbox. Then click the rectangle on the Stage to make it larger and easier to edit.
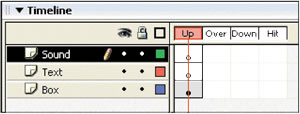
- To make editing easier, you can separate the elements of the button into separate layers. Double-click Layer 1 and rename the layer Box. Add a layer above the Box layer and name it Text. Add a layer above the Text layer and name it Sound. The separate layers are shown in Figure 7-3a.
FIGURE 7-3a:
Text and Sound layers added to the Back Button
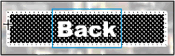
- Click the Up frame of the Text layer and then select the Text tool.
- Click on the rectangle, and on the Property inspector, set the text properties to Arial Black or Helvetica Bold, 10 pt., white, and left-aligned.
- Key Back.
- Select the Selection tool. With the text box still selected, hold down the Shift key and double-click the black and white rectangle. Both the text and the box are selected.
- On the Align panel, click the To stage button to turn it off. Then click Align horizontal center and Align vertical center to align the text and the button box, as shown in Figure 7-3b.
- Save your work and remain in this screen for the next Step-by-Step.
FIGURE 7-3b:
Aligning the text and the button box
Next, you create a button's Over state.
-
STEP-BY-STEP 7.4: Creating a Button's Over State
- Click the Over frame of the Text layer, click the Insert menu, point to Timeline, and then click Keyframe. By inserting a keyframe, you can change the look of this layer when the pointer is over the button, without changing the look of the Up state.
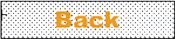
- Select the Selection tool and click the text to select it.
- On the Property inspector, change the text color to orange, #FF9900.
- Click the Down frame of the Text layer, click the Insert menu, point to Timeline, and then click Frame. The orange text will now appear in the Down state of the button. The Hit state is invisible and thus does not need to be configured for text.
- In the Box layer, click the Over frame. Click the Insert menu, point to Timeline, and then click Keyframe.
- Save your work and remain in this screen for the next Step-by-Step. Now you create a button's Down state.
Creating a Down state for the button
-
STEP-BY-STEP 7.5: Creating a button's Down state
- Insert keyframes on the Box layer's Down and Hit frames. The box is configured to show in the Up, Over, and Down states. The Hit state is set to make the area of the box the active area for the button.
- Select the Down frame in the Box layer. With the Selection tool, double-click to select the box. (Warning: Double click the interior of the shape - not just the border.)
- On the Property inspector, change the fill color to white. The button is configured to turn white when a user clicks it, as shown in Figure 7-5a.
FIGURE 7-5a:
Creating a Down State for the button
- Click the Down frame of the Sound layer, click the Insert menu, point to Timeline, and then click Keyframe. A frame is created to hold a sound when the user clicks the button.
- On the Window menu, point to Common Libraries, and then click Sounds to open the library's Sound panel. This panel contains sound clips that come with Flash and can be used for button clicks and other user interactions.
- Scroll through the list of sounds and select the Camera Shutter 35mm SLR sound file. In the Preview window at the top of the library's Sound panel, click Play, as shown in Figure 7-5b. The camera shutter sound plays.
FIGURE 7-5b:
Previewing a sound
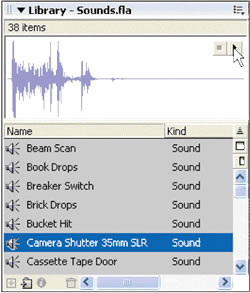
- Make sure the Down state in the Sound layer is still selected, and drag an instance of the Camera Shutter 35mm SLR sound onto the Stage. An instance of the sound is inserted into the Down frame of the Sound layer of the Back Button symbol.
- Click Artist Photo Viewer on the Information bar. You return to the symbol-editing mode of the Artist Photo Viewer movie clip.
- To test the button, click the Control menu, and then click Enable Simple Buttons. Button sounds and states become active. You can no longer double-click a button to enter its editing mode.
- Click the Back button. Its color changes on rollover. On click, it turns white and makes the camera shutter sound.
- Click the Control menu again, and click Enable Simple Buttons to toggle it off.
- Save your work and remain in this screen for the next Step-by-Step.
Duplicating and Customizing a Button
You need a Forward button. Rather than start all over again, you can duplicate and customize the existing Back Button symbol and change the text to say "Forward."
-
STEP-BY-STEP 7.6: Duplicating and Customizing a Button
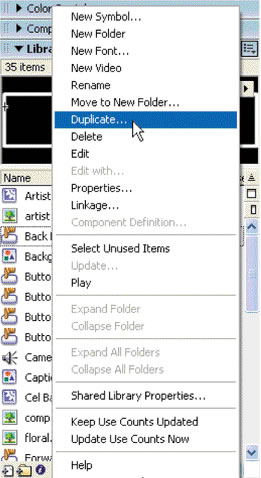
- Select the title bar for Library - home.fla to expand it and then click the Back Button.
- On the library's Options menu, click Duplicate, as shown in Figure 7-6.
FIGURE 7-6:
Duplicating a Button symbol
- Name the button Forward Button and click OK.
- Make sure you are editing Artist Photo Viewer. (Doubl-click on the symbol in the Library panel, if necessary.) Select the Navigation layer, and then drag an instance of the newly created Forward Button symbol onto the Stage and drop it near the lower-right corner of the picture. The button appears on the Stage with its text still reading "Back."
- Double-click the instance to enter symbol-editing mode.
- Change the button's text to Forward in the first Up frame of the Text layer by double-clicking (or dragging) the text to select it, deleting existing text, and replacing it with the new text.
- With the text selected, select the Selection tool, hold down the Shift Key, and double-click the text box. Both the text and its box are selected.
- On the Align panel, center the text in the box horizontally (vertical alignment is already okay).
- Change and align the text in the Over state.
- Click Artist Photo Viewer on the Information bar to return to the Stage for the Artist Photo Viewer movie clip.
- Save your work and remain in this screen for the next Step-by-Step.
Creating Captions for Photographs
You want captions for photographs, so in the next Step-by-Step you create a caption box.
-
STEP-BY-STEP 7.7: Creating a Photograph Caption Box
- Select the Rectangle tool and set the stroke to white and the fill to green, #99CC66.
- Make sure the Navigation layer is selected and draw a rectangle between the two buttons, as shown in Figure 7-9. (Don't worry about the exact size or location of the rectangle. You will configure that later.)
FIGURE 7-7a:
Drawing the rectangle for the caption box

- Select the Selection tool, and double-click the rectangle to select both fill and stroke.
- On the Property inspector, set W: to 173 and H: to 15.
- Convert the rectangle to a graphic symbol and name it Caption Box. Click OK.
- Position the Caption Box symbol between the two buttons.
- Hold down the Shift key and select both buttons and the caption box.
- On the Align panel, toggle the To stage button on and click Distribute horizontal center, as shown in Figure 7-7b.
FIGURE 7-7b:
Distribute horizontal center button
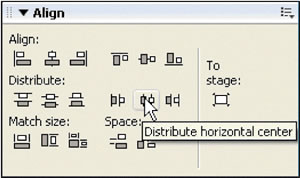
- On the Align panel, toggle the To stage button off and click Align vertical center.
- On the Property inspector, set Y: to 112. The navigation elements are centered and lined up along the bottom of the photograph, as shown in Figure 7-7c.
FIGURE 7-7c:
Aligned buttons and caption box

- Save your work and remain in this screen for the next Step-by-Step.
Creating Caption Text
When you create captions for the photographs, you need to add a separate text object to each frame that has a photograph in it.
-
STEP-BY-STEP 7.8: Creating Captions for the Photographs
- Create a new layer above the Navigation layer and name it Captions.
- Click in frame 1 of the Captions layer.
- Select the Text tool and click inside the caption box. On the Property inspector, set the text properties to Arial or Helvetica, l0 pts., black, and left-aligned.
- Key the following caption for the first photograph: Looking down and around the Peaks. (Be sure to include the period.)
- Click the Selection tool to select the text box.
- On the Align panel, center the text horizontally to the Stage. Use the Selection tool to align the text vertically in the caption box, as shown in Figure 7-8.
Note:You can also drag the elements by using the arrow keys on the keyboard.
FIGURE 7-8:
Centered text in the caption box

- Click frame 2 of the Captions layer, click the Insert menu, point to Timeline, and then click Keyframe. The text box is copied to the caption for the second photo.
- Insert keyframes on frames 3, 4, and 5 of the Captions layer.
- Click each frame of the Captions layer and change the text in that frame to the following:
Frame 2: Twin Peaks hugs her houses.
Frame 3: Grasses flowing down Twin Peaks.
Frame 4: Seeing is experiencing.
Frame 5: Life under the tower.
- Center the captions horizontally.
- Click through the five frames of the Artist Photo Viewer and make sure the captions and pictures are all correct.
Note:
If a button disappears as you move through the photographs, make sure the buttons exist in frame 1 of the Navigation layer. 4 You might have created the buttons on a keyframe of the Photos, or Captions layers. If a button is in the wrong layer, cut it from that layer and paste it into frame 1 of the Navigation layer.
- Save your work and remain in this screen for the next Step-by-Step.
Making the Photo Viewer Work
The last step in making the Photo Viewer work is to make the buttons work. In Flash, you make buttons work by using ActionScript to add "actions." ActionScript, the scripting language for Flash, lets you add interactivity to a movie. You use the Actions panel to write scripts with ActionScript. There are two areas where you can enter code:
- On an object: A button or movie clip can contain ActionScript that does something (for example, stops the movie or turns off all sounds) when clicked or rolled over.
- On a frame: Certain actions are performed (such as going to the beginning of the movie or stopping the movie) when the movie reaches a certain frame (which has to be a keyframe).
-
STEP-BY-STEP 7.9: Adding an Action to a Frame and a Button
- Add a layer above the Captions layer and name it Actions.
Note: Typically the top layer of any movie clip is dedicated to actions and labels.
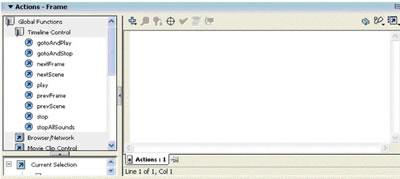
- Select the first frame of the Actions layer and click the title bar of the Actions panel (or click the Window menu and click Actions). The Actions panel expands and is titled Actions - Frame. Figure 7-9a is an example of the Actions panel in use.
FIGURE 7-9a:
Areas of the Actions panel
- In the Actions toolbox on the left of the panel, click the Global Functions category if you need to expand the category.
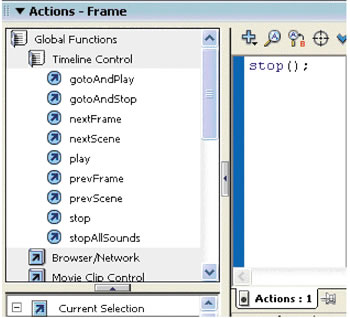
- Expand the Timeline Control category. Double-click the stop action shown in Figure 7-9b.
FIGURE 7-9b:
Creating a stop action
- Click the Actions panel title bar to collapse the panel.
Note: A stop action keeps the movie from automatically playing all frames. The movie will now play just frame 1 and stop.
- To add an action to a button, click the Back button (with the Selection tool) and then click the Actions panel title bar to expand the panel.
- Expand the Movie Clip Control category and doubleclick the on action in the Actions toolbox.
The on action performs an action when a mouse event occurs. You can choose when the action will occur by making a selection from the menu of events, as shown in Figure 7-9c. For example, clicking the Back button should take you to the previous frame when the button is released.
FIGURE 7-9c:
Menu showing events for the on action
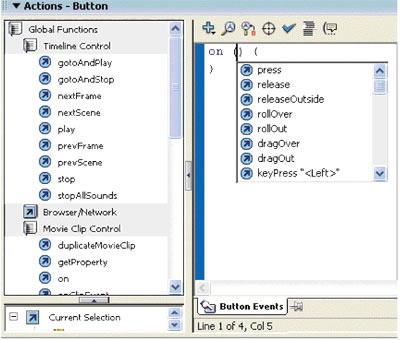
- Double-click release.
- Click after the open curly bracket to place the insertion point.
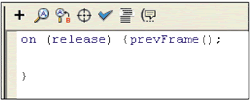
- Double-click the prevFrame action in the Actions toolbox (in the Timeline Control category). The Script pane now looks like Figure 7-9d.
FIGURE 7-9d:
Previous Frame ActionScript
- Collapse the Actions panel, click the Forward button, and then expand the Actions panel.
- Double-click the on action, and then double-click release from the events menu.
- Click after the open curly bracket, and then double-click the nextFrame action (in the Timeline Control category).
- Collapse the Actions panel.
- Save the movie and close it by clicking on Scene 1 on the Information bar. Remain in this screen for the next Step-by-Step.
Integrating a Movie Clip into Another Movie Clip
Now that you have a working Photo Viewer, you're ready to add it to the middle cel of the Featured Artist movie clip.
-
STEP-BY-STEP 7.10: Bringing a Movie Clip into Another Movie Clip
- Double-click the Fstrip Artist movie clip in the library. It appears on the Stage in symbol-editing mode.
Note: Your original guidelines will not show up in the normal editing mode. You can use the existing content as guides for the fea from the library onto the Stage, over the center image. tured artist content.
- Select the Center layer.
- Drag an instance of the Artist Photo Viewer symbol
- Zoom in and use the arrow keys to align the Artist
Photo Viewer instance over the center image of the Fstrip Artist movie.
- With the Artist Photo Viewer instance selected, click the Edit menu, and then click Cut. The movie clip is saved on the Clipboard.
- Select the leaf image now visible in the center cel (an instance of Home Center) and delete it using the Delete key.
- Click the Edit menu, and then click Paste in Place. The movie clip instance now resides in the Center layer of the Fstrip Artist movie clip symbol.
- Save the movie and remain in this screen for the next Step-by-Step.
- You're now ready for the last component of the Featured Artist section: the artist's picture.
Adding an Image to the Featured Artist Section
-
STEP-BY-STEP 7.11: Adding an Image to the Featured Artist Section
- In the Fstrip Artist symbol-editing mode, select the Right layer.
Note:
If you are not in the editing mode for the symbol, double-click the Fstrip Artist movie in the library.
- Open the File menu, point to Import, and then click Import to Stage.
- Navigate to the images folder in your build_GallerySanLuis folder, select artist.jpg, and click Open (Windows) or Import (Macintosh). The artist's photo appears on the Stage in the Right layer.
- Using the Selection tool, click the artist's photo to select it. On the Property inspector, change the size of W: to 345 and H: to 260.
- Use the Selection tool and the arrow keys to align the image directly on top of the image of the woman's face in the right cel.
- With the artist's image selected, click the Edit menu, and then click Cut.
- Delete the woman's face (instance of Home Right) from the right cel of the filmstrip.
- On the Edit menu, click Paste in Place. The artist's image appears aligned in the Right layer.
- Save the movie.
- Click Test Scene from the Control menu and test it by paging through the images.
- When you finish, close the viewer window, close the document, and exit Flash.
Note: If you are asked to save changes to the Sounds.fla document, click No.
 Back to previous page: Lesson 6: Using Movie Clips Back to previous page: Lesson 6: Using Movie Clips
 After this lesson, you should complete the following After this lesson, you should complete the following
- Test on Flash Lesson 7: Creating Buttons
Go to next section: Lesson 8: Motion Tweening
|
