As your first attempt at a simple Flash animation, you will duplicate the Black & White text animation seen below.
STEP-BY-STEP: Creating a Text Animation
In this project, you will create a text animation that fades from one word to another. In the example shown above, the word "White" fades out as the word "Black" fades in. At the same time the background color is changing. You should choose your own words and colors, although the directions below will continue to refer to the Black and White example. The two words you choose should represent an interesting relationship or contrast in meaning. The two words should also contain relatively the same number of letters.
Start Flash and Create a New Flash Document.
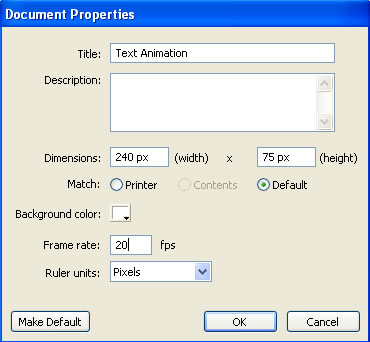
From the Modify menu click on Document to open the Document Propoerties dialog box. In the Title box key Text Animation (or your own document title). For the document dimensions, set the Width at 240 and the height at 75. Set the Fram rate at 20. Click OK.
Figure 12-1: Setting the Document Propoerties
The Stage will now show the document sized according to the above dimensions with a blank Timeline.
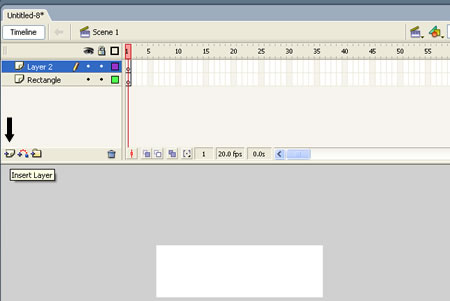
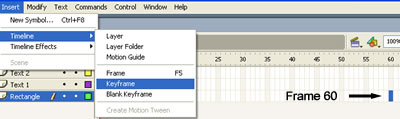
Double-click "Layer 1" in the Timeline and rename the layer Rectangle. Click the Insert Layer button twice (marked by the arrow in Figure 12-2 below) to add two more layers and rename the new layers Text 1 and Text 2. Each of the two words you will be transforming will reside on its own layer - separate from the colored rectangle.
Notice that each layer has its own set of boxes next to it on the timeline. These boxes are called frames, and they act just like the separate frames of a movie. This is way Flash animations are also referered to as movies - even simple text animations like the one you are making.
Click on the Rectangle layer. Notice that the layer name changes color and a pencil appears to indicate that you are working in that layer. Also notice that the first frame of the Rectangle layer's timeline is highlighted in black.
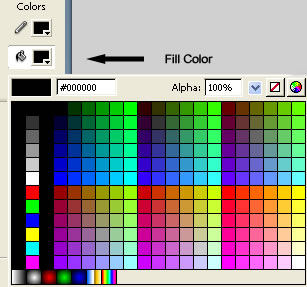
Select the Rectangle tool, choose a fill color in the Color Picker (see Figure 12-3 below.) and draw a rectangle that covers the entire stage. (Remember this example show a black rectangle. Please feel free to make another color choice.)
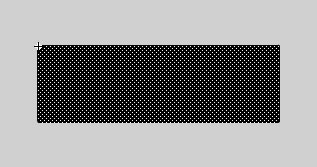
Double click on the interrior of the rectangle to select it. The rectangle turns shaded to indicate it is selected.
From the Modify menu, click Convert to Symbol to open the Convert to Symbol dialog box. Name the symbol Rectangle, select Graphic as Symbol Type and click OK.
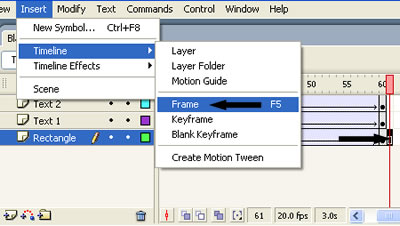
Click in Frame 60 of the Rectangle layer. Then from the Insert menu, select Timeline, and Click on Keyframe.
The timeline should now look like Figure 12-7 below. Notice that the frame 60 is now marked as a keyframe with a black circle in it. The rest of the Rectangle timeline is shaded gray to indicate that the rectangle will stay the same until Frame 60. Right now the rectangle is also the same in Frame 60, but you will now change that.
Make sure you have Frame 60 of the Rectangle layer selected. (It should be the only black frame.)
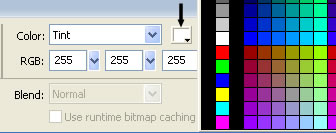
Click on the colored rectangle on the Stage. On the right hand side of the Properties Inspector (on the bottom of the screen), Select Tint from the Color drop-down box. Then choose a new color from the Color Picker men next to it. (This example is using white for the second color of the rectangle.)
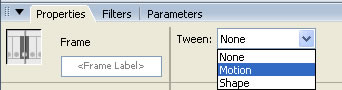
Click in Frame 1 of the Rectangle layer. On the Properties inspector select Motion from the Tween drop-down box.
The Rectangle layer of the Timeline should now show a solid line from Frame 1 through Frame 60. (If it shows a dotted line, an error was made. You should undo your last Steps and and try again.) The rectangle color is now animated. Hit the Enter key to see the animation play. You can also move the animation through the frames manually by sliding the Frame indicator.
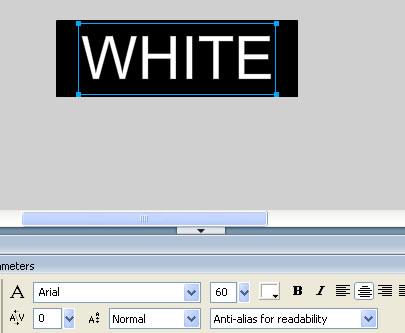
Now you will add the text animation. Click on Frame 1 of the Text 1 layer. Select the Text tool and click in the Rectangle on the Stage. Type in your first word and set the Text font, Size and Color that you like. This example used a size 60Arial font in White. Make sure your color contrasts with the color of the rectangle. You can easily change the initial color of the rectangle by selcting frame 1 of the Rectangle layer and adjusting the Tint on the Color drop-down box like you did in Step 13. You should also choose Center alignment.
With the Selection tool, drag the text box to the center of the rectangle.
Make sure the text box is still selected (there should be a blue box around it, as in Figure 12-8 above).
From the Modify menu, select Convert to Symbol (or key F8). Name the symbol Word1 (or the word you typed, White in this example), click Graphic as Type.
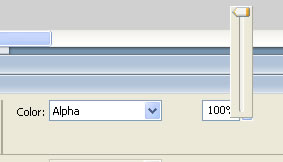
In the Properties inspector, select Alpha from the Color drop-down box and move the slider (or type in) 100%. The Alpha setting adjusts the transparency of the symbol. This does not work on plain text boxes, which is why you are converting everything to symbols.
Click in Frame 60 of the Text1 layer. Then from the Insert menu, select Timeline, and Click on Keyframe.
Select the Text box you entered on the stage and change the Alpha to 0%.
Click in Frame 1 of the Text1 layer. On the Properties inspector select Motion from the Tween drop-down box.
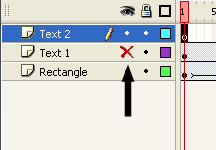
The next text you enter will be difficult to see while the first text is visible, so use the Hide Layer option to hide the Text 1 layer. Do not click the eyeball (which hides all layers); instead, click on the circle in the Text 1 layer beneath the eyeball. An X will appear on the Text 1 label, to indicate that it is now hidden.
In the Text 2 layer, click in Frame 1. The Timeline should look like Figure 12-11 above.
Select the Text Tool and click on the colored rectangle on the Stage. Enter new Text and adjust the Font color if you wish. Otherwise the text will be entered with the same settings as Step 16. Use the Selection tool to adjust the position of the text.
With the text still selected, Convert to Symbol (F8 or Modify menu). Name the symbol Word2 (or the word you typed, Black in this example), click Graphic as Type.
In the Properties inspector, select Alpha from the Color drop-down box and move the slider (or type in) 100%.
Add a keyframe to Frame 60 of the Text 2 layer.
Adjust the Alpha of Text 2 in Frame 60 to 100%.
Click in Frame 1 of the Text2 layer. On the Properties inspector select Motion from the Tween drop-down box.
From the Control Menu click Test Movie to view your animation. You will notice that the movie loops continuously. This is a default setting of Flash to keep animations playing continuously. Right now, however, your movie "jumps" when it loops back to the beginning. That is because you are only halfway done with this project. You need to add animation effects in Frames 61-120 to reverse all the fades and end up in Frame 120 in the same state as you were in Frame 1). This will go much faster, however, since you don't have to draw or type anything new.
Here is a quick version of these last few steps:
(Tru to remember how to do these steps. You can always refer back to Steps 10-31 to aide you.)
Insert regular frames (not keyframes) to all three Frame 61s. (Insert > Timeline > Frame). This tells Flash to make no changes in Grame 61.
Add keyframes in all Frame 120s.
In Frame 120 of the Rectangle layer, Tint the Rectangle back to its original color.
In Frame 120 of Text 1 set the Alpha at 100%.
In Frame 120 of Text 2 set the Alpha at 0%.
Add Motion Tweens in all Frame 61s
Good luck! When you are finished, show off your work (and send a copy to the teacher).