Assignment 3: Plant World Web Site
This Project Web Site assignment requires
you to build a Web site for the Plant World Co.. The finished web site will include a home page and a second, detail page. Click on the images below to view full-sized images.
FIGURE 3-1: The finished home page
Click on image to view a full sized image
FIGURE 3-2: The finished Desert Plants page
Click on image to view a full sized image
Objectives
Upon completion of this assignment, you should be able to:
- Create a home page (review)
- Insert and format images
- Using image tags
- Adjusting the size and/or dimensions of an image
- Alignments and space images
- Wrap text around an image
- Add alt text to an image
- Add a background image
- Insert and format links
- Add a text link to a Web page on another Web site
- Add a text link to a Web page in the same Web site
- Add links to targets within a Web page
- Add an e-mail link
- Add an image link to a Web page in the same Web site
- Format text
- Align and add bold, italics, and color to text
- Change the bullet type used in an unordered list
- Copy and paste HTML code
Creating a Home Page
The following Step-by-Step shows techniques for entering html tags to a text document and publishing it as a web page.
-
Step-by-Step 3.1: Creating a Home Page
- Create a folder named plantworld in your personal file.
- Right-click and save all of the following to your plantworld folder:
- Open Notepad and enter html tags to create a home page for Plant World. Click here if you need to review these tags.
- Type <title>Plant World Home Page</title> in the head section of the document.
- Save as default.txt. Save as default.htm
Note: A home page must be named either defaul.htm or index.htm.
- Place the insertion point in front of the closing </body> tag and press ENTER.
- Move the insertion to the blank line created in the previous step.
- Type <img src="plantworldlg.jpg" /> and then press the ENTER key.
Note: This is the HTML tag for inserting an image with the file name plantworld. jpg. As long as this image file is located in the same location as the web page, the image will appear.
- With the insertion point on the blank line after the image tag, type
<h1><font color="#000066">Welcome to Plant World!</font></h1>
and then press the ENTER key.
Note: This is the HTML tag for adding a navy blue font color to the Home Page heading.
- With the insertion point on the blank line after the heading, type
<p>For the finest in indoor and outdoor plants, come to Plant World! Plant World is the premier nursery for all of your planting needs. Our professional landscape design artists can visit your home and make recommendations for plants to use in your home or your yard.</p>
as the first paragraph in the HTML file.
- Press the ENTER key twice.
- With the insertion point on the next blank line, create an unordered list with square bullets of the following text. (Click here to review the tags foe unordered lists.) Use heading size 2 for the two headings.
Our company
- Founded in 1999 by Jared Adam Smith
- Headquartered in Fairfield, Connecticut
- 38 store locations throughout New England
Our services
- Landscape design
- Planting and maintenance
- Online information for all types of plants
- Press the ENTER key twice.
- Click immediately to the right of the y in the <body> tag on line 5 and then press the SPACEBAR.
- Type background=“greyback.jpg” as the attribute for the body tag.
- Click immediately to the right of the closing </ul> tag you added in step 12, and then press the ENTER twice.
- With the insertion point on a blank line, type
<p>To learn more about the Plant World products and services, please browse the Plant World Web site, where you can find information on all types of plants, both for indoor and outdoor use. You also can learn about this month's featured desert plants, which have a natural beauty that can enhance any landscape!</p>
and then press the ENTER key.
- Locate the words "desert plants" that you just typed in step 18. These are the two words that will be created as a link. Click immediately to the left of the d in desert.
- Type <a href="desertplants.htm"> to start the link
- Click immediately to the right of the s in desert plants. Type </a> to end the link and then press the ENTER key.
- With the insertion point after the closing text of the last paragraph any landscape!</p>,
type
<p>Have a question or comment? Call us at (206) 555-PLANT or e-mail us at plantworld@isp.com. </p>
as a new paragraph of text
- Click immediately before the p in plantworld in the email address. Type
<a href="mailto: plantworld@isp.com"> to end the e-mail link
- Click immediately after the m in com in the e-mail address text. Type </a> to close the e-mail link.
- Save as default.txt. Save as default.htm. Preview in web broswer. Make sure that all images appear and test the two links you created.
Editing the Second Web Page
The following Step-by-Step shows techniques for creating links and editing text in a web page.
-
Step-by-Step 3.2: Images and Text Formatting
- Open the desertplants.txt document you downloaded in Step 2 above. If you were unable to right-click, and you have the .htm document only, open it and Save As > Text Only > desertplants.txt.
- Use the bold tags (<b> </b>) to format in bold the four occurences of "Botanical Name."
- Use the italic tags (<i> </i>) to format in intalics the four Latin names: Agavaceae, Dasylirion wheeleri, Echinocactus grusonii, and Opuntia violacea
- Change the font color of the main heading to navy blue
- Click immediately to the left of the word, DESERT, on line 3. Type
<font color="#000099"> as the start tag
- Click immediately to the right of the word, PLANTS, on line 3. Type </font> as the end tag
- Add an image with wrapped text to each of the four deser plants. Special notes have been added to the desertplants.txt document to help locate where to insert the images.
- Agave image
- Highlight the words <!--Insert Agave image here --> on line 23
- Type <img src="agave.jpg" align="right" alt="Agave" width="212" height="203" /> and do not press the ENTER key
- Highlight the words <!--Insert right break clear here --> on line 37 and then type
<br clear="right" /> as the tag
Note: If we did not insert this tag to Clear the text wrap, this formatting would continue below.
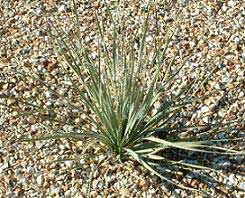
- Desert Spoon image:
- Highlight the words <!--Insert Desert Spoon image here --> on line 40
- Type <img src="desertspoon.jpg" align="left" alt="Desert Spoon“ width="245" height="198" /> to insert a left-aligned image with wrapped text
- Highlight the words <!--Insert right break clear here --> on line 49 and then type <br clear="right" /> as the tag
- Golden Barrel image:
- Highlight the words <!--Insert Golden Barrel image here --> on line 52
- Type <img src="goldenbarrel.jpg" align="right" alt= "Golden Barrel“ width="292" height="197" /> to insert a right-aligned image with wrapped text
- Highlight the words <!--Insert right break clear here --> on line 61 and then type <br clear="right" /> as the tag
- Prickly Pear image
- Highlight the words <!– Insert Prickly Pear image here --> on line 64
- Type <img src= "pricklypear.jpg" align="left" alt= "Prickly Pear" width="250“ height="255" /> to insert a left-aligned image with wrapped text
- Highlight the words <!--Insert right break clear here --> on line 73 and then type <br clear="right" /> as the tag
- Save twice and preview your work.
FIGURE 3-3: Web page with right-aligned image
- Step-by-Step 3.3: Links
- Open the desertplants.txt if it is not already open
- Create a link to another web page at the bottom of your web page.
- Click immediately to the left of Arizona on line 76 and type
<a href="http://www.desertmuseum.org"> to add the text link
- Click immediately to the right of Museum on line 77 and type </a> to end the tag
- Create "targets" (aka anchors) for each of the four plant sections:
- Click immediately to the left of the <font> tag on line 26
- Type <a name="agaveamericana"></a> to create a link target named agaveamericana
- Click immediately to the left of the <font> tag on line 39
- Type <a name="desertspoon"></a> to create a link target named desertspoon
- Click immediately to the left of the <font> tag on line 51
- Type <a name="goldenbarrel"></a> to create a link target named goldenbarrel
- Click immediately to the left of the <font> tag on line 63
- Type <a name="pricklypear"></a> to create a link target named pricklypear
- Create links at the top of the page for each of the fout "target" sections:
- Highlight the words <!--Start unordered list here --> on line 24
- Type <ul type="square"> and then press the ENTER key
- Type <li><a href="#agaveamericana"> Agave Americana </a></li> and then press the ENTER key
- Type <li><a href="#desertspoon"> Desert Spoon</a></li> and then press the ENTER key
- Type <li><a href= "#goldenbarrel">Golden Barrel</a></li> and then press the ENTER key
- Type <li><a href="#pricklypear"> Prickly Pear</a></li> and then press the ENTER key
- Type </ul> and then press the ENTER key
- Click to the left of the < symbol on line 6 and then press the ENTER key
- Position the insertion point on line 6 and type <a name="top"></a> as the tag
- Position the insertion point on the blank line 44 and then type
<p><a href="#top"><font size=-1>To top</font> </a></p> as the tag
- Press the ENTER key
- Highlight the HTML code, <p><a href="#top"><font size= -1> To top </font> </a></p>, on line 44
- Click Edit on the menu bar and then click Copy
- Position the insertion point on line 57
- Click Edit on the menu bar and then click Paste
- Press the ENTER key
- Repeat the second step on the previous slide to paste the HTML code on lines 70 and 84
- Create an image link to the home page for the banner image at the top of the page:
- Click immediately to the left of <img on line 7
- Type <a href="default.htm"> as the tag and then press the ENTER key
- Click immediately to the right of alt=“ “/> on line 8
- Type </a> as the tag
- Click immediately to the left of alt=“ “/> on line 8
- Type border=“0” and then press the SPACEBAR
- Save twice and preview your pages. Test all links.
|
|
