Assignment 6 - Site Management
Upon completion of this unit, you should be able to:
- Set up a working site.
- Understand the purpose and uses of the Files panel.
- Use the Files panel to perform site management functions
- Adding new files from the Files panel
- Create a site map
- Renaming files from the Files panel
- Moving files on the Files panel
- Customize the Files panel.
- Copy files to and from a remote site.
Setting up your Site
The first thing to do when creating a new website with Macromedia Dreamweaver 8 is to define a site and identify a root folder where you will save all files, images, and other elements for the web pages.
Step-By-Step 6.1 Setting up a Local Root Folder
- If you have not already done so, create a folder on your computer to serve as the main folder for your website. Give the folder a name that identifies the website. (Most of you named this "MySite" or "Web") This folder will be your local root folder.
Note: When creating a root folder for a site on your home computer, it is highly recommended that you place it at the top level of your hard drive. For example, C:\my-site (Windows) or Macintosh HD: my-site (Macintosh).
- Start Dreamweaver.
- From the menu bar, select Site > Manage Sites. The Manage Sites dialog box opens.
- Click New and select Site from the pop-up menu that appears. The Site Definition dialog box opens (Figure 6-1a). Make sure the Basic tab is selected.
FIGURE 6-1a: The Site Definition Dialog Box (Basic Tab selected)
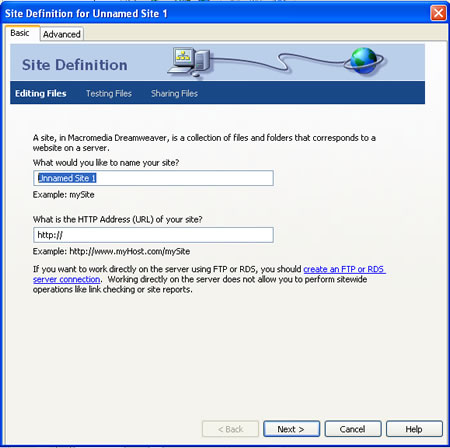
- Delete the temporary name, Unnamed Site 1. Enter a new name for the site. (To keep things simple, use the name of your local file - MySite, for example.)
- In the HTTP address field, enter the URL of your web page. (http://levy.freeweb7.com, for example)
- Click Next to go to the next set-up screen.
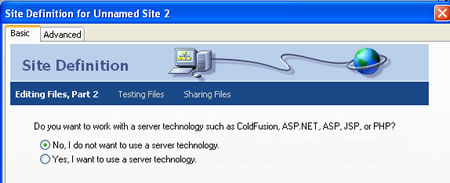
- Make sure No, I do not want to use a server technology, is selected (Figure 6-1b), and click Next.
FIGURE 6-1b: The Site Definition Dialog Box
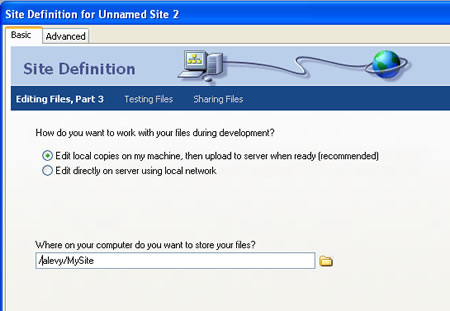
- Make sure Edit local copies on my machine, then upload to server when ready (recommended) is selected (Figure 6-1c).
FIGURE 6-1c: The Site Definition Dialog Box
- Click the Folder icon to the right of Where on your computer do you want to store your files? The Choose Local Root Folder for Site dialog box opens.
- Locate and select the root folder you created for your site. (See Step 1.) Click Open and then Select (Windows), or click Choose (Macintosh).
- Click Next to go to the next set-up screen.
- Select FTP in the How do you connect to your remote server? pop-up menu (Figure 6-1d).
FIGURE 6-1d: FTP settings in Site Definition dialog box
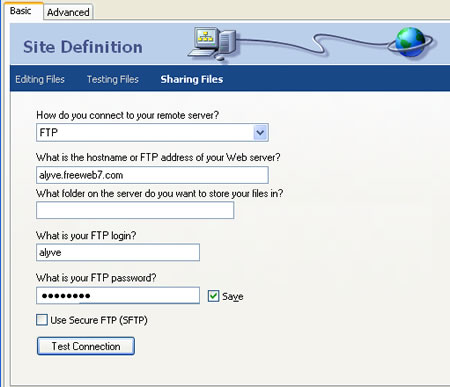
- Enter the FTP access information you received from you web host.
- Click Test to test the connection. Dreamweaver confirms the connection.
- Click Next to go to the next set-up screen.
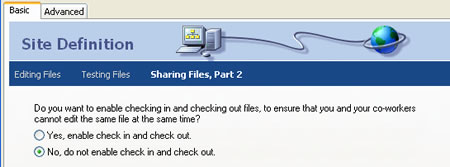
- Be sure No, do not enable check in and check out is selected (recommended).
FIGURE 6-1e: The Site Definition Dialog Box
- Click Next to go to the next set-up screen.
- Check that the summary information in the last screen is correct.
- Click Done to exit the Site Definition dialog box.
Remain in this screen for the next Step-by-Step.
Using the Files Panel
The Files panel displays the file and folder structure of your site. You can add and delete files or folders, rename files and folders, and move files and folders. By using the Files panel to maintain your files, you are assured that your link information stays correct. Conversely, if you make file or folder changes in Windows Explorer (Windows) or Finder (Macintosh), Macromedia Dreamweaver 8 doesn't recognize the changes and can't keep your links updated.
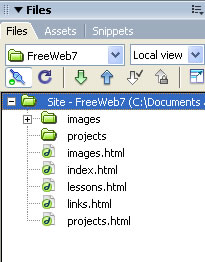
To access the Files panel, click the Window menu, and then click Files. The Files panel opens in collapsed view, displaying only your local files, as shown in Figure 6-2a.
FIGURE 6-2a: The Files panel
-
Step-By-Step 6.2 Expanding the Files Panel
- Start Dreamweaver and make sure the Files panel is open by clicking the Window menu, and then clicking Files.
- With the Files panel open, drag the Files panel group away from the docking area. If you leave the Files panel docked before going on to the next step, you'll be able to view the expanded Files panel, but you won't be able to work on documents while the panel is expanded.
Dreamweaver will automatically load the last site definition used on the system. It should load your information if you were the last user. If it does not, use the list menu in the upper-left corner of the Files panel to locate and select your site's name (and, hence, your site definition).
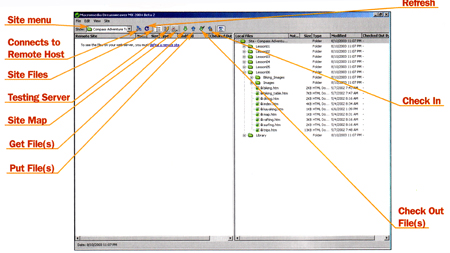
- Click the Expand/Collapse button (refer to Figure 6-2a). The Files panel expands to display two panes, as shown in Figure 6-2b. By default, the pane on the right shows your local files. The pane on the left shows the files on the remote version of your site. If you haven't set up a remote site, the pane on the left is blank.
- Click on Connect to Remote Host button in the Remote Pane to connect to your remote site.
FIGURE 6-2b: The Files panel expanded Refresh
- Review the tools and options available on the Files panel. Remain in this screen for the next Step-by-Step.
For the remainder of this lesson, you'll work with the Files panel expanded. Following are the options on the Files panel:
- Site Files view: Displays the file structure of the remote and local sites in the panes of the Files panel. This is the default view for the Files panel.
- Testing Server view: Displays the directory structure of the testing server (if you have defined one) and the local site.
- Site Map view: Displays a graphical map of your site, based on how the documents are linked to one another. Click and hold this button down to choose Map Only or Map and Files from the pop-up menu.
- Site menu: Indicates the name of the currently selected site. If you have defined more than one site on the local machine, you can use the pop-up menu to switch to one of your other sites. Connects to Remote Host: Connects to or disconnects from the remote site.
- Refresh: Refreshes the local and remote directory lists.
- View Site FTP Log: Shows you a record of the communication that goes back and forth between your machine and the remote server, including files that have been sent to or retrieved from the remote site. (This button is visible only when you have established a remote version of your site.)
- Get File(s): Copies the selected files from the remote site to your local site, overwriting any existing local copies. The files remain available on the remote site for other team members to check out.
- Put File(s): Copies the selected files from the local site to the remote site without changing the file's checked-in or checked-out status.
Note: If Enable File Check In and Check Out is turned off in the Site Definition dialog box, getting a file transfers a copy of the file with both Read and Write privileges.
- Check Out File(s): Transfers a copy of the file from the remote server to your local site, overwriting any existing copies. The file is marked as "checked out" on the server. The Check Out feature makes collaborating on a Web site easier. When you check out a file on the remote server, others can tell that you're working on the file and know not to edit that file at the same time. This option is not available if file check-in and check-out is turned off for this site.
- Check In: Transfers a copy of the local file to the remote server and makes the file available for editing by others. The local file becomes read-only. This option is not available if file check-in and check-out is turned off for this site.
- Expand/Collapse: Toggles the Files panel between single-pane and dual-pane mode.
Adding New Files or Folders to a Site
You can easily add new pages and folders to your site directly from the Files panel.
-
Step-By-Step 6.3a - Adding New Folders and Files to a Site
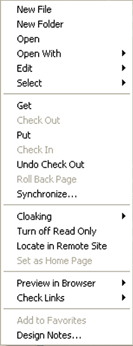
- In the Local Files pane of the Files panel, right-click (Windows) or Control-click (Macintosh) the Site folder. A context menu opens, as shown in Figure 6-3.
FIGURE 6-3a
The Files panel's context menu
- Choose New Folder . A new, unnamed folder is added to your site. The name field is highlighted, indicating that you need to enter a name for this document.
- Key SurfHawaii and press Enter (Windows) or Return (Macintosh) to name the new folder.
- Choose New File in the context menu of the Files panel. A new, unnamed document is added to your site. The name field is highlighted, indicating that you need to enter a name for this document.
- Key default.htm and press Enter (Windows) or Return (Macintosh) to name the new file. Don't forget the htm extension for the filename. When you save a file in Dreamweaver from the Document window, the extension is added for you. When you add a file on the Files panel, you need to key the complete filename.
- Drag the default.htm file into the SurfHawaii folder. Your File Panel should look like Figure 6-3b below. Remain in this screen for the next Step-by-Step.
Note: If you had selected the SurfHawaii folder before clicking New File, the file would have been created within the SurfHawaii folder, eliminating the need for dragging.
FIGURE 6-2a: The Files panel
Uploading Files
If you've selected FTP or Local/Network access to connect to your remote site, you can use Dreamweaver to identify the newest files on your local site. This way, you can update only files that have changed.
-
Step-By-Step 6.4 - Selecting and Uploading New Files Only
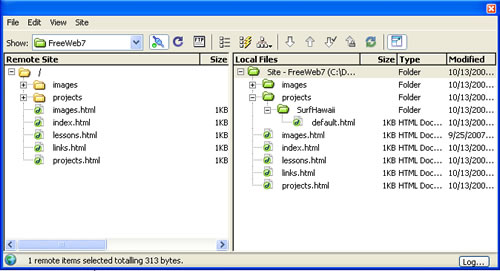
- Make sure that the Site Files view is selected in the Files panel, so that you see the remote site in the left pane and the local files in the right pane. In the Local Files pane, select the top-level folder (your site folder).
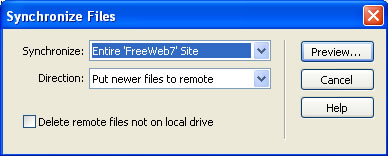
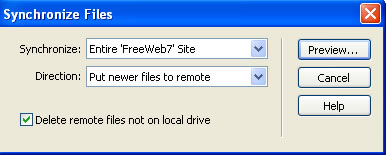
- Click the Synchronize button to open the Synchronize Files option window. From the Synchronise drop-down menu select Entire 'YourName' Site. Be sure the Direction is to Put newer files to remote. Click Preview.
FIGURE 6-4a: Synchronize Files Options Window
- Click the Synchronize button to open the Synchronize Files option window. From the Synchronise drop-down menu select Entire 'YourName' Site. Be sure the Direction is to Put newer files to remote. Click Preview.
FIGURE 6-4a: Synchronize Files Options Window
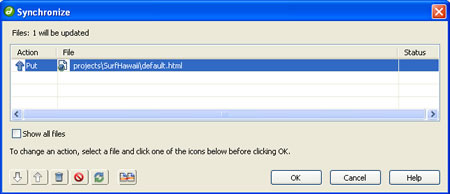
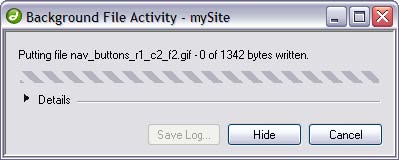
- Click the Preview button. Dreamweaver compares the modification dates of all local files to the corresponding file information at the remote site and selects only the newer local files. The Background File Activity will show while Dreamweaver looks for the newer files.
FIGURE 6-4b: Background File Activity Window
- The Synchronize Window will appear with a list of files that need updating on the remote site. Your list may include other files than shown in Figure 6-4c
FIGURE 6-4b: Background File Activity Window
- Click the OK button to upload your files to the remote site. Both panes of the Files Panel should now be identical, or synchronized.
- Click the Expand/Collapse button to restore the Files panel to single-pane view. Drag the Files Panel and dock with your other panels.
- From the Index Menu of the Files Panel, select Site>Synchronize. You should get a meesage saying there is no need to synchronize. This step was just to show you that your site can be synchronized directly from the unexpanded Files Panel.
- Drag the Files Panel free and Expand it again.
- Remain in this screen for the next Step-by-Step.
Creating a Site Map
A site map is a visual representation of your site and all its linked pages. You can save the site map as a graphic to be used in documentation. To create a site map, you must first select your home page.
-
Step-By-Step - 6.5 Defining Your Site
- In the Local Files pane of the Files panel, select index.html.
- On Windows, click the Site menu on the Files panel, and then click Set as Home Page. On Macintosh, click the options menu in the upper-right corner of the panel, point to Site, and then click Set as Home Page. Or, you can right-click (Windows) or Control-click (Macintosh) the file and choose Set as Home Page from the context menu.
You will not see the result of this command until you create the site map. After you define the home page, you can create the site map.
- To create the site map, click the Site Map button on the Files panel and make sure Map and Files is selected. Remain in this screen for the next Step-by-Step.
The site map is a graphical representation of your entire site, with the home page displayed at the top level, as shown in Figure 6-5. A link from one page to another is shown by a connecting line with an arrowhead. Pages containing links are displayed with a plus or minus sign. Clicking the plus sign displays the linked pages. If a link appears in red, the link is broken. Special links such as e-mail links or URLs are blue and display a small globe.
FIGURE 6-5: The site map
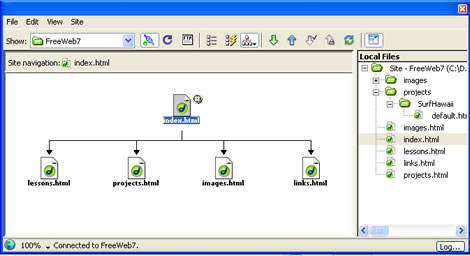
By default, Dreamweaver displays the site map horizontally. If the home page has many links, the site map might not have enough room to show all the pages. You can change the number of columns and the column width to make the site map fit a single page for printing. You can also switch the layout to a vertical format.
-
Step-By-Step 6.6 - Viewing the Site Map Vertically
- In Windows, click the View menu on the Files panel, and then click Layout. In Macintosh, click the options menu, point to View, and then click Layout. The Site Definition dialog box opens, showing the Site Map Layout options.
- In the Number of Columns text box, enter 1 and click OK. The site map is regenerated to show all the linked pages in a single column. Remain in this screen for the next Step-by-Step.
You can save the site map as a graphic. On Windows platforms, the site map graphic can be saved as a BMP or PNG file. On Macintosh computers, you save the graphic in PICT format.
-
Step-By-Step 6.7 - Saving the Site Map as a Graphic
- In Windows, click the File menu on the Files panel, and then click Save Site Map to open the Save Site Map dialog box. In Macintosh, click the options menu, point to File, and then click Save Site Map to open the Save dialog box.
- Save your Site Map in your images folder. If you're using Windows, key compass_site.bmp in the File Name text box. If you're using Macintosh, key compass_site. in the Save As text box. Then click Save. The site map is saved as a graphic that can be printed or viewed in an image editor. Remain in this screen for the next Step-by-Step.
Renaming Files on the Files Panel
If you need to change the name of one of your files, change the name on the Files panel. This preserves the link information maintained by Dreamweaver. If you change the filename outside of Dreamweaver for either an HTML file or a graphics file that is linked, Dreamweaver has no way to track your changes. If you make the change on the Files panel, Dreamweaver updates all pages that link to the file or contain the graphic.
-
Step-By-Step 6.8 - Changing a Filename on the Files Panel
- In the Local Files pane of the Files panel, select lessons.htm. The filename is highlighted.
- Click the filename. A rectangle appears around the name, indicating it is editable.
- Change the filename to assignments.htm and then press Enter (Windows) or Return (Macintosh). The Update Files dialog box opens, listing all the files affected by this name change, as shown in Figure 6-6.
FIGURE 6-8:
The Update Files dialog box
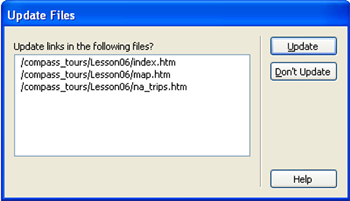
- Click Update to update the files with the new filename. Dreamweaver opens each file in the list, makes the change, and then closes the file. If a file in the list is currently open, Dreamweaver makes the change but does not save or close the file. The site map and site files list now show the new name. Remain in this screen for the next Step-by-Step.
Note:
You might need to click the View menu, and then click Show Page Titles (Windows,) or click the options menu, point to View, and then click Show Page Titles (Macintosh) to see the altered filename.
Moving Files on the Files Panel
If a file or folder is not in its proper place, you can easily move the file or folder to its correct location. Doing this on the Files panel ensures that all the link information remains correct and intact.
-
Step-By-Step 6.9 - Moving a File on the Files Panel
- In the Local Files pane of the Files panel, select the projects file.
- Drag the file's icon to the projects folder. The Update Files dialog box opens, asking if affected files should be updated.
- Click Update to keep the link to this graphic correct. The file moves to the Images folder - and Dreamweaver automatically changes all your links!
- Synchronize your site. Are your local and remote sites exactly the same? Probably not: Dreamweaver did not move the original projects.htm file on the remote site. It just added a second one in the correct location. To fix this, synchronize again, but this time be sure to check the Delete remote files not on local drive check box in the Synchronize Options window. Ask your instructor, if you do not understand why this is necessary.
Figure 6-9: Delete option on the Synchronize Option Window
Top of Page
Congratulations! This completes Assignment 6: Site Management
|
