For this lesson, you will create a simple Personal Web page like the one shown in the illustration below. In addition, you will create a Professional Interests page and a Favorite Links page. In the process of creating this web site, you will learn many different ways to format text and customize the look of your page.
Click on image to view full size
Using a Template to Create a Web Site
FrontPage includes several wizards and preformatted Web sites, or templates. A template is a series of files and Web pages that are organized and formatted with a basic framework of content.
Step-by-Step 1.1: Creating a Web Site Using a Template
Create a folder for your new web site and name it My Site or some other name of your choosing.
Start FrontPage
Click the New Page button arrow on the Standard toolbar.
Click Web Site.
When the Web Site Templates dialog box appears, click the Personal Web Site icon.
Click the Specify the location of the new web site text box and select the default location.
Browse to the folder you created in step 1
Click the OK button. Front Page creates the web site in the folder you specified.
Click Folder List in the Format Menu bar (or on the View Panel).
Note:
In FrontPage 2003, the Folder List pane automatically opens when it is completed creating the site. In older versions you must click on the Folder Panel button.
Double-click the file index.htm in the Folder List pane.
Note: The Home Page is displayed in the document window, as shown below:
Applying a Theme
FrontPage includes a gallery of more than 5 preset themes, which contain a unified set of a design elements and color schemes for bullets, fonts, graphics, navigation bars, and other page elements.
Step-by-Step 1.2: Applying a Theme
Click Format on the Menu Bar.
Click Theme.
When the Theme task pane (or dialog box) is displayed, click the Vivid colors check box to select it.
Select a theme that you like. (The images in this lesson use the Poetic theme.)
Note: The Theme task pane (or dialog box) contains options you can select to control how the current Web site uses themes. Selecting the Vivid Colors check box changes the theme's normal set of colors to a brighter color scheme. Selecting the Active graphics check box animates certain graphic elements. Selecting the Background picture check box applies a textured background image to the pages in the current Web site.
Click the Yes button on the message box to accept the changes to your web site.
Working with Text on a Page
You can add text to a page by typing it or by copying and pasting from an existing text document. If the text is from an application that supports drag-and-drop copying , you can open both Dreamweaver and that application and either copy and paste or drag the text into FrontPage.
Step-by-Step 1.3: Editing Text on a Page
Insert a new line at the top of the page by pressing Enter.
Key About Us in that new line.
From the Property inspector's Format menu, select Heading 1. You now tagged the text as a Level 1 heading.
Save your document and remain in this screen for the next Step-by-Step.
Indenting Text
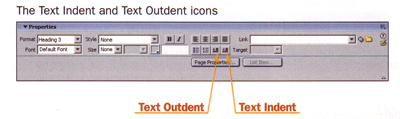
Often you'll want to indent the text on the page. You can use the Text Indent and Text Outdent icons in the Property inspector to do this, as shown in the Figure below. Using Text Indents indents text at the left and righ margins of the page.
Step-by-Step 1.6: Indenting Paragraphs and Removing Indentation
Select the the entire text of your compass.htm document, starting with the word Treat.
Click Text Indent in the Property inspector or click the Text menu and then click Indent.
Select the line of text Featured Trips.
Click Text Outdent in the Property inspector or click the Text menu and then click Outdent.
Repeat steps 3 and 4 for the lines Our Most Popular Trips and We Have Gear and the last sentence that begins When you vacation...
Save the file and preview it in the browser by pressing F12.
Close the browser and remain in this screen for the next Step-by-Step.
Making Lists
Dreamweaver gives you three kinds of lists: ordered (numbered), unordered (bulleted), and definition lists (a term and its definition).
Ordered Lists
An ordered list consists of list items that are ordered numerically or alphabetically. You have the option of using Arabic or Roman numerals or using uppercase or lowercase letters.
Step-By-Step 1.7 - Creating an Ordered (numbererd) Lists
Click in the five sentences beginning with the text Our guides and ending with stress-free.
Click the Ordered List button in the Propert inspector (just to the left of the Test Outdent button - see Figure above), or click the Text menu, point to List, and then click Ordered List. The selected text is indented and numbered.
Save the document and remain in this screen for the next Step-By-Step.
Step-By-Step 1.8 - Changing Ordered List Properties
Click in the line with the text Our guides or in any line in that list.
Click the List Item in the Property inspector, or click the Text menu, point to List, and then click Properties. The List Properties dialog box opens.
From the Style menu, select Alphabet Small (a,b.c) and then click OK. All items in the list are alphabetized.
Save the file and preview in the browser (F12)
Close the browser and remain in this screen for the next Step-By-Step.
Unordered Lists
Unordered lists are often called bulleted lists because each list item has a bullet in front of it. The bullet symbol Dreamweaver displays by default can be changed to a circle or a square.
Step-By-Step 1.9 - Creating an Unordered (Bulleted) List
Indent all of the text in the Our Most Popular Trips section.
Select the text starting with Surfing and ending with Colorado River (at the bottom of the document).
Click Unordered List in the Property inspector, or click the Text menu, point to List, and then click Unordered List. The selected text is indented and bulleted.
Save the document and remain in this screen for the next Step-by-Step.
You can change the default bullet symbol of unordered lists by modifying the list's properties.
Step-By-Step 1.10 - Changing an Unordered (Bulleted) List
Click in any line in the list.
Click List Item in the Property inspector, or click the Text menu, point to List, and then click Properties. The List Properties dialog box opens.
From the Style menu, select Square and click OK. All items in the list now use the square bullet symbol.
Save the document and remain in this screen for the next Step-by-Step.
Definition Lists
A definition list consists of a series of terms and their definitions. The word or term to be defined is left-justified; the definition is indented and placed on the next line. For this formatting to work, a term and its definition must each be a separate paragraph.
Step-By-Step 1.11 - Creating a Definition List
Select the text starting with Sightseeing and ending with a word-famous fly-fishing destination..
Click the Text menu, point to List, and then click Definition List. The terms are now at the left margin, and their indented definitions are on succeeding lines.
Save the file and preview it in the browser.
Close the browser and remain in this screen for the next Step-by-Step.
LIST TIPS:
When you're creating lists, keep these tips in mind:
To change a bulleted list to a numbered list or a numbered list to a bulleted list, select the entire list and then apply the other list format.
To convert a list to plain text, select the list and apply the list type again. This procedure works like a toggle to turn off the list formatting.
If you had extra text selected when you applied the formatting for the list, select the extra text and apply the formatting again to remove the list formatting.
If you are keying within an already formatted list and you want to end the list, press Enter (Windows) or Return (Macintosh) twice.
List items are single-spaced by default. If you want extra spacing between the lines, select all the items in the list and then choose Paragraph from the Format list of the Property inspector.
Character Formatting
Occasionally you will need a word or phrase to look different from the surrounding text. For example, you might want a word to be bold or italicized to visually set it apart from other text. Many times you will find yourself repeating the most recent formatting you applied on another paragraph or other selected text. The Redo command makes that task easier, with a simple keystroke. The first two items listed on the Edit menu are the Undo and Redo commands. You'll want to remember their keyboard shortcuts:
Undo: Ctrl + Z (Windows) and Command + Z (Macintosh)
Redo: Ctrl + Y (Windows) and Command + Y (Macintosh)
Step-By-Step 1.12 - Formatting Text
Select the word Sightseeing in the definition list you just created.
Click Bold (the dark capital B) in the Property inspector, or click the Text menu, point to Style, and then click Bold. The selected text now has bold formatting applied to it.
Select the words Nature Tours in the definition list.
Press Ctrl + Y (Windows) or Command + Y (Macintosh). Because you used the Bold command most recently, it is applied to the selected text.
Repeat the bold formatting on Hiking.
Apply bold formatting to Compass Adventure Travel in the three places it occurs in the first four paragraphs.
Save the document and remain in this screen for the next Step-by-Step.
Positioning Text
If you want to force a line break in the text without creating a new paragraph, you need to insert a line-break character. This would be useful for an address line, for example, where you want a new line for each line in the address, without the extra spacing of a paragraph. You can create a line break by holding down the Shift key and then pressing Enter (Windows) or Return (Macintosh) You also might find that you want to make other adjustments to text, such as centering a heading, to make it more prominent.
Step-By-Step 1.13 - Creating a Line Break and Centering Text
In the last paragraph, position the insertion point before the text Only $125 this month..
Press Shift + Enter (Windows) or Shift + Return (Macintosh). The text after the insertion point moves to the next line. A new paragraph has not been created, so there is no additional spacing between the two lines.
Repeat steps 1 and 2 to move the text 555 Main St. to the next line and Clinton, CT 06371 to a new line.
Position the insertion point before the text Sign up at and then press Enter (Windows) or Return (Macintosh) to insert a new paragraph.
Position the insertion point in the heading Hawaii - Surfer's Paradise.
Click Align Center box in the Property inspector. The heading is now centered.
Save the file and preview it in the browser.
Close the browser. Remain in this screen for the next Step-by-Step.
Changing Font Properties
To make your page more interesting and easier to read, you might want to change the typeface used to display the text. Although a great deal of information is available concerning how type is used for print, not all of that knowledge translates to the Web. You have to consider the fact that users are free to change the screen size or to change the font size and color of the text. The way type flows on a page can easily change from user to user. There is also a dramatic difference between font sizes in Windows and on a Macintosh. The same text displays smaller on Macintosh computers than in Windows.
If you are accustomed to print work, you might be frustrated by the lack of typographic control in HTML, such as line and letter spacing. You also can't control widows (a single word on a line) in Web text, and you can't control line breaks in paragraphs. You should remember that text support on the Web is still primitive (although Cascading Style Sheets can help-more on that later). You need to work within the constraints of the medium.
Changing the Font Face
You can change the font for the entire page or for selected text on the page. However, for users to see your page as you designed it, the font you choose must be installed on the user's computer. Do not make the assumption that all fonts are loaded on everyone's computer. If your first choice is not available, the browser will attempt to use the second choice and then the third. If none of the fonts are available on the user's computer, the text will be displayed in the browser's default font. In the following Step-by-Step, you will make some simple font changes to the text on the page.
Step-By-Step 1.17 - Changing the Font Face
Select the text About Us.
From the Property inspector's Font list, choose Arial, Helvetica, sans serif. The selected text changes to another font, depending on the fonts installed on your computer.
Select the remainder of the text on the page.
From the Property inspector's Font menu, choose Arial, Helvetica, sans serif. All the text now has the same font face.
Save the file and preview it in the browser. Remain in this screen for the next Step-by-Step.
Removing Font Face Settings
In some cases you might not want text to have a font setting but would rather have it displayed in the user's default font. To make this change in settings, select the text whose font you want to remove. Choose Default Font from the Font list in the Property inspector, or click the Text menu, point to Font, and then click Default Font.
Modifying Font Combinations
You can also modify the choices that appear as font combinations and adjust the order in which the fonts will be used. From the Property inspector's Font list, choose Edit Font List, or click the Text menu, point to Font, and then click Edit Font List. The Edit Font List dialog box opens. Select a font combination (such as Arial, Helvetica, sans serif) from the Font list at the top of the dialog box. The fonts in the selected combination appear in the Chosen Fonts list at the lower left of the dialog box. To its right is a list of all fonts installed on your system.
You can choose from the following options:
To add or remove fonts, select the font and then click the directional buttons between the Chosen Fonts list and the Available Fonts list.
To add or remove a font combination, click the plus (+) or minus (-) button at the top left of the dialog box.
To add a font not installed on your system, key the font name in the text box below the Available Fonts list and click the directional arrow to add it to the combination. Adding a font not installed on your system is useful; for example, you might want to specify a Windows-only font when you are authoring on a Macintosh.
To move a font combination up or down in the list, click the directional arrow buttons at the top right of the dialog box.
Changing the Font Color
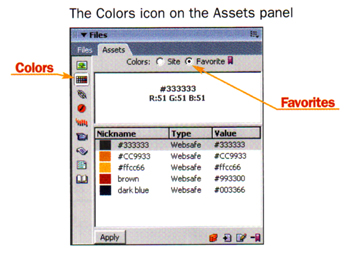
You can easily change the color of your text in Dreamweaver. All colors used at your site are listed on the Assets panel in the Files panel group. To ensure that the colors you use are consistent across your site, you can save commonly used colors on the Assets panel as Favorites.
Step-By-Step1.18 - Adding Colors to Assets Favorites
Click the Window menu, and then click Assets to display the Assets panel. If you have the Files panel group open, you can also click the Assets tab to open the panel.
Make sure the Colors icon is selected and then select Site at the top of the Assets panel, if necessary. Note: If your Site list has only black (#000000) and white (#FFFFFF), choose the Options menu and ; click on Refresh Site List.
Select #003366 to add to the Favorites list.
Select Add to Favorites from the Options menu.
At the top of the Assets panel, select Favorites, as hown in the Figure below
Select #003366 and then select Edit Nickname from the Options menu.
Key dark blue as the nickname for this color and then press Enter.
Step-By-Step1.19 - Changing the Font Color
Add a new color to the Assets Favorites. Select #660000 and nickname it maroon.
Select the text About Us.
Select maroon (#660000). Then click Apply.
Close the browser and remain in this screen for the next Step-By-Step
CSS Styles
As you design your Web pages, you will want to use font changes to make your pages more interesting. You can easily change the font face, including its sixe and color, but, if you want the same color, the same font face, and the same size for all your pages, you would have to remember the settings from page to page.
Good news: Cascading Style Sheets (CSS) saves the text and paragraphing formatting from selected text, making it easy for you to apply that style to other paragraphs in your document or to any document in your site. If you change a CSS style, text originally formatted with that style does not change.
Creating and Applying CSS Styles
The following exercises demonstrate the use of CSS styles on a page. You will format some text, define a CSS style, and then apply that formatting style to other portions of a document.
Step-By-Step 1.17 - Creating a CSS Style Based on Existing Text
Select Sightseeing, the first term in the definition list. You applied bold formatting to this word earlier.
Apply the color dark blue (#003366) from the Assets panel. This word now has the same color as the page's heading.
The remaining definition terms on this page need the same formatting, as do any other lists you create for your site. You'll use a CSS style to accomplish this.
On the Property Inspector, click the Style pop-up menu and choose Rename from the list. The Rename Style dialog box opens.
In the dialog box, name the style Term and click OK.
Note: To apply a style to a selection, you have to highlight all of the appropriate text before applying the style. To apply a style to an entire paragraph, you just have to place the insertion point within the paragraph-you don't have to select each word in the paragraph.
Step-By-Step 1.18 - Applying a CSS Style
Select the definition term Nature Tour. The style is to be applied to a paragraph-so you can either select the whole word or just place your insertion point within the text.
Click Term on the Style menu on the Property inspector. The style is applied to the paragraph.
Repeat steps 2 and 3 for the remaining definition term in the list: Hiking.
Save the document and remain in this screen for the next Step-by-Step.
So far, you have created new CSS styles. But you can also use CSS to specify how existing HTML tags are displayed. In the next Step-by-Step, you'll redefine the Heading 3 tag.
Step-By-Step 1.19 - Redefining an HTML Tag
At the top of the page, click anywhere in the heading Featured Trips.
In the Property inspector, change the style to None. Even if the style is already set to None, set the selection to None again. This should remove the color you added earlier and set the font back to Default.
Click the Align Left button on the Property inspector.
Expand the CSS panel on the right. Click on the menu box in the upper right hand corner of the panel and click New. The New CSS Style dialog box opens.
For Selector Type, choose Tag. For Define In, choose This Document Only. Then use the Tag pop-up menu to select h3 (h3 is the HTML tag used to mark text as Heading 3). Then click OK. This will launch the CSS Style Definition dialog box for the new tag definition.
Start in the Type category. For Font, use the pop-up menu to select Ariel, Helvetica, sans-serif. For Size, key medium (or select it from the pop-up menu). For Color, key #660000.
Switch to the Block category. In the Text Align field, use the pop-up menu to select center.
Click OK to close the CSS Style Definition dialog box. Click Done to close the Manage Styles dialog box. You should see that the heading is set to a style similar to what it was when we started. So why go through all that?
Here's why: Scroll down to the bottom of the page, and click anywhere in the paragraph beneath the We Have Gear heading. Then, in the Format menu on the Property inspector, select Heading 3. Now every time you set some text to Heading 3, it will have all of the characteristics of your first Heading 3. And if you ever decide to change the characteristics of the heading 3 style, the change will be effective for the whole page.
Save the document and remain in this screen for the next Step-by-Step.
Deleting a CSS Style
If you want to delete a CSS style (one which you perhaps no longer need), click the Window menu and then click CSS Styles. On the CSS Styles panel, right-click the style you want to delete and choose Delete.
Clearing Text Formatting
If you want to clear some text formatting, first select the formatted text or, if you are clearing a paragraph style, you can place your insertion point anywhere in the paragraph. Then, from the Style menu on the Property Inspector, select None. All formatting is removed, regardless of how it was applied.
Adding Horizontal Rules
A horizontal rule is a line that goes across the page and provides a visual division between sections of your page.
Step-By-Step 1.20 - Adding a Horizontal Rule
Place your insertion point after the word month at the bottom of the document and press Enter twice.
In the Property inspector, click the Text Outdent option. (This "undoes" the formatting from the previous section.)
Select the Insert menu, point to HTML, and then click Horizontal Rule.
With the horizontal rule selected, key 90 in the W (width) text box of the Property inspector.
Select % from the list menu to the right of the W text box. The horizontal rule will now extend across 90 percent of the browser window regardless of the browser width. It is displayed as a shaded bar centered across the page. Note: You can select pixels from the menu to specify an absolute width. If you choose this option, the rule is not resized when I users resize the browser window.
Deselect Shading to display a solid bar.
Key 3 in the H (height) text box. The horizontal rule is 3 pixels in height.
From the Align pop-up menu, select Left. The thick, unshaded bar moves to the left but still extends across 90 percent of the browser window.
Position the cursor to the right of the horizontal rule and press Enter twice.
Save the file and preview it in the browser.
Close the browser. Remain in this screen for the next Step-by-Step.
Adding Special Characters to Your Page
When working in Dreamweaver, you are generally typing at the keyboard. Sometimes you need characters and other information not directly accessible from the keyboard. With Dreamweaver, you can easily insert special characters, e-mail links, and dates.
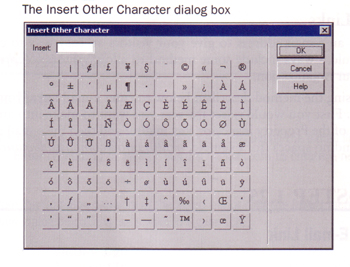
The Characters pop-up menu on the Text category of the Insert bar contains the most commonly used special characters. To insert characters not found on this panel, click the arrow to the right of the Characters:Copywright button from the Text category of the Insert bar, or click the Insert menu, point to HTML, point to Special Characters, and then click Other. The Insert Other Character dialog box opens, as shown in the Figure below. You can select any needed characters from this dialog box.
Step-By-Step 1.21 - Entering Special Characters
Make sure your cursor is positioned at the bottom of the page.
To the right of the copyright symbol, key 2010, Compass Adventure Tours.
Save the file and preview it in the browser.
Close the browser. Remain in this screen for the next Step-by-Step.
Adding a Date Automatically
Sometimes you will need to keep track of the date when you last modified a page in your site. Dreamweaver lets you place the date and time on your pages to track this information. The date and time can be updated automatically so you don't have to do it.
Once you have an automatically updated date in your document, you can change its formatting by selecting it and then clicking Edit Date Format in the Property inspector. The Edit Date Format dialog box opens (just like the Insert Date dialog box shown in Figure 1-27 below). Make appropriate changes to the options and then click OK.
Step-By-Step - 1.26 Inserting the Date
Make sure the insertion point is at the end of the line containing the e-mail link you created earlier. Press Shift + Enter (Windows) or Shift + Return (Macintosh) to create a new line just under the e-mail link.
Click Date from the Common category of the Insert bar or click the Insert menu and then click Date. The Insert Date dialog box opens.
Make the following changes:
Select Thursday, (with a comma) from the Day Format list menu.
Select March 7,1974 from the Date Format list menu.
Select 10:18 PM from the Time Format list menu.
Select Update Automatically on Save to update the date on your page each time you save your document.
Click OK. The current day, date, and time appear below the e-mail link. This information will change every time you save your document.
Press Enter (Windows) or Return (Macintosh) to skip a line and create a new line under the copyright notice.
Enter the company address in the new line: 555 Main St.
Hold down shift and enter Old Lyme, CT 06371
Remain in this screen for the next Step-by-Step.
Adding E-mail Links
You can link to an e-mail address to give your visitors an easy way to contact you from a Web page. You should always include some method to allow visitors to correspond or interact with someone in your organization.
In addition to using the method described below to enter e-mail links, you can also manually enter an e-mail link. First you would select the text you want to make into an e-mail link. Then, in the Link text box of the Property inspector, key mailto: and then the e-mail address. Make sure you key the colon and no spaces (for example, mailto:info@compassadventure.com).
Step-By-Step 1.22 - Entering an E-mail Link
Place the insertion point at the end of the business address you created above. Press Enter (Windows) or Return (Macintosh) to skip a line and create a new line under the copyright notice.
Click the Insert menu, and then click Email Link. The Email Link dialog box opens.
Make the following changes:
For Text, key Send us your questions!
For E-Mail, key your e-mail address.
Click OK. The text appears as a link. The Property inspector shows the e-mail address in the Link text box.
Center align the bottom section (copywright, date, addresses) by highlighting and clicking the Center Align button in the Property Inspector.
Save the file and preview it in the browser.
Close the browser. Remain in this screen for the next Step-by-Step.
Adding Flash Text
When you add a heading to your page, your options are to use text and format it as a heading tag or to create a graphic and insert it on your page. Text formatted as a heading loads quickly because it is text, but your font choices are limited. Graphics as headings solve the font choice problem, but you might not have access to a graphics program, or you might not have enough time to create the graphic you need.
Flash text provides the best of both options. You can use any font you choose and create the text within Dreamweaver. The text you create is a small Flash file (a SWF file). Because it is Flash and not normal body text or a bitmap graphic, you can resize the text directly in the Document window.
In the following Step-by-Step you will create the following Flash Text. Note how the text color changes when you roll over the flash object with your mouse:
Note: Resizing graphics (which will be discussed in Lesson 2) within Dreamweaver is not recommended. But you can resize the Flash text image you create because it is a vector graphic. Vector graphics are scalable. Bitmap graphics (such as GIF and JPEG images) are not.
Step-By-Step 1.27 - Adding Flash Text
Create a new line at the top of the document by pressing Enter (Windows) or Return (Macintosh).
Click the arrow to the right of the Media button on the Common category, and then click Flash Text. (Be sure you haven't selected Flash or Flash Button.) The Insert Flash Text dialog box opens.
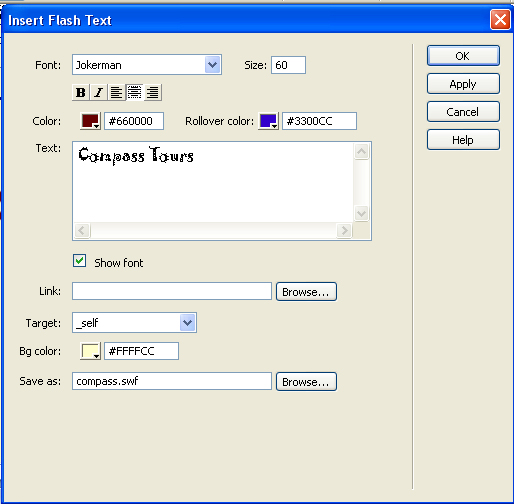
Make the following changes:
From the Font pop-up menu, choose Jokerman. (Choose another font if this is not available on your machine.)
In the Size text box, replace the existing size with 60.
From the Color color picker, choose a maroon color (#660000).
From the Rollover Color color picker, choose a blue color (#003366).
In the Text text box, key Compass Tours
For Bg Color, key #FFFFCC, or click on the color picker and use the eyedropper to click the background in the Document window.
In the Save As text box, key compass.swf.
Your dialog box should look similar to Figure 1-27. Click OK.
In the Property inspector, click Play to start the Flash animation.
In the Document window, place your pointer over the Flash text. The text changes to the rollover color you chose.
In the Property inspector, click Stop.
In the Document window, select the Flash text and increase its size by dragging one of the handles.
Save the file and preview it in the browser.
Close your browser and close Dreamweaver.
Modifying Flash Text
Once you have incorporated Flash text into your Dreamweaver document, you can make modifications to it. In the document window, double-click the Flash text. This opens the Insert Flash Text dialog box. Change the options to your liking. Click Apply to see the results of your changes. When you finish, click OK to close the Flash Text dialog box. The edited Flash text is placed on the page, and the SWF file is updated.
Congratulations! This completes Assignment 1: Creating a "Surf Hawaii Web Page
Please be sure to Save your final version of the surf_hawaii.htm page.

