Assignment 2: Campus Tutor Web page
This Project Web Site assignment requires
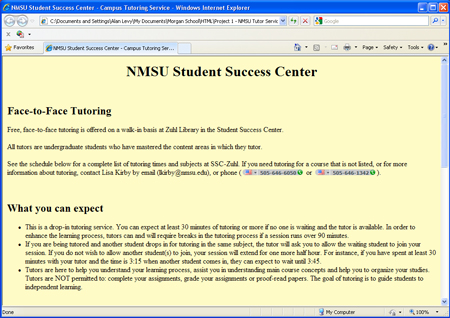
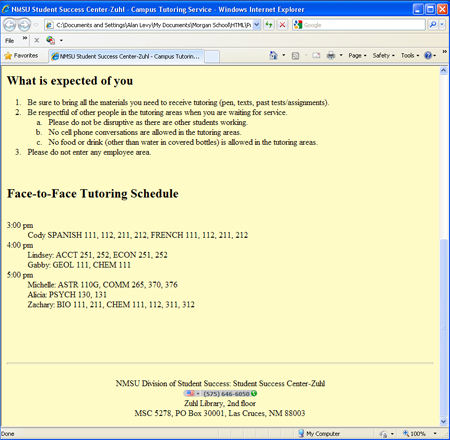
you to build a Web site for a tutoring center at a college campus. The finished web page appears below.
FIGURE 2-1: The finished web page
Entering HTML Tags and Text
The following Step-by-Step shows techniques for entering html tags to a text document and publishing it as a web page.
-
Step-by-Step 2.1: Formatting an HTML document
- Right-click tutor.txt and save it to your personal folder. This file contains all the text vou will need to create the web page.
- Open the tutor.txt from your folder. Enable word wrap, if necessary.
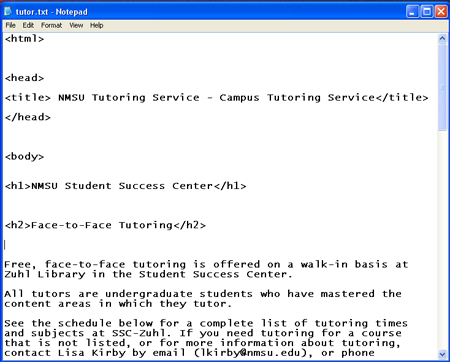
- Save As tutor.htm. Open this file from your folder by double-clicking. The broswer will open the page, but you will see just text, as in the image below:
FIGURE 2-2: The unformatted web page

- Save the tutor.htm file as a .txt file to return to editing mode.
- Format the web page by entering <html> at the top of the page (before any of the text) and </html> at the bottom of the page (after all the text.)
- Define the two parts of the web page by entering <head> and </head> after the opening <html> tag. Hit enter a couple of times, then enter <body>. At the bottom of the page insert the closing tag </body> after the text ends, but before (above) the closing <html> tag.
Note: Keep in mind that you can add extra lines to separate parts of your text document to make it easy to read. These will not appear when viewed by a web browser.
- Add a Title in the Title Bar by typing the following in between the opening and closing Head tags:
<title> NMSU Tutoring Service - Campus Tutoring Service</title>
FIGURE 2-3: The HTML tags added to the text document
Note: Keep in mind that you can add extra lines to separate parts of your text document to make it easy to read. These will not appear when viewed by a web browser.
- Save your tutor.txt file as a txt file. Save again as tutor.htm and preview in your browser.
Entering Heading and Paragraph Tags
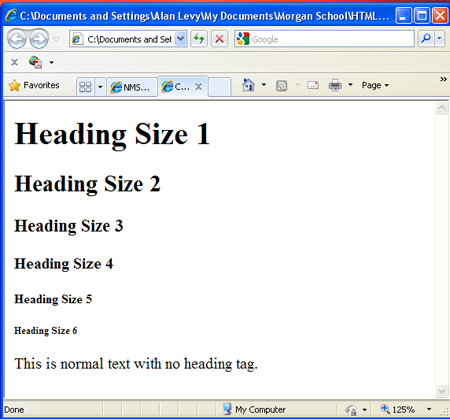
Headings serve to separate text and introduce new topings on Web pages. The headings used for this vary in size. The tags used to specify the heading size range from <h1> to <h6>, with <h1> being the largest.
FIGURE 2-4: Heading Sizes
-
Step-by-Step 2.2: Enrtering Heading and Paragraph Tags
- Open the tutor.txt from your folder. Enable word wrap, if necessary.
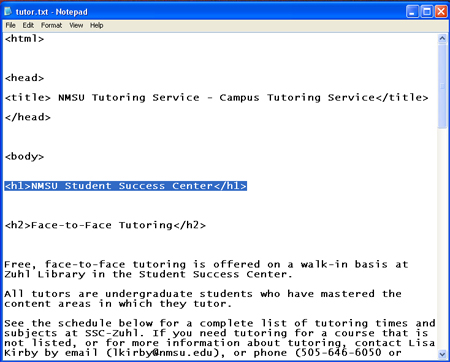
- Type the opening tag <h1> in front of the sentence, "NMSU Student Success Center.
- Type the closing tag </h1> after the sentence, "NMSU Student Success Center.
FIGURE 2-5: Heading Tags
- Place <h2> and </h2> tags around "Face to Face Tutoring."
- Place <h2> and </h2> tags around "What You Can Expect."
- Place <h2> and </h2> tags around "What is Expected of You."
- Place <h2> and </h2> tags around "Face to Face Tutoring Schedule."
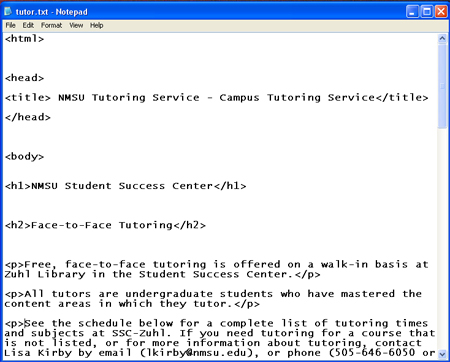
- Break up into paragraphs the large block of text under the "Face to Face Tutoring" section by placing an opening <p> tage and a closing </p> tag around each section of the text that is a separate paragraph
Note: Do not go on to the "What To Expect" section. Those will be made into lists, not paragraphs.
FIGURE 2-6: The paragraph tags added to the text document
- Save your tutor.txt file as a txt file. Save again as tutor.htm and preview in your browser.
Creating Lists
On a Web page, text is often easier to read as a list, instead of as a paragraph format. Lists structure text into an itemized format, using numbers (an ordered list) or bullets (an unordered list.).
In this section you will learn how to create an unordered (bulleted) list.
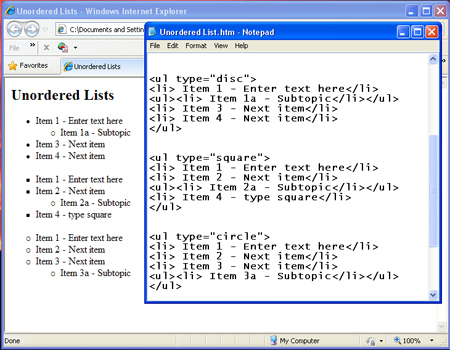
FIGURE 2-7: Unordered Lists
-
Step-by-Step 2.3: Creating Unordered Lists
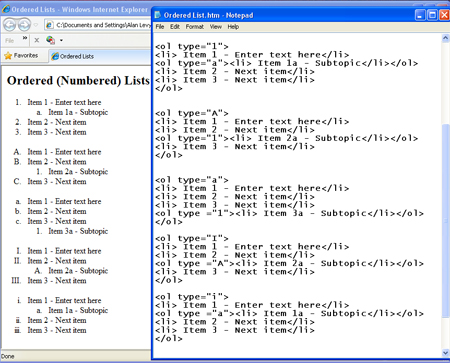
- Study Figure 2-7 above, which shows the .txt document on the right that created the different bullets on the left hand web page. Notice how the "type" part of the ul tag determines whether the shape of the bullet.
- Open the tutor.txt from your folder. Enable word wrap, if necessary.
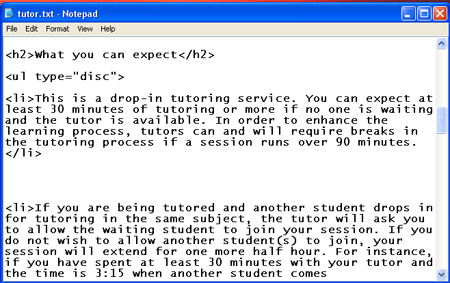
- Locate the "What you can expect" section. This is the only section of text that will be bulleted.
- Type the opening tag <u1type="disc"> in front of the sentence, "This is a drop-in tutoring service."
- Type the closing tag </u1> at the end of the "What you can expect" section. The last sentence to be included in the bulleted section is "The goal of tutoring is to guide students to independent learning." </ul>
Note: Please note that the bullet type is not needed in the closing tag. A simp </ul> tag ends the ul formatting no matter the type of bullet.
- Place an opening <li> tag in front of the first bullet item: "This is a drop-in tutoring service." In other words, the opening tag comes right after the opening <ul> tag.
- Place a closing </li> tag after the first bullet item: "This is a drop-in tutoring service."
FIGURE 2-8: Unordered List Tags
- Place <li> and </li> tags around two more blocks of text:
- Beginning with "If you are being tutored..." and ending with "they can expect to wait until 3:45."
- Beginning with "Tutors are here to help..." and ending with "independent learning.."
- Save your tutor.txt file as a txt file. Save again as tutor.htm and preview in your browser.
In this next section you will learn how to create an ordered (numbered) list.
FIGURE 2-9: Ordered Lists
-
Step-by-Step 2.4: Creating Ordered Lists
- Study Figure 2-7 above. Notice how the "type" part of the ol tag determines whether the list item is a number or letter.
- Open the tutor.txt from your folder. Enable word wrap, if necessary.
- Type the opening tag <o1 type="1"> in front of the sentence, "Be sure to bring..."
- Type the closing tag </o1> after "past tests/assignments)."
Note: The example above will create the number style used in Figure 2-1. Feel free to pick a different type.
- Place an opening <li> tag in front of the first numbered item: "Be sure to bring..." In other words, the opening tag comes right after the opening <ol> tag.
- Place a closing </li> tag after the first numbered item: "...test/assignments."
FIGURE 2-10: Ordered List Tags

- Place <li> and </li> tags around five more blocks of text:
- The sentence beginning with "Be respectful..."
- The sentence beginning with "Please do not be disrespectful..."
- The sentence beginning with "No cell phone..."
- The sentence beginning with "No food..."
- The sentence beginning with "Please do not enter..."
- To create subheadings, place an additional opening <ol type="a"> tag in front of the <li> tag for the sentence beginning "Please do not be disrespectful..."
- Place a closing </ol> tag after the </ol> tag after the "...in the tutoring areas." This closes the subheading section and returns the formatting for the next list item.
- Save your tutor.txt file as a txt file. Save again as tutor.htm and preview in your browser.
In this final section you will learn how to create a third type of list called a definition list.
FIGURE 2-11: Definition Lists
-
Step-by-Step 2.5: Creating a Definition List
- Study Figure 2-11 above, which shows how a definition list appears in a web page. Notice how a definition list creates definition terms <dt> which are aligned on the left margin and definitions <dd> which are indented on the line below.
- Open the tutor.txt from your folder. Enable word wrap, if necessary.
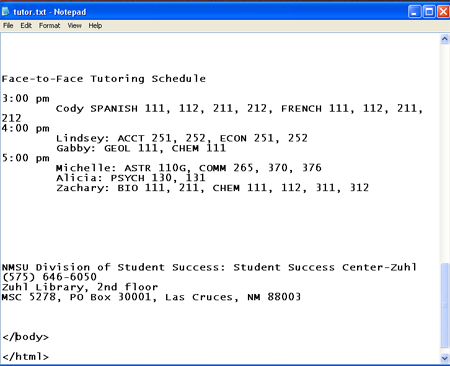
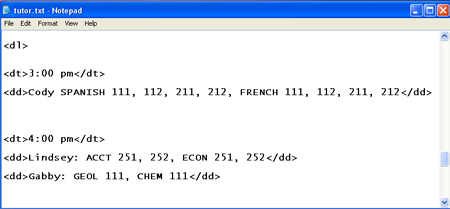
- Locate the "Face to Face Tutoring Schedule" section. This is the only section of text that will be a definition list. The time is the definition term and the tutors names and classes are the definitions.
- Type the opening tag <dl> in front of the sentence 3:00 time.
- Type the closing tag </d1> at the end of Zachary's information.
Note: Please note that there is no "type" specification for definition lists.
- Place an opening <dt> tag and a closing </dt> tag around the first definition term: 3:00 pm
- Place an opening <dd> tag and a closing </dd> tag around the first definition: "Cody SPANISH 111, 112, 211, 212, FRENCH 111, 112, 211, 212"
- Place an opening <dt> tag and a closing </dt> tag around the second definition term: 4:00 pm
- There will be two definitions (tutors) for this time period. Therefore, place opening <dd> tags and a closing </dd> tags around the definitions for Lindsey and Gabby.
FIGURE 2-12: Definition List Tags
- Add tags for the 5:00 time slot and the three tutors scheduled at that time.
- Save your tutor.txt file as a txt file. Save again as tutor.htm and preview in your browser.
Improving the Appearance of Your Web Page
Now let's make some finishing touches to create a Web page that is visually appealing and maintains the interest of the visitors.
-
Step-by-Step 2.6: Adding Background Color
- Open the tutor.txt from your folder. Enable word wrap, if necessary.
- To change the background color, the bgcolr attribute must be added to the <body> tag.
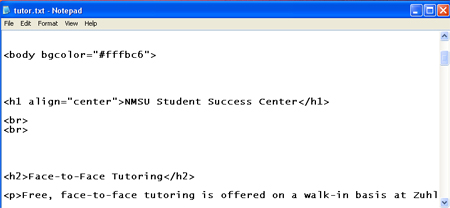
- Locate the <body> tag near the top of your tutor.txt document. Place the cursor in front of the last bracket and type in bgcolor="#fffbc6"
Note: #fffbc6 is the six-digit (or hexadecimal) code for a pale yellow color.
FIGURE 2-13: Adding the bgcolor attribute

- #fffbc6 is the six-digit (or hexadecimal) code for a pale yellow color. Use the table below to choose your background color, and enter the hexadecimal code in place of #fffbc6. Click here if you would like to view even more hexadecimal codes.
FIGURE 2-14: Hexadecimal codes
- Save your tutor.txt file as a txt file. Save again as tutor.htm and preview in your browser.
- Be sure the text is legible against the background color you have chosen. Re-do steps 4 and 5, if necessary.
-
Step-by-Step 2.7: Formatting Text
- Open the tutor.txt from your folder. Enable word wrap, if necessary.
- To center the first Heading, the align attribute must be added to the <h1> tag.
- Locate the <h1> tag near the top of your tutor.txt document. Place the cursor in front of the last bracket, hit the spacebar, then type align="center"
FIGURE 2-15: Adding the text alignment attribute
- Center and format the Contact Information at the bottom of the page, as follows:
- Place paragraph tags around the entire name and address, if you have not already done so.
- Add the align attribute to the opening <p> tag so it now reads
<p align="center">
- Break the contact info into separate lines by adding page break tagss <br> before the telephone number, before "Zuhl Library", and before "MSC 5728".
- Make the name of the tutoring center bold by adding opening <bold> and closing </bold> tags around the name "NMSU Division of Student Success: Student Success Center-Zuhl
- Add line spacing between sections and after headings, by inserting page break tags <br>. The sample in Figure 2-1 uses two page breaks between sections and after the main heading, and one page break after the other <h2> headings.
- Save your tutor.txt file as a txt file. Save again as tutor.htm and preview in your browser. Adjust spacings to duplicate the appearance of Figure 2-1.
-
Step-by-Step 2.: Adding a Hrizontal Rule
- Open the tutor.txt from your folder. Enable word wrap, if necessary.
- To add a horizontal rule, simply place one tag where you would like the line to appear.
- See the samples below to recognize how to specify the size and shading of the <hr> tag.
FIGURE 2-15: Adding a horizontal rule
- Add two horizontal rules to your Web page, as follows:
- Add a size 2 line under the top heading
- Add a size 4 unshaded line above the Contact Info at the bottom of the page.
- Save your tutor.txt file as a txt file. Save again as tutor.htm and preview in your browser. Make adjustments to duplicate the appearance of Figure 2-1.
|
|
