Lesson 4c: Working with Tables for Page Design
Upon completion of this unit, you should be able to:
- Use tracing images
- Use tables to lay out your pages
- Use tables for information and data
 Importing Data from Spreadsheets Importing Data from Spreadsheets
If you have text in a spreadsheet or even in a table in Microsoft Word, you can insert it very easily into Dreamweaver. You need to save or export the text as a tab- or comma-delimited file.
-
Step-by-Step 4.8: Inserting Data into a Table
- Start Macromedia Dreamweaver and open the biking_table.htm file that you created in the previous lesson.
- Click to the right of the table and then press Enter (Windows) or Return (Macintosh). The insertion point is in a new paragraph.
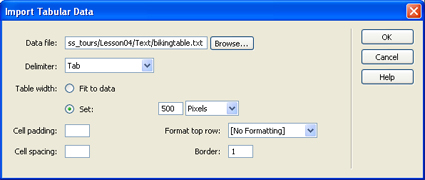
- Click the Insert menu, point to Table Objects, and then click Import Tabular Data, or click the Tabular Data button in the Layout category of the Insert bar. The Import Tabular Data dialog box opens, as shown in Figure 4-8.
FIGURE 4-8:
The Import Tabular Data dialog box

- Click Browse, navigate to the bikingtable.txt file in the Lesson04/Text folder, and then double-click it.
- In the Import Tabular Data dialog box, set the Delimiter to Tab, click the Set option under Table Width, enter 500 in the text box, click the arrow on the Percent box, select Pixels, make sure (No Formatting) is selected in the Format Top Row box, and that 1 is in the Border box.
- Click OK. The data is imported, and a table is built for you with the settings you chose. Remain in this screen for the next Step-by-Step.
You have two tables: the first you created with the row headers and a second one with the data. You now want to combine the two tables.
 Copying and Pasting Table Cells Copying and Pasting Table Cells
You can copy and paste multiple table cells at one time, preserving the cell's formatting, or you can copy and paste only the contents of the cells.
Cells can be pasted at an insertion point or in place of a selection in an existing table.
To paste multiple table cells, the contents of the Clipboard must be compatible with the structure of the table or the selection in the table in which the cells will be pasted.
-
Step-By-Step 4.9 - Working with Cells and Cell Content
- Select all the cells in the second table by dragging across the cells. Start in the upper-left cell and drag to the lower-right cell. The selected cells are displayed with a black border. To be cut or copied, the selected cells must form a rectangle.
- Click the Edit menu and then click Copy, or use the keyboard shortcut Ctrl + C (Windows) or Command + C (Macintosh).
- Click in the first cell of the second row in the top table. This is where the copied cells will be pasted.
- Click the Edit menu and then click Paste, or use the keyboard shortcut Ctrl + V (Windows) or Command + V (Macintosh). All the cells from the second table should now be inserted in the first table.
- Save the document and remain in this screen for the next Step-by-Step.
If you are pasting entire rows or columns, the rows or columns are added to the table. If you are pasting an individual cell, the contents of the selected cell are replaced if the Clipboard contents are compatible with the selected cell. If you are pasting outside a table, the rows, columns, or cells are used to define a new table.
 Selecting Table Elements Selecting Table Elements
To change or delete a table, you need to select the table. Dreamweaver provides several methods for selecting a table. You will find that some methods are easier than others, depending on the complexity of the table structure. You can easily select a row, a column, or all the cells in a table. You can also select noncontiguous cells in a table and modify the properties of those cells. (You cannot copy or paste noncontiguous cell selections.) You can use Expanded Tables mode to make it easier to select and edit cells. Expanded Tables mode temporarily adds space inside cells, between cells, and to the table border. That space disappears when you revert to Standard mode.
Following are options for selecting and working with parts of a table:
- Selecting rows or columns: Position the pointer at the left margin of a row or at the top of a column and click when the selection arrow appears. Or click in a cell and drag across or down to select multiple rows or columns.
- Selecting one or more cells: Click in a cell and drag down or across to another cell. Or click in one cell and then hold down Shift and click another cell to select all cells within the rectangular region defined by the two cells.
- Selecting noncontiguous cells: Press Ctrl (Windows) or Command (Macintosh) and click to add cells, rows, or columns to the selection. Or select multiple cells in the table, and then press Ctrl (Windows) or Command (Macintosh) and click cells, rows, or columns to deselect individual cells.
- Resizing a column: Move the pointer over one of the column borders. When the pointer changes to a two-headed arrow, drag the column border.
- Adding a new row: Click in the last cell of a row and press Tab, or click the Modify menu, point to Table, and then click Insert Row. You can also right-click (Windows) or Ctrl-click (Macintosh) in the table, select the Table menu, and then click Insert Row from the submenu.
- Deleting a row: Click in the row, click the Modify menu, point to Table, and then click Delete Row. You can also use right-click (Windows) or Ctrl-click (Macintosh) while in the table row, select the Table menu, and then click Delete Row from the submenu.
- Adding a row in the middle of the table: Click in the row below where you want the new one, click the Modify menu, point to Table, and then click Insert Row. You can also rightclick (Windows) or Ctrl-click (Macintosh) in the row below, select the Table menu, and then click Insert Row from the submenu.
- Inserting a row and controlling placement before or after the current row: Click the Modify menu, point to Table, and then click Insert Rows or Columns. A dialog box opens in which you can specify whether to insert before or after the current row.
- Spanning columns or rows: Drag to select multiple cells and then click Merge Cells on the Property inspector. You can also click the Modify menu, point to Table, and then click Merge Cells.
- Splitting a cell: Select the cell and then click Split Cell on the Property inspector, or click the Modify menu, point to Table, and then click Split Cell to return the number of cells to the original number (if you previously merged them) or to split a cell into any number of rows or columns.
-
Step-By-Step 4.10 - Selecting Table Elements
- Select one or more cells in the second table, but not an entire row or column.
- Click the Edit menu, and then click Clear or press Delete. This removes cell content but leaves the cells intact.
- Drag across all the cells in a row of the second table to select the row.
- Press Delete. The row and all its contents are deleted. Remain in this screen for the next Step-by-Step.
- Practice selecting an entire table by doing the following:
- Position the pointer on the upper-left corner of the second table or anywhere on the bottom edge. The pointer turns to a white arrow with a small table icon when you are close to the edge. Click when you see the pointer. Click outside the table to deselect it.
- Click once in the second table. Click the Modify menu, point to Table, and then click Select Table. Click outside the table to deselect it.
- Position the pointer anywhere inside the second table and select the <table> tag in the tag selector at the lower-left corner of the Document window.
Selection handles appear around the table when it is selected. When the table is selected, you cannot see the black border around any of the cells.
- With the second table selected, press Delete to remove the second table.
- Save the document and remain in this screen for the next Step-by-Step.
 Changing Cell Attributes Changing Cell Attributes
You can change the attributes, or characteristics, of a cell, row, or column by using options in the Property inspector. Following are definitions of the options in the cell, column, or row Property inspector:
- Horz: Sets the horizontal alignment of the cell's contents to the browser's default (usually Left for regular cells and Center for header cells), left, right, or center.
- Vert: Sets the vertical alignment of the cell's contents to the browser's default (usually Middle), top, middle, bottom, or baseline.
- W and H: Sets the width and height of selected cells in pixels. To use percentages, follow the value with a percent sign (%).
- Bg (top): Sets the background image for the cells.
- Bg (bottom): Sets the background color for the cells. Background color appears inside the cells only-that is, it does not flow over cell spacing or table borders. This means that if your cell spacing and cell padding are not set to zero, gaps will appear between the colored areas even if the border is set to zero.
- Brdr: Sets the border color for the cells. Borders must be set for the entire table for this attribute to be recognized.
- No Wrap: Prevents word wrapping, so cells expand in width to accommodate all data. Normally, cells expand horizontally to accommodate the longest word and then expand vertically.
- Header: Formats the selected cell as a table header. The contents of table header cells are bold and centered by default.
-
Step-By-Step 4.11 - Changing the Attributes of a Row, Column, or Cell
- Select the Location column in the table.
- Click the arrow in the Horz box in the Property inspector and set the horizontal alignment to Center, as shown in Figure 4-11. Leave the vertical alignment set to Default.
FIGURE 4-10:
The Property inspector with a column centered

- Select the Rating column and change the horizontal alignment to Right.
- Select the top row of cells by positioning the pointer at the left margin of the row and clicking when the pointer changes to a selection arrow.
- On the Property inspector, click the Bg color box to open the color picker.
- Select a light gray color. The background color of the first row of cells changes accordingly.
- Save the document and remain in this screen for the next Step-by-Step.
 Sorting Tables Sorting Tables
You can perform a simple table sort by sorting on the contents of a single column. You can also perform a more complicated sort by sorting on the contents of two columns. You cannot sort tables that contain merged cells.
The Sort Table dialog box offers a number of options:
- Sort By: This is the first column you will sort by.
- Order: Choose whether you want to sort the column alphabetically or numerically. This option is important when the contents of a column are numerical. An alphabetical sort applied to a list of one- and two-digit numbers results in an alphanumeric sort (such as 1, 10, 2, 20, 3, 30) rather than a straight numeric sort (such as 1, 2, 3, 10, 20, 30). Then choose Ascending (A to Z or low to high) or Descending for the sort order.
- Then By: Specify sort options here to perform a secondary sort on a different column.
- Sort includes the first row: Select this option to include the first row in the sort. If the first row is a heading that shouldn't be moved, leave this option unchecked.
- Sort header rows: Select this option if you have marked header rows for your table with the THEAD tag. The rows with THEAD tags will be sorted but will remain at the top of the table. If you expect your table to be printed (and for it to be printed across multiple pages), you can use the THEAD tag to have a consistent set of headings at the top of each page on which the table appears.
- Sort footer rows: Select this option if you have marked footer rows for your table with the TFOOT tag. The rows with TFOOT tags will be sorted but will remain at the bottom of the table. TFOOT is similar to THEAD but applies to rows used as footers.
- Keep all row colors the same after the sort has been completed: If you changed any attributes for a row, you can retain that attribute in the row by selecting this option. For example, suppose you sort a table with a color in the first row. After sorting, the data in the first row moves to the second row. If this option is selected, the color moves with the data to the second row. If this option is not selected, the color remains in the first row.
-
Step-By-Step 4.12 Sorting
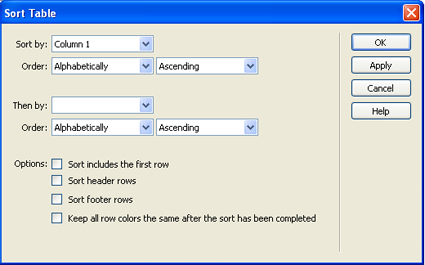
- Click View, point to Table Mode, and make sure Standard Mode is selected. Select the table, click the Commands menu, and then click Sort Table. The Sort Table dialog box opens, as shown in Figure 4-12.
FIGURE 4-11: The Sort Table dialog box

- Make sure the following options are set in the Sort Table dialog box:
- Sort By: Select Column 1.
- Order: Select Alphabetically. Choose Ascending.
- Then By: Leave blank.
- Sort Includes First Row: Leave unchecked.
- Sort Header Rows: Leave unchecked.
- Sort Footer Rows: Leave unchecked.
- Keep All Row Colors the Same After the Sort Has Been Completed: Leave unchecked.
- Click OK. Your table is sorted alphabetically by the first column, but the row headers remain in the first row.
- Save the document and remain in this screen for the next Step-by-Step.
 Exporting a Table Exporting a Table
A table you create in HTML has all the tags needed to display the table in a browser. If you need to extract the table information to place it in a database, a spreadsheet, or a word-processing or page layout application, you can't just copy and paste the text. All you'll get is the text with no row and column formatting. However, you can easily export the table and save the file as a tabdelimited file that can be read by most applications.
-
Step-By-Step 4.13 - Exporting a Table
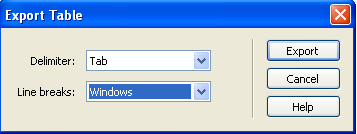
- With the table still selected, click the File menu, point to Export, and then click Table. The Export Table dialog box opens, as shown in Figure 4-13.
FIGURE 4-13: The Export Table dialog box

- For the Delimiter (the character that separates cell data), Tab is the default selection. The other options are Space, Comma, Semicolon, or Colon. Make sure Tab is selected.
- For the Line Breaks, choose line breaks for the operating system to which you are exporting the file. The options are Windows, Mac (Macintosh), or UNIX. Select the option that's running on your local machine.
- Click Export to open the Export Table As dialog box.
- Enter new_biking_table as the name of your file, followed by your initials and then the .txt extension. (The file you are creating is an ASCII text file. You should add the .txt extension to the filename.) Click Save.
- Save and close the document.
 Final Design of Biking Table Final Design of Biking Table
Make the following design changes to the Montana Mountain Biking page you have been working on.
-
Step-by-Step 4.14: Inserting Data into a Table
- Open biking_table.htm, if necessary.
- Use the Page Properties dialog box to make the following changes:
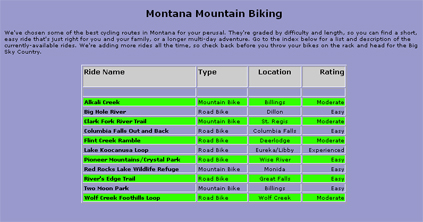
- change the background color of the biking table.htm file to purple (#9999CC).
- Change the font of the text in biking table.htm to Verdana.
- Change the font size of the text to 10.
- Center the entire table on the page.
- Format the names of the rides in the first column to be Bold. Don't include the column label.
- Format the column labels (Ride name, Type, Location and Rating) to Heading 5.
- Add a blank row after the column labels, if necessary.
- Starting with the third row of the table (the row that begins with Alkali Creek), change the background color of every other line in the table to yellow.
- Save and preview the document
FIGURE 4-14: The completed Montana Mountain Biking page

- Close the document.
- Open the biking.htm page and create a link to the biking_table.htm page
- Add the following sentence underneath the picture: "Click here to view the trail list."
- Create a link to the biking_table.htm page from the word "here."
 Back to previous page: Lesson 4b: Working with Tables Back to previous page: Lesson 4b: Working with Tables
 After completing this lesson, you should go on to the following: After completing this lesson, you should go on to the following:
|

