Lesson 2: Working with Graphics
Before you begin this lesson, you must be able to identify the graphics formats commonly used on web pages. Click here to learn the difference between, and when it is appropriate to use gif or jpg files.
 Placing Graphics on the Page Placing Graphics on the Page
Dreamweaver lets you choose how it references images: with document-relative or siteroot-relative references. With document-relative referencing, Dreamweaver constructs the path to the image based on the relative location of your HTML document to the graphics file. Site-root-relative referencing constructs the path to the image based on the relative location of that image from your site root.
Generally, you should use document-relative links and paths. If you have an extremely large site, or if you plan to move pages frequently within the server, you might want to use site-rootrelative referencing.
Until you save your file, Dreamweaver has no way to create the reference. You should always save your document before you insert graphics. If you don't, Dreamweaver displays an alert box and then fixes the filename path when you do save the Dreamweaver file.
-
Step-by-Step 1.1: Inserting a Graphic by Using the Insert Bar
- Start Dreamweaver.
- Click the File menu and click New. In the New Document dialog box, make sure Basic Page is selected in the Category list and HTML in the Basic Page list, and then click Create.
- Save the document as travel_log, followed by your initials in your compass_tours folder.
- In the document Title box, key Compass Extreme Adventures.
- Click the Modify menu and then click Page Properties.
- In the Page Properties dialog box, make sure Appearance is selected in the Category List. Change the Background color to #006699 and the Text color to #FFFFFF. Then click OK.
- Click in the document to make sure the insertion point is on the first line of the document.
- From the Common category on the Insert bar, click Images and then click Image.
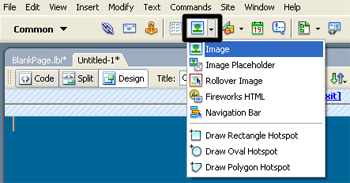
Optional: click the Insert menu and then click Image to insert a graphic on the page. The Select Image Source dialog box opens.
- Locate and open the Lesson02 folder, and locate the file banner_head.gif in the Images folder.
- In the Relative To box, make sure Document is selected. The document filename travel log.htm appears to the right of the menu.
- Click OK (Windows) or Choose (Macintosh).
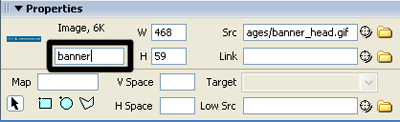
- On the Property inspector, key banner in the image name text box (it's on the far left, under the word Image), as shown in Figure 2-1. Although naming your images is not essential, it is a good practice. Non-text objects in a Web page must have names if you want to include user interactivity enhancements (Lesson 5).
- Save your work and remain in this screen for the next Step-by-Step.
When you import a graphic, the width and height of the graphic are automatically added on the Property inspector. This gives the browser the information it needs to define the layout of the page.
You can use the width and height attributes to create a special effect for a graphic without making the graphic larger or smaller in file size. For example, you can create a 1-pixel by 1-pixel graphic of a color-a solid dot. Use the width attribute to create a colored line across the page; use the height attribute to change its height.
Note: Including the width and height of the image in the HTML code can make a difference in the time it takes for a browser to render your page. You can change these numbers in Dreamweaver, but don't! If you scale the image larger, the image quality diminishes. You could scale the image smaller and it would look OK, but you won't have changed the file size; thus, the graphic will take just as long to download. Always adjust the image size in image-editing software (such as Fireworks) to ensure that you use the smallest file size possible.
Working with Graphics and Adding Adding Alt Text
The Alt attribute (Alt being a shortened form of Alternate) lets you specify text to be displayed on browsers when graphics can't be displayed. This is a significant feature to add to any graphic, particularly graphics that are critical for navigation. If users have disabled graphic display or are using a text-only browser, at least they can see some of the information they are missing. People with vision disabilities use a reader that speaks the Alt tags along with the text on a Web page. In some browsers, Alt text is displayed briefly when the user moves the pointer over the graphic.
-
Step-By-Step 2.2 - Working with Graphics and Adding Alt Text
- Make sure the banner head.gif image is selected.
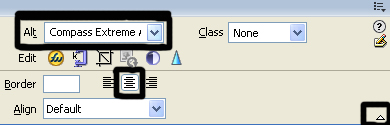
- On the Property inspector, key Compass Extreme Adventure Tours in the Alt text box.
- On the Property inspector, click the Align Center button, shown in Figure 2-2. If you don't see the Align Center button, click the expander arrow at the bottom right of the Property inspector.
- Click outside the banner graphic to deselect it. Press Enter (Windows) or Return (Macintosh) to move to the line below the banner graphic, and key My Diving Travel Log. Select the text, and click the Italic button, click the arrow on the Format box and select Heading 2, select the Verdana, Arial, Helvetica font, and click the Align Left button.
- Create a new paragraph under the heading and make sure the line is set to Paragraph format and left alignment. Make sure that the Italic button is not selected.
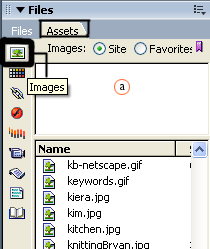
- Next, insert a new image by using the Assets panel. On the Assets panel, click the Images button. (If the Assets panel is not open, click the Window menu, and then click Assets.
- Drag the diver.jpg graphic from the Assets panel to the document and place it below the heading.
- Key Diver in the Alt text box on the Property inspector. Key diver in the image name text box.
- Save the document and remain in this screen for the next Step-by-Step.
Adding Images to Asset Favorites
All images used within a site are listed as site assets on the Assets panel. For images that are used repeatedly, placing them in Image Favorites can be a time-saver. You can organize your images into folders to make them easy to locate.
It might take a few seconds for the panel to create a listing of all the assets used by files in your site. If you haven't created a site cache for this site, the Assets panel prompts you to do so; the asset catalog can't be created without a site cache.
If you add a new asset to your site, it might not immediately appear on the Assets panel. To update the Assets panel to include all the images in your site, you need to refresh the site catalog. Click the Refresh Site List button at the bottom right of the Assets panel. (this button is only available when Site is selected in the Assets panel).
-
Step-By-Step 2.3 - Working with Asset Favorites
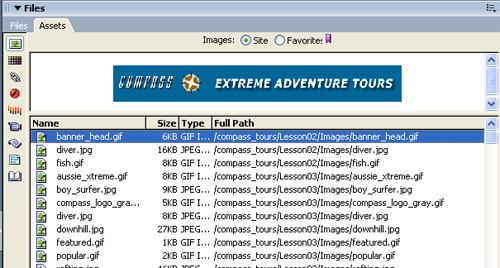
- Click Site at the top of the Assets panel. Click the Full Path column heading to rearrange the images according to their folder structure (path), as shown in Figure 2-5 (you may need to resize the panel to see the column). This places all the images in the Lesson02 folder together.
- Select the fish.gif graphic from the list of images.
- Click Add to Favorites at the lower right of the panel. (And click OK if a message box appears.)
- Click Favorites at the top of the Assets panel. The fish.gif image is listed in Favorites.
- Remain in this screen for the next Step-by-Step.
To create a folder in Asset Favorites, click New Favorites Folder at the bottom of the panel. Once you have created a folder, you can collapse it or expand it by double-clicking it.
To remove an image from Asset Favorites, select the image from the list of images and then click Remove from Favorites. The image is no longer listed as a Favorite. You haven't deleted the image-it is still in its original location-you've simply removed it from the list of Favorites. To remove a folder from Asset Favorites, select the folder to delete, and then click Remove from Favorites at the bottom of the panel.
Note: If a Favorites folder you want to remove contains any images you want to keep as Favorites, first move the images to another folder.
Wrapping Text Around Images
A common formatting preference is to have text wrap around a graphic on the page. You can achieve this easily by changing the Align attribute of the image. For text wrapping to work properly, make sure the image is inserted at the beginning of a paragraph. The text wraps to the bottom of the graphic and then returns to the left margin of the window.
Dreamweaver gives you several alignment options for images, including Top and Text Top. If you want your text to wrap or move to the top of the image, you might think that one of these options would work. Remember that multiline text can wrap only on either the left or the right side of an image, so the only options that will accomplish this are Left or Right. If you want to place the image on the left and wrap the text on the right, select the image and choose Left in the Align field. If you want to place the image on the right and wrap the text on the left, select the image and choose Right in the Align field.
The other alignment options on the pop-up menu are for the placement of a single line of text next to a graphic. You will work with these later.
-
Step-By-Step 2.4 - Wrapping Text Around an Image
- From the data files for this lesson, use the Files panel to open the file diving.txt from the Text folder of the Lesson 02 folder provided by your instructor. Double-click the file so that you can view it in Dreamweaver.
- Select all the text, and click Copy on the Edit menu. Close the diving.txt file without saving.
- In the travel_log.htm file, paste the copied text to the right of the diver graphic. Left-align all the text. You might need to insert paragraph breaks manually.
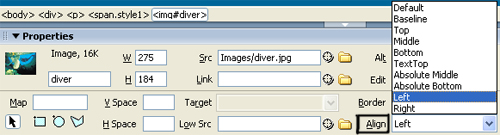
- Select the diver graphic. On the Property inspector, choose Left from the Align pop-up menu, as shown in the Figure below. The text wraps around the diver graphic.
- Save the file and preview it in your browser.
- Close your browser and remain in this screen for the next Step-by-Step
Modifying the Space and Adding a Border Around Images
When you use an Align option to wrap text around graphics, you'll probably want to adjust the space around the image as well. You can do this on the Property inspector.
-
Step-By-Step 2.5 - Adding Space and a Border Around an Image
- Make sure the Diver graphic is selected.
- On the Property inspector, enter 15 in the H Space text box. This creates 15 pixels of space on both the left and right sides of the image. You cannot add space on only one side.
- Enter 2 in the V Space text box. This creates 2 pixels of space at both the top and bottom of the image.
- In the Border text box of the Property inspector, enter 2. Press Enter (Windows) or Return (Macintosh) to see the change. A 2-pixel border is added to the diver image.
- Save your document and remain in this screen for the next Step-by-Step.
Aligning Images and Text
Often you'll want to control the placement of a graphic on the page in relation to a single line of text that appears near it. You can change the relative location of the graphic to the text by using options on the Property inspector.
-
Step-By-Step 2.6 - Aligning a Single Line of Text Near a Graphic
- Press Enter (Windows) or Return (Macintosh) at the end of the document to add a new line.
- On the Assets Favorites panel, drag the fish.gif image to a new line after the body text. Key Fish in the Alt text box, and key fish in the image name text box.
- On the Property inspector, click the Align Center button. Be sure to click the button; don't select Center on the Align menu.
- Position the insertion point to the right of the Fish graphic and key Check out some of the fish we saw. The text is aligned with the bottom of the graphic and is too close to the graphic.
- Select the Fish graphic and add a 2-pixel border to it.
- On the Property inspector, enter 15 in the H Space text box. This will force the graphic and text to move apart.
- From the Align pop-up menu, choose Middle. The baseline of the text is aligned with the middle of the graphic.
- Save the file and preview it in your browser.
- Close the browser and remain in this screen for the next Step-by-Step.
Image Alignment Options
You need to understand how the alignment options work. The following seven options work well for aligning a single line of text near a graphic. As you saw earlier, they don't work for wrapping multiple lines around a graphic (use Left or Right instead). Here's what happens when you use the Align pop-up menu:
- Baseline: Aligns the bottom of the image with the baseline of the text line.
- Top: Aligns the image with the top of the tallest item in the line.
- Middle: Aligns the baseline of the text line with the middle of the image.
- Bottom: Identical to Baseline.
- Text Top: Does what many people think Top should do, which is to align the image with the top of the tallest text in the line (this is usually, but not always, the same as Top).
- Absolute Middle: Aligns the middle of the text line with the middle of the image.
- Absolute Bottom: Aligns the bottom of the image with the bottom of the text line.
 Go to next page: Adding Flash Objects Go to next page: Adding Flash Objects
|
