Lesson 5: Adding User Interactivity
Upon completion of this unit, you should be able to:
- Add user interactivity to your pages by using behaviors.
- Create and work with rollovers.
- Attach behaviors to objects.
- Modify behaviors.
- Understand events.
- Add multiple behaviors to one user action
 Defining a Behavior Defining a Behavior
Behaviors are used to add interactivity to your pages, enabling your users to change or control the information they see. A behavior combines a user event (for example, moving the pointer over a graphic button) with an action or series of actions that take place as a result of that event. Behaviors are prewritten JavaScript programs you can easily incorporate in your page when using Dreamweaver.
You can specify more than one event to trigger a behavior and more than one action for each event. Macromedia Dreamweaver MX 2004 includes several predefined behavior actions. If you are proficient with JavaScript, you can add your own behaviors. You can also download new behaviors from the Macromedia Exchange for Dreamweaver Web site by clicking the Dreamweaver Exchange link on Dreamweaver's start page. If you have an Internet connection, your primary browser will open and you will be taken directly to the Web site.
Top of page
Creating Rollover Buttons
One common use of JavaScript on Web pages is for creating a rollover - an image that changes when the user moves the pointer over the image. You can create button rollovers in Dreamweaver without ever looking at the HTML or JavaScript code.
Here are a few things to remember when designing rollover buttons for your page:
- Create each image the same width and height. If you don't, Dreamweaver resizes the second rollover image to the size of the first image. Resizing distorts the second image.
- Make the buttons as small as possible. Remember, with rollovers you are displaying not one, but two images for the same button. The file size of the button is effectively doubled, because you have two images to download.
Inserting Rollover Magic
Dreamweaver makes it easy to insert rollovers in your page. JavaScript behaviors rely on naming of objects (such as images). Using the Rollover Image command provides you with a field for naming the image, so you won't forget. If you haven't already placed your initial images on the page, you might find this method preferable because it steps you through inserting and naming the images.
Top of page
Adding Rollovers to Existing Images
Using the Insert Rollover Image command makes it very easy to insert rollovers on your page. Sometimes graphics are already placed on the page and you want to add rollovers. You could delete the graphics and use the Insert Rollover Image command to put them back on the page, but there is a possibility of changing the page design, especially if the graphics are in a table. In the next Step-by-Step, you will add rollovers to the buttons across the top of the page.
-
Step-By-Step 5.2 - Adding Rollovers to an Image
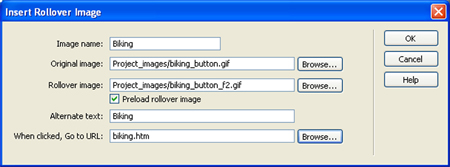
- Select the Adventure Gear image and key gear in the image name text box on the Property inspector (illustrated in Figure 5-2a). The image name text box is under the word Image in the upper-left corner of the Property inspector.
FIGURE 5-2a:
The image name text box in the Property inspector

- Click the Window menu, and then click Behaviors to open the Behaviors panel.
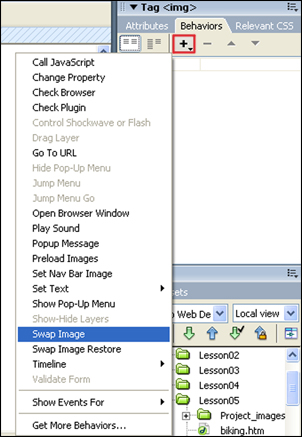
- With the image still selected, click the Add Behavior (+) button at the top of the Behaviors panel and click Swap Image from the pop-up menu, as shown in Figure 5-2b. The Swap Image dialog box appears, with the gear image selected.
FIGURE 5-2b:
The Behaviors panel with the Actions menu displayed
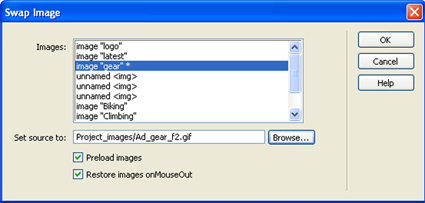
- In the Swap Image dialog box, click Browse and select the Ad_gear_f2.gif image from the Project_images folder. Click OK (Windows) or Choose (Macintosh). The Swap Image dialog box should look like Figure 5-2c. Click OK to close the Swap Image dialog box.
FIGURE 5-2c:The Swap Image dialog box
- Save your file and preview it in your browser.
- Repeat steps 1-5 to add rollovers to the remaining buttons, using the corresponding image files featured_f2.gif, Travel_logs_f2.gif, and About_f2.gif. Don't forget to name each image before you add the Swap Image behavior.
- Save the document and remain in this screen for the next Step-by-Step.
Note:
In the Swap Image dialog box, Dreamweaver selects the Preload Images and Restore Images onMouseout options by default. Leave these options on. Preload Images ensures that the rollover image loads when the page loads, so users do not have to wait the first time they roll over the image. Restore Images onMouseOut returns the button to the first image when users roll off the image.
Understanding Events
After you select an action, Dreamweaver adds that action to the list in the Behaviors panel. Dreamweaver also adds an appropriate event for that action. The event is what causes the action to occur; for example, an event could be the user clicking a button. The action is the result of the user interaction. You can see the list of events and actions for an object (such as a graphic) by selecting the object on the page. If you want to change the event, select the event in the left column of the Behaviors panel and then pick a new one from the pop-up menu (the arrow) to the right of the event, as shown in Figure 5-6. The events in the pop-up menu might change depending on the action and the browser type you choose. The Events pop-up menu appears only after you add an action and select the event. The Show Set Events button shows only those events that have been attached to the current document. The Show All Events button shows all available events.
FIGURE 5-2d:
The Events pop-up menu in the Behaviors panel
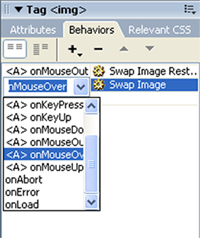
The Events pop-up menu displays events using two methods. In the top portion of the list, Dreamweaver displays events that need an anchor placed around the selected object. These events are listed with <A> preceding the event name. The bottom section shows events that can be directly attached to the selected object. Sometimes, the same event is listed in both sections. The difference is that if you choose from the bottom section, the behavior call is added to the object's tag. If you choose from the top section, the same behavior call is added to a hyperlink containing the selected object.
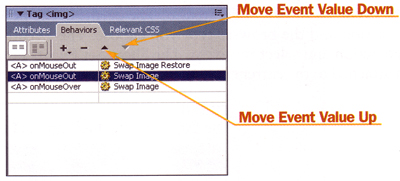
Adding Several Actions to an Object
After you define a user event, you can attach several actions to that event. To add another event, select the object with the first event and use the Behaviors panel to add another action. To change the order in which the actions are executed, use the Move Event Value Up arrow or Move Event Value Down arrow on the Behaviors panel, as shown in Figure 5-3a.
FIGURE 5-3a:
The Behaviors panel with several actions assigned to one event
You can also have several images swap out with a single event. For example, you might want two images to swap out when the user rolls over one button. You might think you should create two separate Swap Image actions, but this behavior only works if you use the same Swap Image action for both images. The Swap Image Restore action restores only the last swapped image, so if you have two swap images, only the last one is restored. In the Swap Image dialog box, pick the first graphic and choose the image to swap. Then, before leaving this dialog box, pick the other image and choose its swapped image.
In the next Step-by-Step, you want two images to swap when the user rolls over the buttons on the left. You already have one of the rollovers done. Two actions need to occur on the same onMouseOver event. Instead of adding a new action, you edit the existing Swap Image action and add a new swap image.
-
Step-By-Step 5.3 - Swapping Out Two Images on a Rollover
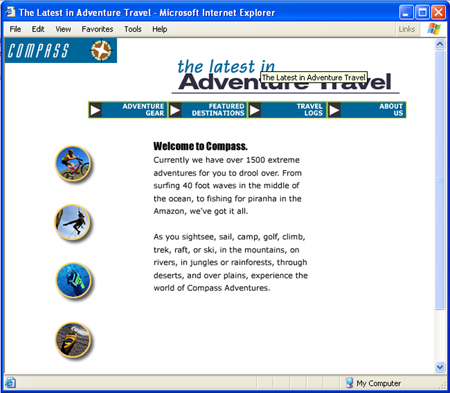
- In the latest.htm file, select the Welcome to Compass graphic. This is the graphic you want to change when the user rolls over each of the buttons.
- Name the image text.
- Select the round biking image to the left. This image has a Swap Image behavior assigned.
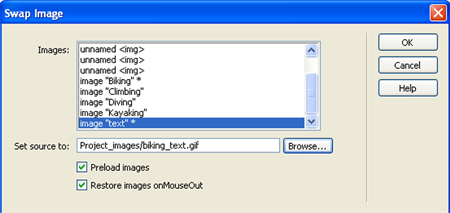
- Double-click the Swap Image action in the Behaviors panel. The Swap Image dialog box opens. Images that have an asterisk at the end of the name have been assigned a swap image. This is a quick way to verify which images will swap to other images.
- Select image "text" in the list.
- Click Browse and select biking_text.gif from the Project images folder. Then click OK (Windows) or Choose (Macintosh). Your dialog box should look like the Swap Image dialog box in Figure 5-8. Click OK to exit the dialog box.
FIGURE 5-8:
The Swap Image dialog box with two swap images assigned
- Repeat steps 3-6 for all the round buttons, using climbing_text.gif, diving_text.gif, and kayaking_text.gif from the Project_images folder.
- Save your file again and test it in your browser. When you roll over each button, the button should swap and an image should swap in the Welcome area. When you roll off the button, both the button and the Welcome text graphic should restore to their original images.
- Close the browser, close your file, and close Dreamweaver.
Linking the Latest page
Please add a descriptive link to the latest.htm page on your Compass Tours home page.
 After this lesson, you should complete the following After this lesson, you should complete the following
|