Lesson 4b: Working with Tables for Page Design
Upon completion of this unit, you should be able to:
- Use tracing images
- Use tables to lay out your pages
- Use tables for information and data
 Using Tables for Page Design Using Tables for Page Design
Up to this point, you've had little control over the design of your pages. You've wrapped text around a graphic and indented the text on the page, but these options are limited and don't always provide the desired effect. Tables can give you more control.
Tables in HTML are very similar to tables in a spreadsheet. Tables in HTML were meant to be a means of presenting information in a very organized manner; they contain rows and columns where you can place data. But in HTML, tables also provide a way to design your pages with some control over placement of text and graphics. You can use the cells of a table to put graphics in a location other than just the next place vertically on the page, or you can use a cell to create a sidebar for your text.
If you've ever had to hand-code an HTML table, you know how tedious the task can be. To simplify the building of a table, Dreamweaver provides a Layout mode in which you can easily place the elements you want on the page. Dreamweaver then creates the table for you. Layout mode works much like page layout programs in which you draw boxes on the page and then fill the boxes with text or graphics. You can resize the boxes, and you can place the boxes anywhere on the page.
In Dreamweaver, you can view tables on the page in either Layout, Standard, or Expanded mode. In Standard mode, you see all the rows and columns of the table. In Expanded mode you see the rows and columns just as in Standard mode except that Dreamweaver adds cell padding and spacing and widens the borders to make editing easier. In Layout mode, you see just the cells (boxes) you draw.
You can switch to Layout mode by clicking the View menu, pointing to Table Mode, and then clicking Layout Mode, or by clicking Layout Mode on the Layout category of the Insert bar, as shown in Figure 4-3. When you are in Layout mode, you can add layout cells or a layout table to the page. If you add just a layout cell, Dreamweaver automatically draws a layout table as a container for the cell. The layout table is drawn as wide as the Document window and starts at the upper-left corner. You can resize the table to any size you need.
FIGURE 4-3: The Layout category on the Insert bar

Layout tables appear with a tab at the top, which helps you identify the table. The tab contains column numbers and a column menu and visually moves the table down from the top of the page. The tab will not be displayed in the browser.
Designing Tables in Layout Mode
In the next Step-by-Step, you build a Web page based on the tracing image you just imported. The graphics you need for this exercise are in the Lesson 4 folder of the Favorites section of the Assets panel (open the Assets panel, select the Images category, and select Favorites to see images). The text is in the student table_project.txt file located in the Lesson04/Text folder, accessible via the Files panel. You do not have to exactly match the tracing image-just use it as a guide to help you place the text and images.
-
Step-by-Step 4.3: Inserting a Layout Cell
- In the Insert bar, use the category pop-up menu to switch to the Layout category. Then click the Layout Mode button.
- Click the Draw Layout Cell button shown below in Figure 4-3a. The pointer changes to a crosshair.
FIGURE 4-3a:
The Draw Layout Cell button in the Layout category of the Insert bar

- Place the pointer on the page and then drag to draw the cell. A table is automatically drawn to contain the cell. The cell is outlined in blue to distinguish it from the table, which appears in green. When you move the pointer over a cell border, the border turns red to indicate which cell you are over.
- Click the red border to select the cell. The cell border turns blue and handles appear, which you can drag to resize the cell. You can also hold down Ctrl (Windows) or Command (Macintosh) and click within a cell to display the resize handles.
- Drag the border of the cell to move the cell to a new location. Now move this cell to cover the plane on the left side of the page. Use the handles to resize the cell, to cover only the plane, and not the Compass logo on the top.
- Make sure the Files panel is open. Open the Images folder inside the Lesson 4 folder, and locate the plane.gif file. Insert the plane graphic by dragging it from the Images folder into the cell.
- Draw six more cells to cover the Adventure Tours title, the Compass logo, and each of the four buttons across the top. To draw multiple cells without clicking the Draw Layout Cell button each time, hold down Ctrl (Windows) or Command (Macintosh) as you draw the first cell. You can then continue to draw new cells until you release the modifier key. If necessary, you can resize the cells later as you insert the graphics.
When you draw a cell on the page, white guides appear to help you place other cells you want to align with the first cell. Use the horizontal guides to align the top of each cell.
- Insert the graphics adventure_tours, compass_logo, feature_button, gear, about, and trip_button in each of the other cells.
- Create links for these buttons, as follows:
- compass_logo links to default.html
- feature_button links to destinations.html
- gear links to default.html
- about links to default.html
- trip_button links to trips.html
- Draw cells to cover the Mountain Biking, Kayaking, and Surfing images and insert biking-icon, kayaking-icon, and surfing-icon in these cells. If there is space available around the cell, you can use the arrow keys to nudge the cells to the correct locations.
- Draw four cells for the text areas.
- Draw three more cells. Each cell will hold both the price and the More Details graphic for that trip.
- Make links for each of the More Details graphics, as follows
- Mountain Biking More Details links to biking.html
- Kayaking More Details links to rafting.html
- Surfing More Details links tosurfing.html
- Open the student_table_project.txt file in the compass_tours/Lesson04/Text folder. This is a text (ASCII) file and opens in a text-editing window (Dreamweaver's Code view).
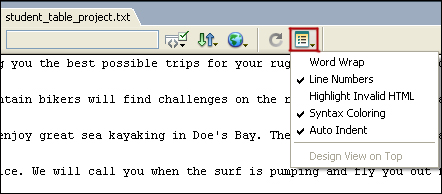
- To make the text wrap within the window, click View Options on the Document toolbar and select Word Wrap from the View Options menu, as shown in Figure 4-3b. A check next to the menu item indicates that it is selected.
FIGURE 4-3b:
View Options menu on the toolbar
- Select and copy the first paragraph. Return to your destinations.htm page (using the tab at the top of the Document window), place the insertion point in the top text cell, and click Paste on the Edit menu.
The text is copied to this cell. Adjust the cell size to accommodate the text by clicking and dragging the cell border. You might also need to change the font and font size. The tracing image uses Verdana for the font and 10 pixels for the font size. (Macintosh users might want to try -1 for the font size.)
- Return to the text document and copy the remaining text into the other text cells you've drawn on the page. Use the Assets panel to insert the details image in each of the price cells.
- When you have copied and pasted all of the text from student_table_project, close the text file.
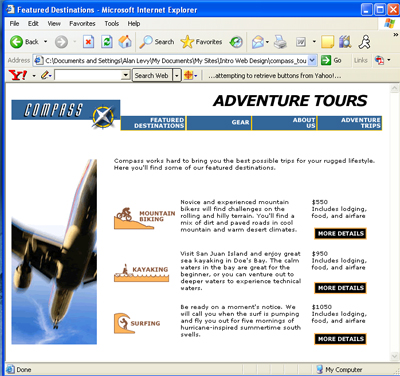
- Resize and move the cells to make your page look like Figure 4-3c.
FIGURE 4-3c:
Fine-tuning the table layout
- To hide the tracing image as you fine-tune your page, click the View menu, point to Tracing Image, and then click Show. This is a toggle to show or hide the tracing image.
- Save your page and then preview it in your browser.
- Close the browser and close the destinations.htm document.
- Open the Compass Tours home page (default.html) and create a link to the destinations. html page. Please use the phrase adventure tours in the last paragraph as the hypertext (under the "Our Most Popular Trips" heading).
- Leave Dreamweaver open for the next Step-by-Step.
Top of Page
Altering a Layout Cell
As you design your pages in Layout mode, you will want to move or resize cells or add new cells to add more content. You can also add a background color to each cell or to the table. A layout cell cannot overlap other cells and cannot be moved outside the layout table.
-
Step-By-Step 4.4 - Moving a Layout Cell and Adding Color
- In the Files panel, open the rafting_tours.htm file in the compass_tours/Lesson04 folder. Make sure you are in Layout mode. This page has a table with some text and graphics in the cells. (Make sure all the graphics are in view. If not, restore the image location in the Src Field on the Propert Inspector.)
- Click the rafting image cell border to select the cell. Blue handles appear around the cell.
- Drag the cell to a new location or use the arrow keys to move it. Move the cell vertically within the table. Remember, the arrow keys move the cell 1 pixel at a time. Hold down Shift to move the cell 5 pixels at a time.
- Draw a new cell below the rafting image for a caption. Make it as wide as the image. Key Rafting the Rockies in the cell. Format the text as Heading 4.
- Select the cell in which you added the caption.
- Click the Bg color picker on the Property inspector and use the eyedropper to select the yellow color in the raft. 7. Save the document and remain in this screen for the next Step-by-Step.
Try This:
To add color to a table, select the table, click the Bg color box, and choose a color for the table.
Cell Formatting
You can change several options for each cell. You can control the alignment of objects in each cell in a table horizontally and vertically. The default HTML setting for horizontal alignment in a cell is along the left. The default HTML setting for vertical alignment in a cell is the middle of the cell. When you draw a cell in Layout mode, Dreamweaver changes the vertical alignment to Top, but you can easily change that setting.
-
Step-By-Step 4.5 Changing the Cell Alignment
- Select the caption cell and then choose Center from the Horz list menu on the Property inspector. This centers the text horizontally in the cell.
- Change the Vert setting to Middle. This centers the text vertically in the cell.
- Save the document and remain in this screen for the next Step-by-Step.
You can also control the width and height of the cell. The cell can be set to a fixed width or set to change width depending on the width of the browser. If you change a cell to Autostretch, Dreamweaver changes the entire column to Autostretch.
-
Step-By-Step 4.6 Setting a Column to Autostretch
- Select the main text cell.
- Click Autostretch on the Property inspector or click the number 235 at the bottom of the column to open the column header menu and choose Make Column Autostretch, as shown in Figure 4-6a.
FIGURE 4.6a:The column header menu

- Save the document, and then preview the page in your browser and change the width of the browser. Notice that the column stretches as you change the width.
- Close the browser and then close rafting_tours.htm. Leave Dreamweaver open for the next Step-by-Step.
When you select a column to Autostretch, you cause all cells in that column to Autostretch. Use the white guides on the page to determine if another cell is within the column you've selected. When you use Autostretch, Dreamweaver inserts spacer images to control the layout and sets the width of the table to 100%. A spacer image controls the spacing in the layout but is not visible in the browser window.
If you choose not to use spacer images, columns will change size or even visually disappear if they do not contain content. You can insert and remove spacer images in each column yourself or let Dreamweaver add them automatically when creating an Autostretch column. The spacer GIFs are added to a cell at the bottom of each column of the table.
To add a spacer image, select Add Spacer Image from the column header menu. If you have never created a spacer image for the site, the Choose Spacer Image dialog box opens, as shown in Figure 4-6b.
Important Note: The Choose Spacer Image dialog box (described in the next Stepby-Step) appears if a spacer image is not associated with your site. If the dialog box appears, click Use an Existing Spacer Image File and locate spacer.gif
in the Lesson04/Images folder. The spacer file location is saved in your preferences. Click the Edit menu, point to Preferences, and then click Layout Mode to change or remove the spacer image.
FIGURE 4-6b:The Choose Spacer Image dialog box

Choose from the following options:
- Create a spacer image file: If you choose this option and click OK, another dialog box opens in which you can navigate to the directory in your site where you want to store the spacer image file (for example, an images folder).
- Use an existing spacer image file: If you already have a spacer image created for your site, choose this option and then navigate to your spacer image in the next dialog box that opens.
- Don't use spacer images for autostretch tables: If you select this option, fixed-width columns in your layout might collapse to a small width, or even to zero width. Use this option only if you've already placed enough content in your fixed width columns to prevent them from col lapsing, or if you have already added spacer images manually.
You can insert spacer images into specific columns, remove them from specific columns, or remove all spacer images on the page.
To insert a spacer image into a column, click Add Spacer Image from the column header menu to insert the spacer image into the column. You will not see the spacer image, but the column might shift slightly.
To remove a spacer image from a column, click Remove Spacer Image from the column header menu. The spacer image is removed and the column might shift.
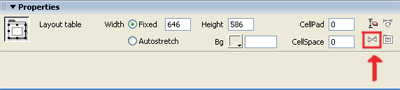
To remove all spacer images from your page, click Remove All Spacer Images from the Table Header menu, or click Remove All Spacers on the layout table Property inspector, as shown in Figure 4-6c. Your whole layout might shift slightly-or dramatically-depending on your content. If you do not have content in some columns, these columns might visually disappear completely.
FIGURE 4-6c:
Property inspector showing Remove All Spacers button
Creating Tables in Standard Mode
Although the Layout mode provides the easiest way to design your pages, you will often need to view your page in the Standard mode, which shows you the HTML table structure. You can create tables yourself in this mode or view the table Dreamweaver created when you drew a table in Layout mode. If the information you want to present is structured into rows and columns, using a standard table is easier than drawing the rows and columns yourself.
To switch to Standard mode, click Standard Mode on the Insert bar. If a table exists on the page, you'll see the table borders and all the cells of the table.
-
Step-By-Step 4.7 - Inserting a Standard Table
- Open a new document and save it as biking_table (followed by your initials) in your compass_tours folder. Title the page Montana Mountain Biking.
- On the Insert bar, make sure the Layout category is selected. Click the Standard Mode button.
FIGURE 4-7a: Standard Mode on the Insert bar

- Open the mt_biking.txt file from the compass_tours/Lesson04/Text folder. Make sure the Word Wrap feature is turned on.
- Copy the Montana Mountain Biking header and paste it at the top of your page. Change the header to Heading 3 style.
- Copy the paragraph from mt_biking.txt and close the text file. In your page, press Enter (Windows) or Return (Macintosh) after the header. Then paste the paragraph into your page.
- Place the insertion point after the body text. Press Enter (Windows) or Return (Macintosh) to create a new paragraph.
- Click the Insert menu and then click Table, or click Table in the Layout category of the Insert bar. The Table dialog box opens.
- Make the following changes in the Insert Table dialog box, as shown in Figure 4-7b:
- Enter 2 in the Rows box and 4 in the Columns box.
- Change the Width to 500 Pixels. You also have the option of setting the width as a percentage of the browser window. Tables specified in pixels are better for precise layout of text and images. Tables specified in percentages are a good choice when the proportions of the columns are more important than their actual widths.
- Set the Border thickness to 1. This represents the width of the table border.
- Leave Cell Padding and Cell Spacing blank. Cell Padding refers to the amount of spacing between the cell content and the cell walls. Browsers use a default value of 1 pixel if you don't specify a value for the cell padding. Cell Spacing refers to the amount of spacing between table cells, not including the border. Browsers use a default value of 2 pixels if you don't specify a value for the cell spacing.
- Click OK to close the dialog box.
FIGURE 4-7b: The Table dialog box

- Key Ride Name in the first cell of the first row; then press Tab to move to the next cell. Key Type, press Tab again, key Location, press Tab, and key Rating.
FIGURE 4-7b: Inserted Table with Content

- Save the document, and then preview the page in your browser.
You could continue to enter the remaining text for the table. In the next Step-by-Step exercise, however, you use another method to fill the table.
 Back to previous page Back to previous page
 Go to next section: Lesson 4c: Working with Data in Tables Go to next section: Lesson 4c: Working with Data in Tables
Top of Page
|
